Wi-Fi made easy with Pycom and MicroPython
Follow article
 Dave from DesignSpark
How do you feel about this article? Help us to provide better content for you.
Dave from DesignSpark
Thank you! Your feedback has been received.
Dave from DesignSpark
There was a problem submitting your feedback, please try again later.
Dave from DesignSpark
What do you think of this article?
The rapid growth of connected infrastructure has made the applications of IoT a lot more accessible to a growing community of makers around the world. The popularity of high-level programming has also helped streamline the development process with very little compromise. Success stories like the Raspberry Pi have largely been driven by the accessibility of languages like Python and have now inspired a new generation of embedded scripting frameworks like MicroPython and CircuitPython.
The pace of this development is impressive, particularly where full hardware and software solutions are now available through brands like Microbit and Pycom. The aim for this project, therefore, is to demonstrate the simplicity of establishing these often complex IoT functions using Pycom hardware and the MicroPython scripting language to connect our next maker project to a local Wi-Fi network.
Prerequisites
For this project, we will be using the WiPy (172-0647) development board alongside the Pycom expansion board (125-9534) to upload our scripts over USB. The WiPy is capable of both Bluetooth and Wi-Fi connectivity and is, therefore, an excellent piece of hardware to learn on. The Pycom development environment consists of a simple plugin for Visual Studio Code which includes a functional REPL terminal window that can be used for uploading code and debugging. I also recommend the use of a putty terminal as a highly functional TCP/IP port monitor that can connect to and monitor Wi-Fi networks in real-time.
The Python files for this project can be found on GitHub.
The Pycom MicroPython API documentation can be found on their website.
Method
The Pycom hardware alone gives us everything we need to get our project connected to Wi-Fi. With Visual Studio Code running and our board plugged into our PC, we can start writing our code to the “main.py” file in our project folder while leaving the "boot.py" file empty for this example. These are the only two files the Pycom hardware needs to run any MicroPython program.
import network
import usocket
import machine
import time
Import dependencies.
The first thing to do is to add our dependencies for the project by importing the respective modules into the Python script file. The two main modules we will be referencing are “network” and “usocket” which are required to establish a connection to the local Wi-Fi and setup a data channel for our putty client to listen on. The other two imports are needed for housekeeping and will be used to access the Pycom IO and delay functions respectively.
Following this, we need to setup our radio to connect to an existing Wireless Local Area Network by calling the WLAN constructor function and setting the mode to station. The radio can also be setup as an access point if we ever want to host our own private network.
# Setup test input pin
button_state = machine.Pin("G17", mode=machine.Pin.IN, pull=machine.Pin.PULL_UP)

# Setup WiFi
JoshyLAN = network.WLAN(mode=network.WLAN.STA) # Set radio to station mode
JoshyLAN.ifconfig(config="dhcp") # Use automatic IP address allocation when connected
Setup hardware button and WLAN configuration.
For this project, we will be connecting to an existing domestic network and sending data to another connected device. As this is an established network, we need the router to tell us what IP address is free to use so as to avoid any conflict. The router can allocate our device an address automatically by using the DCHP protocol which will stop any problems caused by static IP addresses on the network.
# Scan for available networks and attempt to connect
JoshyLAN.scan()
JoshyLAN.connect("SSID", auth=(network.WLAN.WPA2, "password"), timeout=None)

# Wait for connection
while not JoshyLAN.isconnected():
    print("Connecting...")
    time.sleep(1)
print("Connected to WiFi network")
Scan and wait for the Wi-Fi network connection.
Once the radio understands how to talk to the network, our device should be ready to connect. Using the scan function, we can easily establish a list of available networks to connect to. Each Wi-Fi network is allocated an identifier known as SSID which can be used to tell the radio what network we wish to connect to. The radio will then attempt to connect to the network of the same name and password until a positive result is returned. We can use a simple while loop to monitor this process and print any debug messages to the REPL console at the bottom of the screen in Visual Studio Code.

REPL terminal output confirming the connection.
Congratulations we are now connected to Wi-Fi! As the router automatically allocates an address for our radio to use, the risk of collisions while sending any data will now be very low. However, in order to send data over the network, we will now need to establish a socket and bind it to our address alongside a port number.
A socket is a simple interface that is used to handle a variety of network events, from standard internet functions to specific IoT protocols like LoRa and SigFox. We can initialise a standard IP socket using the code below and bind it to our address which can be found in the recently updated WLAN config that we printed to the REPL debug terminal. The port number can be chosen by us.
# Setup Sockets
JoshySocket = usocket.socket(usocket.AF_INET, usocket.SOCK_STREAM, usocket.IPPROTO_TCP) # establish standard IP socket
JoshySocket.bind((JoshyLAN.ifconfig()[0],100)) # Bound socket to local IP and random port
print("IP address " + str(JoshyLAN.ifconfig()[0]) + ", Port " + str(100)) # Prints IP and Port number to be used by Putty.
Create a new socket and bind it to the allocated IP address and port number.

IP address and port number are displayed in the REPL terminal for reference.
Having established a socket for our dataflow we can now start listening for incoming connections on the local network. The listen function below can be used to monitor a specified socket which will stop the program until a connection is requested from another device on the network. Upon receiving a request, the program will restart and immediately accept the connection along with the returned socket object.
print("Listening for connection")
JoshySocket.listen() # Blocking function # Listen on socket for incoming connection
PuttySocket = JoshySocket.accept()[0] # Accepts latest connection and gets socket object
print("Connection accepted")
Listen on the new socket object and wait for a connection request.
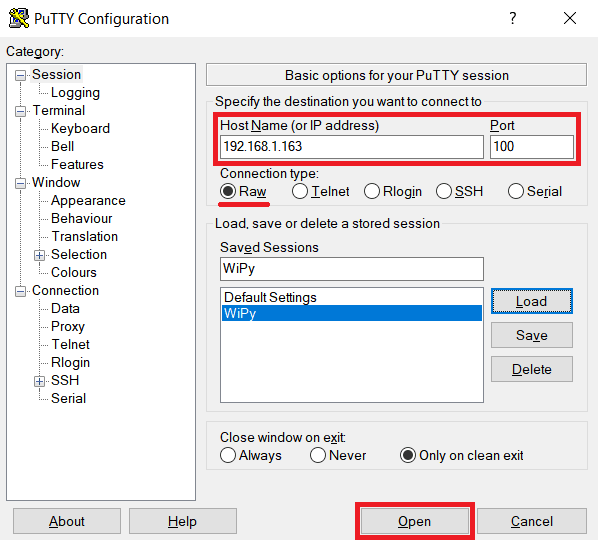
Open a putty terminal using the IP address and port number from earlier.
To request a connection on the WiPy we are going to open a putty terminal on our computer while connected to the same Wi-Fi network. Start the putty client and select the button labelled "raw" under connection type which will allow us to send and receive low-level data over the network. We can then enter the IP address that was allocated to our WiPy device by the router at runtime. As we told our device to print these variables earlier, our IP address and port number should be visible in the REPL debug window and if input correctly, the putty terminal should prompt the WiPy to stop listening and accept our connection request.

REPL debug messages showing the connection is made.
The accept function should return a socket object connected to the putty terminal which can then be used to send and receive simple data packets between the two devices on the network. In this example, we will be testing the connection using a hardware button connected to one of the WiPy pins and sending its Boolean value to the putty terminal over Wi-Fi.
PuttySocket = JoshySocket.accept()[0] # Accepts latest connection and gets socket objectPuttySocket.send(str(button_state.value())+"\r\n") # Send button statusAccept the connection and use the new socket to talk directly to putty over Wi-Fi.

Upon successful connection, the terminal should show the hardware button state periodically.
Upon connection, this value should appear as a periodic series of ones and zeros in the putty terminal window that corresponds to the status of the Pycom hardware button. Lastly, by wrapping the send function in a try/except statement, the program is able to return to listen mode when the remote connection is terminated by the putty monitor. This whole process can be seen below.
while True:
    print("Listening for connection")
    JoshySocket.listen() # Blocking function # Listen on socket for incoming connection
    PuttySocket = JoshySocket.accept()[0] # Accepts latest connection and gets socket object
    print("Connection accepted")

    while True:
        try:
            PuttySocket.send(str(button_state.value())+"\r\n") # Send button status until socket is closed
            time.sleep(1)
        except:
            print("Connection closed")
            break
A nested while loop controls the connection status of the WiPy.
Conclusion
This short example effectively demonstrates the ease of sending simple data structures over a local Wi-Fi network using very little code. The implementation of the MicroPython framework by Pycom illustrates the growing feasibility of adding low-cost IoT functions to many maker projects and could easily find applications in home automation and remote sensor monitoring. This feasibility does not limit itself to Wi-Fi either, with other Pycom hardware platforms that support many IoT protocols like LoRaWAN, Sigfox and even LTE NB-IoT the possibilities are hugely exciting and is something that will certainly need exploring in greater detail in the near future.