Where We Should Use Arduino Nano Boards?
Follow article Dave from DesignSpark
How do you feel about this article? Help us to provide better content for you.
Dave from DesignSpark
Thank you! Your feedback has been received.
Dave from DesignSpark
There was a problem submitting your feedback, please try again later.
Dave from DesignSpark
What do you think of this article?
An Arduino Nano board, a particular type of microcontroller board created by the Arduino team, is described in length in this article. Atmega168 or Atmega328p is the foundation of this microcontroller. Although it is somewhat similar to the Arduino Uno board, due to its smaller size, the nano board has supplanted the Arduino Uno in terms of pin arrangement and functionalities. As we know, small-sized components are ideal when creating an embedded system. Embedded systems, robotics, and other electronic projects are the principal uses of Arduino boards. However, the nano boards were primarily developed for novices without a technical background.
What is an Arduino Nano Board?
One form of microcontroller board is the Arduino Nano, created by Arduino.cc. It is possible to construct it using an Atmega328 microprocessor. Additionally, the Arduino UNO uses this microprocessor. It is a flexible board that is modest in size and has many different uses. Arduino Mega, Arduino UNO, Arduino Pro Mini, Arduino YUN, Arduino Due, Arduino Lilypad, and Arduino Leonardo are some of the other Arduino boards.
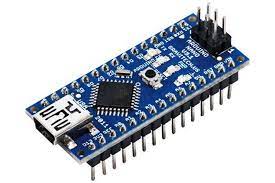
This board is similar to an Arduino Duemilanove board in numerous ways and features. The packaging for this Nano board is unique, though, It lacks a DC jack, so the power source can be supplied via a tiny USB port rather than directly connecting to pins like VCC and GND. The nano board can be powered from 6 to 20 volts using a small USB connector on the board.
Arduino Nano Pinout
The pin configuration for the Arduino nano is illustrated below, and the functionality of each pin is covered below:

- Digital Pins: On the board, you'll find 14 digital pins for plugging in all sorts of extra hardware.
- Analog Pins: There are 6 analog pins on the PCB for taking voltage readings between 0 and 5V.
- LED: The board's pin 13 is connected to an LED incorporated within the device.
- VIN: If you're powering your Arduino board from an external source, you'll need to supply it with a voltage of at least this much (6-12V).
- 3.3V: It is a minimal voltage generated by the board's voltage regulator.
- 5V: The board's controller and other electronics are supplied with power via a regulated power supply.
- AREF: A reference voltage, known as an analog reference, is supplied to the machine from a separate power source.
- GND: The board has two ground pins accessible for use.
- Reset: The board features two reset pins for convenient use. With these pins, you may perform a software reset on the controller.
- External Interrupts: External interrupts are initiated via pins 2 and 3. These pins should only be used in an emergency.
- USART: The board is compatible with the universally standard asynchronous serial transfer mode (USART), which has two pins (Tx and Rx) for serial data transmission and reception.
- I2C: Two pins, SCL and SDA, are needed to facilitate the I2C communication protocol built into the device. The data is transmitted across a serial data line called SDA, and a serial clock line called SCL is used to synchronize the data between the devices connected to the I2C bus. Using the I2C bus is possible using the Arduino Software's Wire Library.
- SPI: The device can also communicate using the SPI (serial peripheral interface) protocol, which utilizes four pins (SS, SCKMISO, MOSI, and SCK). The microcontroller and various peripheral devices communicate with one another using this protocol.
Arduino Nano Communication
An Arduino Nano board may communicate with other Arduino boards, computers, or microcontrollers, among other things, utilizing various sources. The Nano board's microcontroller (ATmega328) supports serial connectivity (UART TTL). It is available at digital pins such as TX and RX. A serial monitor is included in the Arduino software to make it simple to send and receive a text from the device.
Every time data is delivered to the computer via the FTDI & USB link, the TX & RX LEDs on the Nano board will begin to flicker. Any of the board's digital pins can support serial connection thanks to the library-like SoftwareSerial. The microcontroller also supports SPI and I2C (TWI) communication.
How to Program Arduino Nano
Arduino IDE Software is the official software released by Arduino. cc that you can use to write code for any Arduino board. The board can function according to the data given into it by using a code that is burned into it.
Additionally, the board has a built-in bootloader, so you are not required to purchase an additional burner to burn the Arduino software. The device has a tiny USB connector and supports a USB interface. The board and PC are connected using a USB wire.
Where We Should Use Arduino Nano Boards
Arduino boards are great because they may be used independently or as a component in more complex electronic creations. Nano can communicate with other boards in the Arduino family and Raspberry Pi devices. Anyone with a rudimentary understanding of electronics may utilize Arduino boards to create impressive creations.

The primary uses of the Arduino Nano Board are as follows:
- Embedded Systems
- Medical Equipment
- GSM-Based Projects
- Arduino Metal Detector
- Automation in Manufacturing
- Virtual Reality Applications
- Real-Time Face Recognition
- Robotics and automation
- Android Application
Conclusion
Thus, the focus of this article is a summary of the Arduino features. Finally, based on the information presented above, we can conclude that due to its advantages—such as affordability and ease of use across a range of applications—the Nano board is strongly recommended for novices new to electronics. This board's tiny USB port allows for a direct connection to any computer.