The weekly hack: It Moves!
Follow article
 Dave from DesignSpark
How do you feel about this article? Help us to provide better content for you.
Dave from DesignSpark
Thank you! Your feedback has been received.
Dave from DesignSpark
There was a problem submitting your feedback, please try again later.
Dave from DesignSpark
What do you think of this article?
This could be a great family project. Not to delegate the boring work of winding coils. But to share the fun with them. I found it a long time ago on the fantastic internet pages "Toys from Trash".
The first Coil
The first coil will produce the permanent magnetic field for our motor (stator). If you do have a 10 mm Neodyn magnet at hand, you might well use such a permanent magnet instead of the stator coil. It would save a lot of the battery's life.

We will wind the first coil on a metal sewing machine bobbin. If you are not into sewing, you might have a problem getting such a bobbin. In this case, you need to improvise. Take any metal object which could serve as the core for the coil. You could, e.g. glue or solder two large diameter washers to a short piece of a bolt.
We need to wind up about 10 m of the copper wire. You could take this as a meditational work, or you let your electric drill do this job for you. But please do not forget to leave a 10 cm wire part of the coil at the beginning, i.e. sticking out of the coil, or you need to unwind the coil and start again. You also need to leave a spare wire length of about 2 m for the second coil.
Take off the insulation of the two ends of the coil. You could use abrasive paper or a cutter knife. Be careful not to cut off the wire! Then wind both ends around the safety pins like in the picture.
The second Coil
The second coil will be the rotor of our motor. Therefore it needs to be prepared very precisely.

Take 1.5 m of the wire and wind it around the battery to get a nice circle. Leave about 5 cm of the wire sticking out. When having this done, take the two ends of the wire and wind them around the coil (like in the picture). These two ends will work as an axis for the coil to rotate. Therefore they need to be as straight as possible and as symmetrical as possible. If you've done this job well, the coil will be perfectly balanced and turn smoothly around the wire axis.
You need to completely remove the insulation of one of the wires sticking out. YOU MUST NOT scratch off the insulation of the second wire at the other side of the axis! The insulation should be scratched off at only three sides while at one side (about 90° of the circumference) the insulation should stay on the wire. This is important to get a break of the electric circuit during the rotation of the rotor. It will result in an oscillating magnetic field.
Assembling the motor
Use a short piece of bicycle tube (or shrinking tube if at hand or any elastic band) to hold the safety pins in position and to contact the battery with the stator coil. Please note that there is a high current flowing as soon as you stick the pins between the tube and the battery poles. So do not leave the pins pressed at the pole when not running the motor!
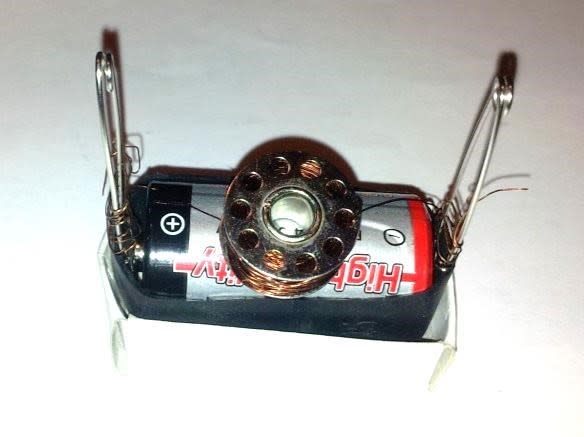
Finally, get the ends of the rotor coil inside the pin's upper rings like in the picture:

check the orientation of the axis wires to be straight and in line so the coil to be well balanced. If you give it a little kick, it should start rotating like shown below.
If you have problems getting it running, please recheck the wire contacts. Have you stripped the wires naked? Are they tightly wind around the two safety pins? Is the coil freely and smoothly rotating when turned by hand? Is the stator coil as close as possible to the rotor coil? Is the battery fresh (we do need very much power for these coils)?
I hope you've had fun with this hack. If you want to explain the science behind this motor to children, here's what you could say:
Explanation for Kids
When an electric current is flowing through a wire, it produces a magnetic field. This is called "electromagnetism". That's what we've got here, even two times! The wire on the sewing machine bobbin is such an electromagnet. The current is flowing from the battery into the safety pin, into the wire of the coil, into the second safety pin and back into the battery. So it is flowing in a circle. That's why it is called an electric "circuit". The current produces a magnetic field, and the metal of the coil is making this field even stronger.
But we do have a second coil which is hanging in the air. Well, actually it's not hanging in the air, but it rests on the two rings at the end of the safety pins. And these pins are...right; they are under power. Part of the energy is pumping the current through the bobbin coil. The rest of the current flows through the upper coil. This current also produces a magnetic field around the top coil.
The two magnetic fields make the two coils attract or repel, just like two ordinary magnets do. This makes the upper coil move. It can move because we have given it an axis to revolve.
If the coil turns far enough, it will reach a position where the current stops flowing through it. Why this? Because we have left a part of the insulation on one of the two wires working as an axis. This is important because this way the coil only get's a kick in one position. That's just like on a swing. If you left your feet always stretched, the swing would stop moving. You need to stretch your legs at certain points to keep moving and to swing higher and higher. And our coil is looping on its swing.
By the way, do you know that electrical motors are so strong that they can accelerate an electric car to 100 Km/h (60 mph) in less than 2 seconds? A petrol engine needs at least twice as much time. Only a Formula One racing cars could make it to this in less than 2 seconds.