Siemens IoT2020 - Making use of the full SD Card size
Follow article
 Dave from DesignSpark
How do you feel about this article? Help us to provide better content for you.
Dave from DesignSpark
Thank you! Your feedback has been received.
Dave from DesignSpark
There was a problem submitting your feedback, please try again later.
Dave from DesignSpark
What do you think of this article?
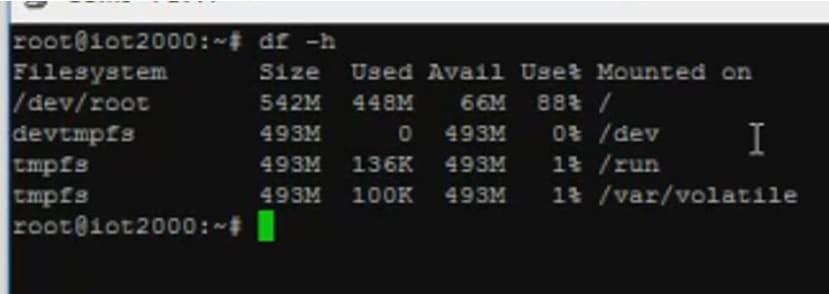
The creation of an OS image on an SD card to boot your IoT2020 with Linux is simple enough but it leaves you with only a little over 500MB of storage and 88% of that is used before you even start to add any applications. Not alot for your apps so here is how you can fix that
or for those that prefer written instruction as well...
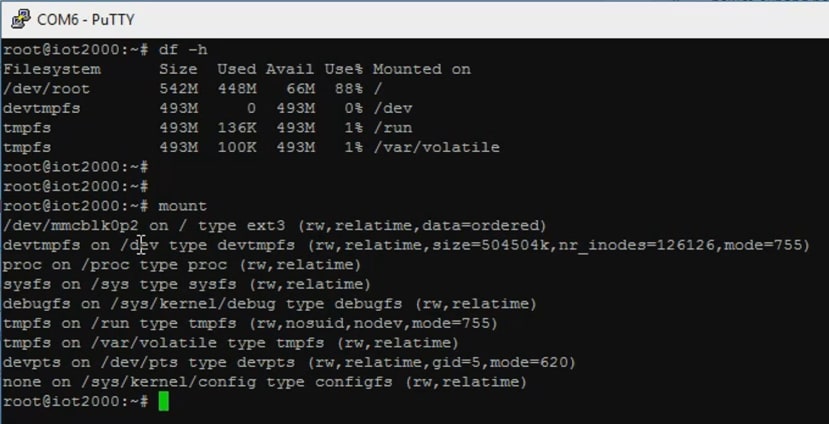
Display after running "df -h"
So we need to delete the existing primary partition and create a new one using the whole of the SD card (Or a portion if you wish). to do this we need to know the partition to use and then use FDISK to modify it. To see the current partitions use the "mount" command
or "fdisk -l"

In both cases you will see the second partition is "mmcblk0p2" and that this is the one that is NOT the boot partition. you dont want to touch the boot partition. you will see also that its size matches the output of the "df -h" command for the root partition. Also not the mounted device name for the SD card "mmcblk0"
We will use the fdisk command now to change the partition.
THIS PROCESS DOES NOT DESTROY THE DATA ON THE PARTITION EVEN THOUGH WE REBOOT AND CHANGE THE PARTITION TABLE
so you need to execute these commands in sequence
fdisk /dev/mmcblk0
d 2
n
w <-- write the partition to the SD Card, up to now its only in memory
reboot
resize2fs /dev/mmcblk0p2
reboot
df –h

And thats all there is to it. Quite safe if you follow the process and as we accept the defaults when using the 'n' option of fdisk to create the new partition and simply select "enter" each time it will size to what ever SD card your using be it 1GB, 2GB, 4GB, 8GB, 16GB or even 32GB
