DSPCB - Composing with BOM Composer
Follow article
 Dave from DesignSpark
How do you feel about this article? Help us to provide better content for you.
Dave from DesignSpark
Thank you! Your feedback has been received.
Dave from DesignSpark
There was a problem submitting your feedback, please try again later.
Dave from DesignSpark
What do you think of this article?
Note: to use the below features, you will need DesignSpark PCB with a Creator or Engineer subscription.
DSPCB provides a flexible tool to create a customised Bill Of Materials, here we cover the basics to allow you to be creative.
Launch the BOM Composer from the Menubar.
At the top level, it is simply a matter of selecting the checkboxes of what you require in your BOM.
The BOM Report content appears 'live' below the selected options.
Experiment with the options to see the result and achieve what you require.
The selections for "Sections", "Columns" and "Group By" are highlighted in how they will appear in the BOM Report in the image below.

You may have noticed some extra icons in the "Options" next to the "Sections:" and "Columns:"
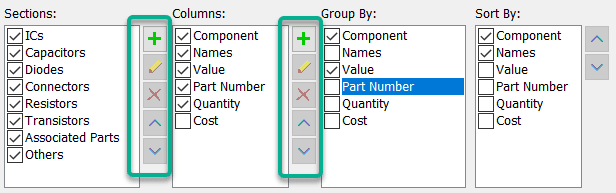
These tools allow a deeper configuration of the BOM.
The "Columns:" tools are probably the most used as they control the detailed content in the BOM Report.
Here we examine the customisation of the report details.
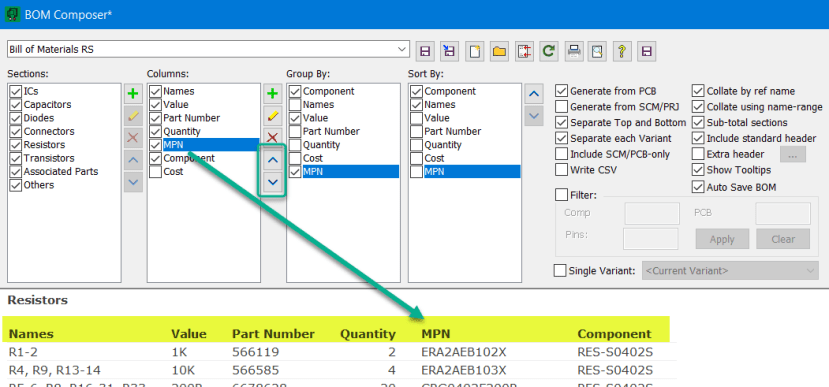
First, we add a column to display the Manufacturers Part Number.
Click the 'plus' next to the "Columns:" and the Add Column window will appear. From The "Type" pulldown choices select "Component Values", then add the text for the name of the column in the "Caption" field.
Next, we add the "Values" that will be retrieved from the "Values" of the components used. Click the 'plus' and from the pull-down options select the 'Value Name' to be used, in this case, "MPN".
Close the windows and the new column entry will be created.

Here we have our 'live' updated BOM Report.

As you will see the new entry is at the bottom of the Columns: list and will appear on the right of the report.
The report view can be completely reconfigured as shown below.
Select any entry in the "Columns:" list and using the 'Up' and "Down" buttons rearrange the list as required.
The Column 'Caption" can also be changed, select the heading to change, click the 'pencil' symbol to edit.
Here we change it to "RS Part Number".

In the Values list, the entries are those that will be searched from the component Values.
Multiple "Values" are allowed and the first found in the list will be used in the report, selecting a "Value" and using the Up and Down buttons allows you to customise the search order.
If you have entries/Component Values you wish to add to your search, click the 'plus' button and in the new window, you can select any appropriate Value Names from the available Values from the pull-down list.
This is useful for any legacy components or where you have created custom 'values' for your components.

We will now mention the icons to the top right of the BOM Composer.
Having composed your new BOM you can either save the changes to the current template or create a new template file.

The 'mouse over' tool-tips provide the name/function of the icon and the following are two useful examples.
"Print the report", functions as described.
"Switch to view this report in the Report Browser" provides a very useful HTML view with active links to the components in your design.
NOTE Save your new template before switching to this view!

The "Help" icon provides a link to the Help File providing further information to using the BOM Composer.

Now it's time to get creative and start composing!