LattePanda — a tiny feature rich PC
Follow article
 Dave from DesignSpark
How do you feel about this article? Help us to provide better content for you.
Dave from DesignSpark
Thank you! Your feedback has been received.
Dave from DesignSpark
There was a problem submitting your feedback, please try again later.
Dave from DesignSpark
What do you think of this article?
It may sound like the next trendy drink from your favourite coffee shop, but in reality it’s a nifty Intel Atom PC and Arduino all wrapped up into a tiny package.
Is it an Arduino or a PC or both?
LattePanda (124-4684) is a tiny single board Windows 10 PC with an integrated Arduino compatible core, only slightly larger in size than the ubiquitous Raspberry Pi. While it’s not possible to ignore the similarities to the Pi, it is aimed at a similar market but with a different flavour; unlike the Pi which is designed with Linux in mind the LattePanda board is designed around the Windows 10 operating system.

To provide a good Windows desktop experience the board uses a powerful 1.8GHz Cherry Trail Intel Atom CPU (Z8300). The I/O is handled by a second microprocessor rather than the Intel Atom. This micro controller is re-programmable (source code provided) and can be re-programmed to offload the Atom if an application is so demanding. Having considered the performance of the Atom Processor it is quite unlikely the Atom CPU will become overstretched, as the specifications are similar to those found in a modern netbook. While these are modest by some modern PC computing standards the Atom CPU is no slouch and will run most Windows 10 applications without issue. To help give some context: the on-board CPU/GPU combo gives CPU and 3D graphics performance equal or better than your mid-range PC of 2009 and is roughly 8 times more powerful that a Pi.
Windows 10
The LattePanda (124-4684) is available as two options, either with or without the Windows licence. The licensed version offers better value for money than an unlicensed + separate licence. The licence free option is likely for those who would like to use a different OS or already have a site license. The price delta at the time of writing was significantly less than a Windows 10 licence, so it was an obvious choice to order a pre-licensed version.
Why Arduino?
By using the Arduino the LattePanda has the advantage of both worlds: a scheduled windows based system and a deterministic Arduino co-processor. As anyone who has tried to use a Linux/Windows system for real-time/deterministic operation (e.g. bit banged I2C/SPI) will tell you it doesn't work well. An advanced OS like Linux or Windows is based around scheduling and when we ask for a GPIO to go high it schedules this event. All well and good, but when does it happen? Well this depends on a number of factors and all of these factors add up to “some time later” being the answer. This is where the Arduino comes in. It is based on a much simpler architecture and runs code in a linear fashion, which by it’s nature causes a more deterministic operation. Additionally the Arduino comes with Analogue inputs and hardware blocks (I2C, timers etc.). An example would be a I2C slave where the platform doesn’t control the timing. Using a hardware I2C device means more reliable operation as the software is no longer having to poll the I/O and the hardware will do all of the hard work.

The Arduino comes pre-programmed with the StandardFirmata sketch, this is common Arduino sketch for PC Operation. It provides an interface to the Arduino hardware via the serial port providing a simple yet effect way of controlling the GPIO/Peripherals. Reprogramming the Arduino is the same as usual, simply select the device and click upload.
Accessories

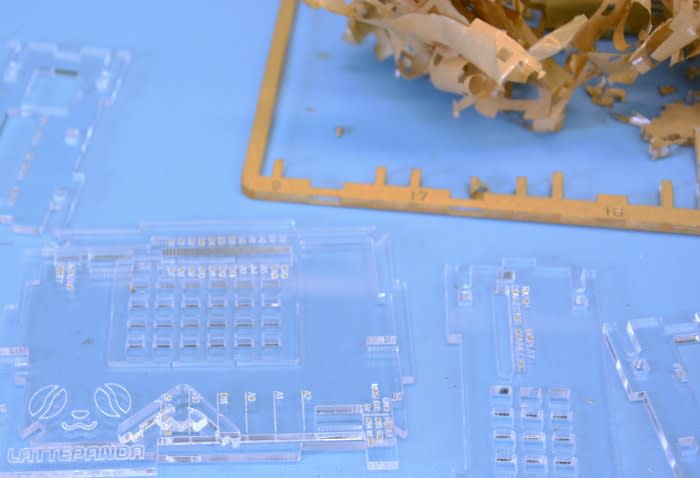
The acrylic case & fan (126-3112)
A TFT LCD (126-3116)
A sensor kit (126-3114)
Acrylic case
The acrylic case is provided as a laser cut flat-pack with the backing material still on. This took some time to remove as we removed this after we had broken the parts from the support. In hindsight it maybe be best to remove this first. After removal of the backing material the case went together well and feels solid once built, leaving us with a well protected panda and a pile of backing material.
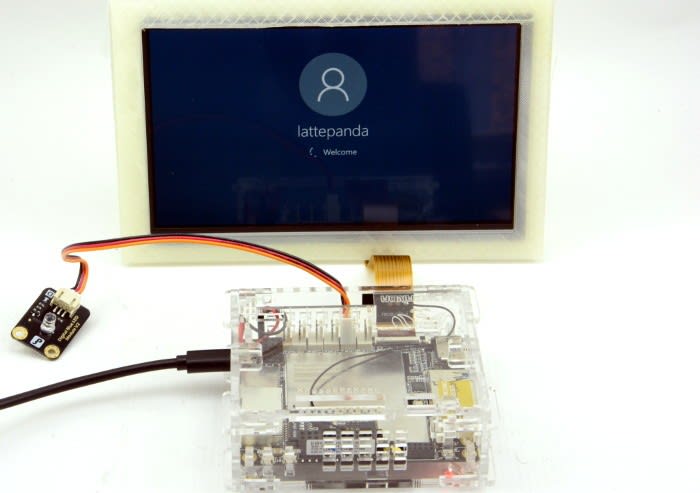
7 Inch IPS Panel
We chose to get the TFT for use with the LattePanda. This panel is provided as an alternative or addition to the HDMI monitor port so we can set it up standalone. The image from the display is surprisingly good for such a small panel. Add a mouse and keyboard and our LattePanda has now turned into a mini PC with a 7 inch display, a self contained development platform!

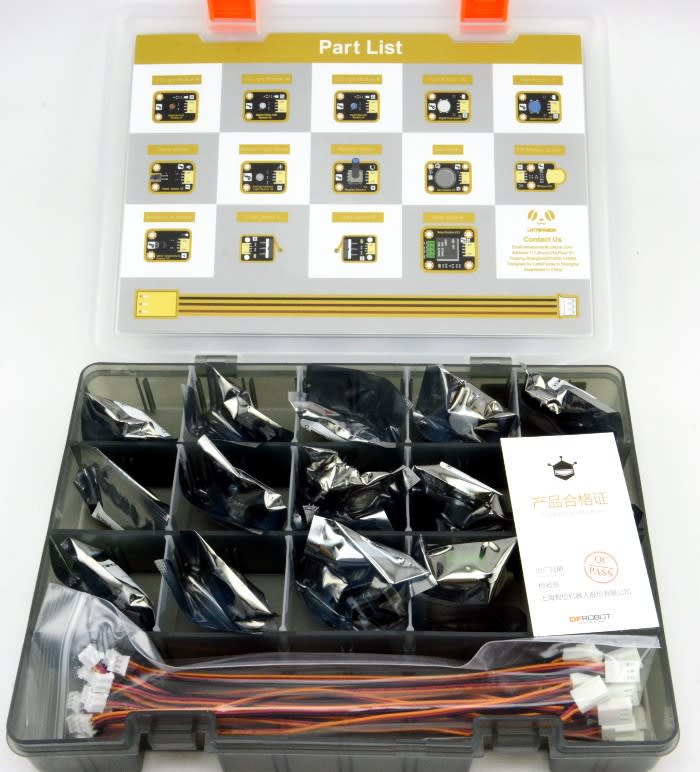
Gravity Series Sensor Kit
Finally we ordered the Gravity Series Sensor Kit. This kit comes with 14 sensor boards designed to plug directly into the LattePanda. Great for getting stuck in without having to solder or use breadboard to prototype solutions. This kit contains the following items: 3 LEDs (Red/Blue/White), two push buttons, a flame sensor, ambient light sensor, “rotation sensor” (a potentiometer), gas sensor (MQ2 Combustible Gas/Smoke), PIR sensor, temperature sensor, 2 “crash sensors” (End stop switches) and finally a 10 A relay module. This kit may not contain the sensors for every application but is very useful for a quick set-up with an array of devices.
A fifteen minute example
After installing the LCD and powering on the LattePanda we were quickly met by the Windows login screen. After signing in with the LattePanda login we were met with the Windows 10 desktop with a few icons, the most notable being a pre-installed version of Arduino with the correct library for the onboard device.
C# code
The LattePanda is designed with a lot of languages in mind, these are listed on the LattePanda website here. We chose to use C# because of it’s simplicity and the C# code (below) is the blinking LED example we chose to run. C# is a wonderfully simple yet powerful language. It can be far more accessible than C++/Java. In addition it is also highly integrated into the Microsoft .NET ecosystem which provides a huge amount of functionality with little work.
Visual studio integration
Choosing to dive right in with a Visual Studio example we connected the WiFi and installed Visual Studio express with C# and .NET without issue. This is by far the most time consuming part of the whole experience due to the size of the software install. The Arduino is pre-programmed with the library so no modification was required.
Following the tutorial provided by LattePanda we quickly had a LED blinking. This did require us to change the GPIO to match the IO we had plugged the LED module into.
Deciphering the code below:
First the required libraries are declared and then a new object is created called Arduino. This object is an instance of the Firmata code and will pass the commands to our Arduino. Using this object we pass the setup for the GPIO (pin 10 is output) then change the LED state every 1000ms. Hey presto a blinking led, an small start to a much larger application, but with a little know-how this can be expanded into a fully featured application in no-time.
Code:
using System;
using System.Collections.Generic;
using System.Linq;
using System.Text;
using System.Threading.Tasks;
using System.Threading;
using LattePanda.Firmata;
namespace blinkYourBoard//project name
{
	class Program
	{
		//create an instance and initialize with the default parameters
		static Arduino arduino = new Arduino();

		static void Main(string[] args)
		{
			//Set the digital pin 10 as output this is where we connected the LED module
			arduino.pinMode(10, Arduino.OUTPUT);

			while (true)
			{
				// ==== set the led on or off
				arduino.digitalWrite(10, Arduino.HIGH); //set the LED on
				Thread.Sleep(1000); //delay a second
				arduino.digitalWrite(10, Arduino.LOW); //set the LED off
				Thread.Sleep(1000); //delay a second
			}
		}
	}
}
All in all a very powerful platform to develop upon. A lot more could be done with this little PC/micro combo so it’s time to brush up on the C# (or language of choice) and get coding.
Karl Woodward