 Dave from DesignSpark
こちらの記事について、内容・翻訳・視点・長さなど、皆様のご意見をお送りください。今後の記事製作の参考にしたいと思います。
Dave from DesignSpark
Thank you! Your feedback has been received.
Dave from DesignSpark
There was a problem submitting your feedback, please try again later.
Dave from DesignSpark
こちらの記事の感想をお聞かせください。
背景
インターネットやスマートフォンなどの機器の発達により、チャットや電話など、世界中の人々と瞬時にコミュニケーションを取れるようになった。そのためには、まず相手の連絡先を知る必要がある。現在、連絡先の交換手段の一つとして、名刺交換がある。しかし名刺では、後から相手の情報を自分の端末に入力したり、管理が面倒である。また、相手の連絡先に変更があった場合に連絡が取れなくなる可能性もある。
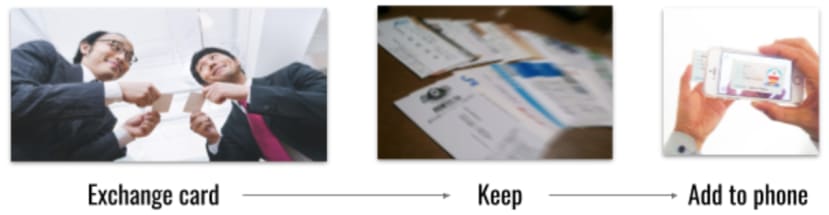
別の連絡先の交換手段として、LINEなどのチャットアプリがある。しかし、スマートフォンを取り出し、QRコードを出してスキャンするという動作が面倒である。また、ネット上で自分のQRコードを拡散されてしまう可能性もある。

そこで、私たちはハグをするだけで連絡先を交換できるシステムを開発した。相手の情報を自分で入力したり、スマートフォンを取り出して連絡先を交換する必要がない。このシステムにより、イベントなど多くの人と連絡先を交換する際に非常に便利になると考える。
アプリケーション設計
全体的なプロトコルの設計について紹介する前に、以下のような前提を仮定する
・ユーザAとユーザBの2人がそれぞれデータベースに自分の情報(ログインID、名前、連絡先など)を入力済み
・自分のIDが書き込まれたRFIDカード(もしくはタグ)とRFID受信機を持っている。
ユーザAとユーザBが情報交換を行う一連の処理は以下のようになる
1. まず、2人がハグをする。
2. ハグをしたら、お互いのRFID受信機は相手のタグの情報(ここでは、相手のユーザID)を読み込む。
3. 読み込んだ情報を、ラズパイを通じて、PHPのurlでサーバーのデータベースに書き込む。
4. アプリ側では、ユーザA(ユーザB)がConnectした連絡先をサーバに要請し、サーバから相手ユーザB(ユーザA)を含む連絡先情報を獲得する。
RFIDについて
Radio Frequency IDentification(RFID)について述べる。今回タッチを検知し、情報交換に使うのが下の図のように、一つの受信用のRFIDリーダと送信用のタグとカードがついてるRFID MFRC522キットである。
読み込んで、サーバと連携するで具体的なコードとしては以下のようになる、
|
#!/usr/bin/python # -*- coding: utf8 -*- # This is built based on the MFRC522-Python Read.py import requests import RPi.GPIO as GPIO import MFRC522 import signal continue_reading = True # 予め自分のユーザIDを設定する src_uid = 1 #サーバアドレスs url = "http://satosugar.php.xdomain.jp/db_write_authenticate.php" #相手のユーザIDリスト uid_list = [] # 配列を数値に直す def change_to_num(target): target = target[::-1] result = 0 itera = 0 for i in target: result = result + i * pow(10, itera) itera = itera + 1 return int(result) # データベースに入れる def insert_data(src_id, des_id): print(uid_list) if src_id == des_id: return r = requests.get(url, params= {"src":src_id, "des":des_id}) print "inserted"
# Capture SIGINT for cleanup when the script is aborted and insert obtained uid to database def end_read(signal,nframe): global continue_reading print "Contacts added and end reading." continue_reading = False GPIO.cleanup() # Hook the SIGINT signal.signal(signal.SIGINT, end_read) # Create an object of the class MFRC522 MIFAREReader = MFRC522.MFRC522() while continue_reading: # Scan for cards (status, TagType) = MIFAREReader.MFRC522_Request(MIFAREReader.PICC_REQIDL) # If a card is found if status == MIFAREReader.MI_OK: print "Card detected" #カードやタグのID番号の取得d (status,uid) = MIFAREReader.MFRC522_Anticoll() もし取得できたら、次に進みe if status == MIFAREReader.MI_OK: # Printカードの UID print "Card read UID: %s,%s,%s,%s" % (uid[0], uid[1], uid[2], uid[3]) # This is the default key for authentication key = [0xFF, 0xFF, 0xFF, 0xFF, 0xFF, 0xFF] # Select the scanned tag MIFAREReader.MFRC522_SelectTag(uid) # Authenticate status = MIFAREReader.MFRC522_Auth(MIFAREReader.PICC_AUTHENT1A,08, key, uid) # Check if authenticated if status == MIFAREReader.MI_OK: MIFAREReader.MFRC522_Read08 # カードに書き込んだ情報を読み込む) des_uid = MIFAREReader.MFRC522_Return_Data08) print des_uid MIFAREReader.MFRC522_StopCrypto1() #読み取ったユーザIDを数値に直し、サーバに入れるd # print(uid_list) des_uid = change_to_num(des_uid) if des_uid in uid_list: print "Already in list." else: uid_list.append(des_uid) print "\n inserting data" insert_data(src_uid, des_uid) else: print "Authentication error |
アプリの使い方
以下に、アプリの使い方を図示しながら説明していく。
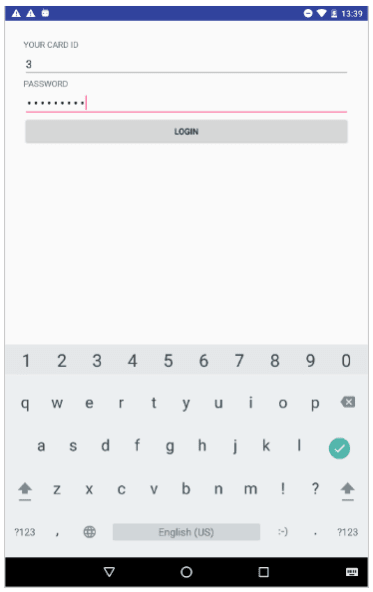
MainActivity: Deviceと一緒に配れたIDとPasswordを入力する
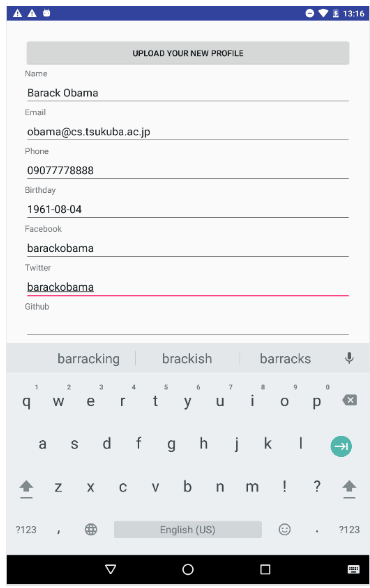
RegisterActivity: IDとPasswordがマッチすれば、次の画面に進む。もし、初回のLoginである場合(まだ自分の情報を入力していない場合)、Register画面が表示される、ここで自分の名前、電話番号、メールアドレスなどを入力してUploadする (すでに登録されている場合はこの画面がでない)。 登録が終わったら次の画面に映る。

ListViewActivity: ここでは、自分が持っているContactsが閲覧できる。各Contactsにクリックすると詳細の情報が見られる(次の画面)。さらに、Serverと同期して新しいContactsを獲得するための”SYNC CONNECTED CONTACT” buttonと自分の情報を更新するための”EDIT YOUR PROFILE”ボタンもある。

SingleViewActivity: ListViewActivityでListの一つの要素がクリックされたときに表示される画面である。この画面では特定のUserの詳細情報が見られる。各情報にクリックすると直接にメールを送ったり、電話をかけたりすることもできる。
アプリの設計
各Activityの概要
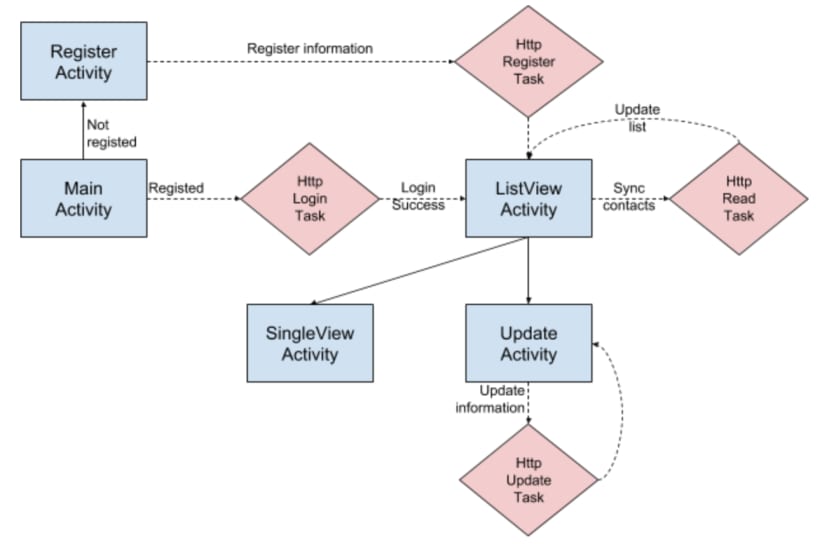
- MainActivity: Login画面の表示、そしてLogin処理を担当するHttpLoginTaskを稼働させる。
- RegisterActivity: まだ個人の情報を入力していないUserに対して、個人の情報を入力して、HttpRegisterTaskを稼働させる。
- ListViewActivity: LoginしたUserに対して、HttpUpdateTaskを稼働させて、そのUserの持っているContactsを全て表示さ
- SingleViewActivity: ListViewAcitivyで表示されたContactsの中から特定の一つの詳細を表示させるActivityである。
- UpdateActivty:すでに登録した情報を変更するためのAcitivityである。Userの情報を入力欄から読み取り、HttpUpdateTaskを稼働させる。
Serverとやり取りするためのAsyncTaskたち
・HttpLoginTask: MainActivityからIDとPasswordを引数としてもらい、Serverとやり取りして、認証の処理を実際に行う。
・HttpRegisterTask: RegisterActivityでUserが入力した情報をServerに更新する処理を行う。
・HttpReadTask: あるUserの持っている全てのContactをServerとやり取りして獲得し、データに反映させる
・HttpUpdateTask: HupdateActivityからUserが入力した新しい情報をServerのDatabaseに更新させる処理を行う。
実装詳細
- 全体的に、Activityでは入力制御または表示を担当している。そして、Serverとの情報をやり取りするために、各AsyncTaskを起動させる。AsyncTaskではPHPServerとやり取りするために、URLを生成し、httpモジュールで通信を発生させる。各ActivityとAsyncTaskの実装は類似するものが多いため、ここでは代表のものだけを示すとする。具体的に、
- Contactsを獲得して表示するためのListViewActivityとHttpReadActivity
- User情報を更新するためのUpdateActivityとHttpUpdateTask
について説明することにする。
ListViewActivity
ListViewActivtyでは、あるUserが持っているContactsを表示するActivityである。このクラスはContactsの情報を格納するArrayList<UserProfile> userProfilesというStatic変数を持っている。Staticをする理由としては、AsyncTaskを実行するときにデータの更新が楽であるからだ。
|
static public ArrayList<UserProfile> userProfiles; |
また、userProfilesの中のcontactsを表示するために、今回はListViewを採用した。ListViewは表示されるListの中の要素にsetOnItemClickListenerでClickされるときの処理が一様に定義できて便利からだ。
|
static public ListView listView; listView = findViewById(R.id.listViewContainer); |
- HttpReadTask
HttpReadTaskは、あるUserが持っているContactsをServerとやり取りして獲得するためのAsyncTaskである。 AsyncTaskは主にonPreExecute, doInBackGround, onPostExecuteの実装を述べる。
onPreExecuteでは、PHPのurlの準備を行う。
|
protected void onPreExecute() { |
doInBackgroundでは実際にHttpのTaskを走らせて情報を獲得する。
|
protected String doInBackground(Integer... args) { |
onPostExecuteは取得した情報をプログラムに格納する処理を担う。
|
protected void onPostExecute(String result) { |
データベースとPHPサーバーの実装
MySQLで2つのデータベースを作成した。表1、表2に各データベースのカラム名を示す。表1のrelationテーブルは、誰と誰がハグをしたのかを記録しておくデータベースである。src、desに格納されるのはuidである。例えば、uid1の人とuid2の人がハグをした場合に、[src des]= [1 2] 、[2 1]が格納されることになる。
|
カラム名 |
src |
des |
|
型 |
int |
int |
表1 relation テーブル
表2のusersテーブルは、ユーザの連絡先や個人情報を格納するテーブルである。ユーザはあらかじめこれらの情報を端末から登録しておく。
|
カラム名 |
uid |
Name |
|
Phone |
Birthday |
|
|
Github |
|
型 |
int |
text |
text |
text |
date |
text |
text |
text |
表2 users テーブル
次に、phpによるデータベースへのデータの格納及び、データの読見込みについて説明する。
まず、ユーザの個人情報の登録はwrite.phpによって行われる。mysqli_connect()により、データベースに接続し、mysqli_select_dbでデータベースを選択する。そして、HTTPのGET通信からユーザ情報を取得し、mysqli_queryでクエリーを実行し、データベースに格納する。
|
$link = mysqli_connect($url,$user,$pass) or die("MySQL接続失敗"); $sdb = mysqli_select_db($link,$db) or die("データベース選択失敗"); $uid = (int)$_GET["uid"]; $name = $_GET["name"]; $mail = $_GET["mail"]; $phone = $_GET["phone"]; $birthday = $_GET["birthday"]; $facebook = $_GET[“facebook”]; $twitter = $_GET[“twitter”]; $github = $_GET[“github”]; $sql = "INSERT INTO users (uid,name,birthday,phone,mail) VALUES ($uid, $name, $birthday, $phone, $mail, $facebook, $twitter, $github)"; $result_flag = mysqli_query($link, $sql) or die('INSERTクエリーが失敗しました。'.mysqli_error($link)); |
write.php
read.phpでは、指定されたuidをもつ人と連絡先を交換しているすべてのユーザのデータを、usersテーブルから読み込むプログラムである。誰と連絡先を交換しているかを確認するために、relationテーブルを参照している。
|
$link = mysqli_connect($url,$user,$pass) or die("MySQL接続失敗"); $sdb = mysqli_select_db($link,$db) or die("データベース選択失敗"); $uid = $_GET["uid"]; $sql = "SELECT * FROM users WHERE uid IN ( SELECT des FROM relation WHERE src =$uid )"; $result = mysqli_query($link, $sql); if(!$result) { echo "SELECTクエリー失敗\n"; } |
read.php
relation.phpでは、誰と誰がハグをして連絡先を交換したのかというデータ(src, des)を受け取りrelationテーブルに格納する。
|
$link = mysqli_connect($url,$user,$pass) or die("MySQL接続失敗"); $sdb = mysqli_select_db($link,$db) or die("データベース選択失敗"); $src = (int)$_GET["src"]; $des = (int)$_GET["des"]; $sql = "INSERT INTO relation (src,des) VALUES ($src, $des)"; $result_flag = mysqli_query($link, $sql) or die('INSERTクエリーが失敗しました。'.mysqli_error($link)); |
relation.php