How can I add a fiducial mark to my PCB?
Follow article
 Dave from DesignSpark
How do you feel about this article? Help us to provide better content for you.
Dave from DesignSpark
Thank you! Your feedback has been received.
Dave from DesignSpark
There was a problem submitting your feedback, please try again later.
Dave from DesignSpark
What do you think of this article?
Zendesk is the place to go if you have a design conundrum when using DesignSpark PCB. It might be something simple, or perhaps something a little beyond the norm. In this article, deftly borrowed from the pages of DesignSpark PCB Zendesk, we look at adding Fiducial Marks to your PCB.
How can I add a fiducial mark to my PCB?
What is a fiducial mark?
Fiducial marks are used for position referencing by imaging systems when components are being placed. They consist of a small filled circle of copper and a clear area from the solder resist layer and usually a minimum of two are placed in diagonally opposite corners of the board. In some situations with high-density areas of small surface mount components, additional fiducial marks are required local to that area.
There is not an official recommendation on the size, number or positioning of fiducial marks so it is recommended that you discuss with your manufacturer for their recommendations.
Various suggestions are made on the internet that the solid copper area should be 1 to 2mm diameter and the clearance in the solder mask twice this, e.g. 1.5mm diameter copper and a 3mm diameter clearance in the resist.
Pads cannot be used as they do not have the required control over the solder mask and paste mask, however, it is quite simple to create the fiducial on your PCB layout as follows.
Creating a fiducial
The use of the "Add Shape Circle" provides the required flexibility for this.

However before adding the shape, assuming you wish to add a 1mm diameter copper area and a 3mm aperture in the paste mask it is easier if you set the grid to 1mm and snap to grid to half or quarter grid. This allows the easy location of the shape and snapping to a 1mm diameter.

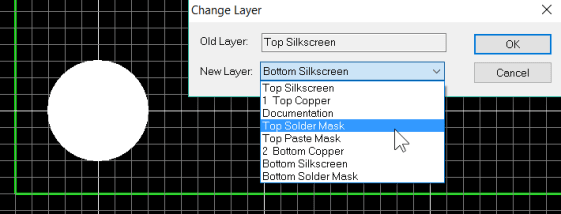
Select the "Add Shape Circle" and right click before placing and ensure "Filled Shape" is set, you may also select the Layer or change layers after placing as shown.

Place the circle shape and expand to the next half grid line. Note grid setting in this example is 0.5mm.

If required then change the layer using the "L" key shortcut or select the object, right click and select "Layers". Change the layer to Top Copper.

Repeat for solder mask exclusion area by adding another closed circle shape over the copper shape and change the layer to Top Solder Mask. The solder mask is a negative image, the shape will correspond to the excluded area of solder resist.
The fiducial is now created, use F5 to redraw the view.

At this point it is good practice to select the fiducial, right click and select 'Group', this will prevent the copper circle and paste mask becoming misaligned.
Further fiducials can be simply placed by selecting the fiducial and copying by CTRL+C and pasting by CTRL+V.

Although the fiducial cannot be saved as a library component a quick and easy solution for future use is to save the fiducial as a PCB design with the fiducial. When working on a new design also open this PCB design and you can copy and paste the fiducial to your current design as shown below.

The fiducials.pcb file contains various fiducials for you to examine and use as required and is available to download from the Zendesk article itself.
Read and comment on this article in Zendesk
If you haven’t downloaded DesignSpark PCB, what are you waiting for?