Wiring the Internet of Things with Intel Edison and Node-RED
Follow article
 Dave from DesignSpark
How do you feel about this article? Help us to provide better content for you.
Dave from DesignSpark
Thank you! Your feedback has been received.
Dave from DesignSpark
There was a problem submitting your feedback, please try again later.
Dave from DesignSpark
What do you think of this article?
Reading an analog temperature sensor and publishing data to the web.
In this tutorial we will conduct a simple test writing to a GPIO pin, before connecting a TMP36 analog sensor, running Node-RED on the Edison and using this to publish temperature readings to Twitter. The approach used could easily be adapted for use with other analog sensors and publishing to other channels, such as IRC, email and HTTP.
It is always advisable to be running the latest version of the Linux image on your board. At the time of writing the latest Yocto image available for the Edison was version 1.6. If running a different version it is possible that some different steps may need to be taken.
It is assumed that you are using the Arduino breakout board (833-0895) and your Edison is already configured on your network for login over ssh.
Writing to a pin
It is possible to control the GPIO pins on Edison from the shell directly, for examples see this detailed guide on the Emutex Labs site. This is a rather verbose way of controlling the pins, requiring a lot of setup, but is a good introduction to the workings of Edison GPIO.
Thankfully, there is a library to help with this.
The MRAA library
The Intel MRAA library simplifies working with GPIO and provides a consistent interface across different platforms, such as the Galileo, MinnowBoard and Raspberry Pi. It includes C++ bindings to Python and JavaScript.
Interestingly at the time of writing the MRAA library is not included as part of the latest Yocto image released for the Edison – surprising as the Edison specifically targets Internet of Things (IoT) applications, but fortunately it is easy to install:
Login as root to your Edison via SSH:
$ ssh root@192.168.0.145 (note you will have to change the ip address to that of your Edison)
Type in the following commands:
# echo "src mraa-upm http://iotdk.intel.com/repos/1.1/intelgalactic" > /etc/opkg/mraa-upm.conf
# opkg update
<em "># opkg install libmraa0
Next we will make a simple JavaScript application to turn on the onboard LED – the breakout board echoes many other Arduino boards in having this tied to pin 13 – handily allowing us to conduct a test without having to do any wiring.
You can login to the Edison over SSH and edit files using vi, or alternatively edit files on your local computer with your preferred text editor, before copying them across using scp.
Create a file called testLED.js with the following content:
var mraa = require('mraa');
var pin13 = new mraa.Gpio(13);
pin13.dir(mraa.DIR_OUT);
pin13.write(1);
From your Edison terminal execute the file:
# node testLED.js
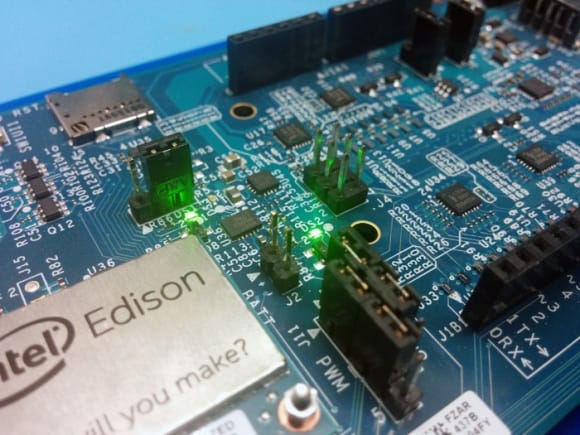
Look at your Edison board and if successful the LED attached to pin 13 (DS2) should now be illuminated, giving a total of 2 LEDs illuminated on the board.
To double-check for sanity, go back and change pin13.write(1); to pin13.write(0);, and execute again to turn off the LED.
This shows that we can control Edison GPIO using Javascript and the MRAA library.
Next we will work with GPIO using Node-RED – a visual tool for building IoT projects.
Node-RED on Edison
<
First check for the latest version of Node-RED here and make a note of the version number. At the time of writing the latest version was 0.9.1, substitute below if necessary.
Assuming you are still logged in as root to the Edison via SSH, execute the following commands:
# wget --no-check-certificate https://github.com/node-red/node-red/archive/0.9.1.zip
<em "># unzip 0.9.1.zip
# cd node-red-0.9.1
# npm install --production
<em "># cd nodes
# wget --no-check-certificate https://github.com/node-red/node-red-nodes/archive/0.8.0.tar.gz
# gunzip 0.8.0.tar.gz
# tar xvf 0.8.0.tar
# cd ..
# node red.js
This will install and start Node-RED. You can test this by opening a new browser tab and going to the Edison's IP address and port 1880, for example http://192.168.0.145:1880. If all is well the web interface will load and you will be able to start your first project.

Node-RED allows you to 'wire' together hardware and software in a graphical environment, creating flows. It comes bundled with many default nodesand there are many others available to download and install as you need. It provides an excellent rapid development environment.
Creating your first flow
-
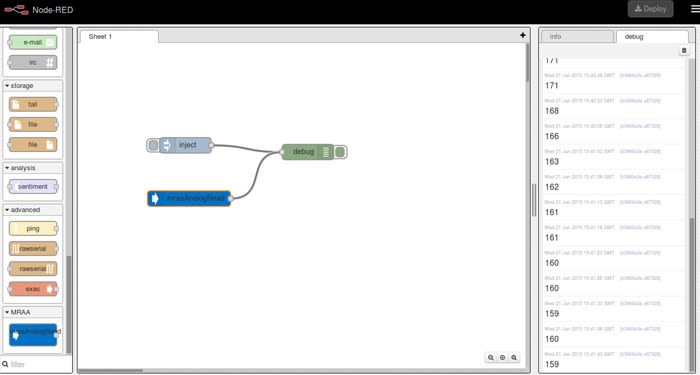
Add an inject node by dragging it from the left side palette to the workspace. Note that hovering over the nodes in the left side palette will display further information about that node.
-
Select the inject node and read the information in the right sidebar. If this right sidebar is not displayed, click the button in the top right and select 'Sidebar'.
-
Add a debug node to the workspace.
-
Drag a wire between the two by hovering over the small grey point/box at one side of a node (it will highlight orange), clicking and dragging to the other node's point. There is now a 'wire' connecting the two nodes.
-
Note that each node has a small blue circle on it, and clicking the large buttons on the side brings an error message from the top of the window. This is because the nodes are yet to be deployed on the server and only exist in the editor.
-
Click the Deploy button.
-
To test your flow, click the debug tab in the right sidebar and click the button on the Inject node. A large number should be shown each time you click the button.
This demonstrates how quickly nodes can be wired up in Node-RED, with the many core and third-party nodes that are available making it fast and easy to prototype.
A collection of wired nodes in a Node-RED workspace is known as a flow. Flows can be exported and imported as text – as JSON formatted files - making the sharing of them particularly easy provided that the correct nodes are installed. There is a sizeable flow library on the Node-RED site.
Integrating analog sensors with Node-RED
Now we have Node-RED running on our Edison we will try connecting an analog sensor to it and passing data from the physical world into Node-RED.
At the time of writing we could not find any examples implementing Edison GPIO within Node-RED, so we created a very simple new node to demonstrate this, mraaAnalogRead, available here.
-
Download the 90-mraa-analog-read JavaScript and HTML files
-
Put these files in your node-red-0.9.1/nodes/ directory
-
Restart Node-RED (ctrl-c followed by node red.js)
The mraaAnalogRead node should now appear in the left palette sidebar.
Next we can connect the TMP36 sensor to our breakout board.
Hardware required:
-
Breadboard
-
Jumper wires
-
>TMP36 sensor (042-7351)
-
Intel Edison Arduino Kit (833-0895)
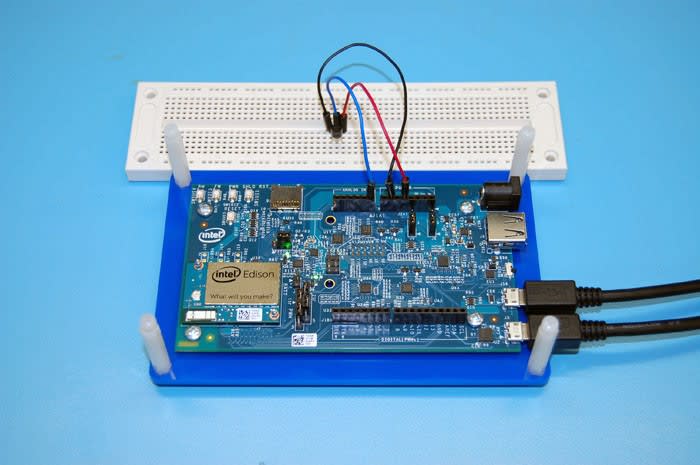
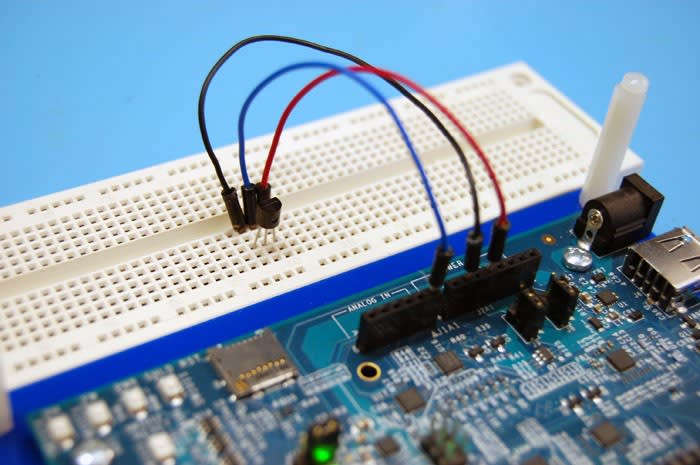
Power off your board. Using a breadboard and suitable wires connect the TMP36 sensor to the board as shown in the photo above (5v – pin 1, A0 – pin 2, GND – pin 3). Note it is important to get the orientation of the TMP36 correct, double-check your wiring before powering on your board.
Execute Node-RED and open the web interface as before. Next:
-
Navigate to the left palette and drag the mraaAnalogRead node into the workspace
-
Double click the node and set repeat time to 5
-
Wire the node to the existing debug node
-
Deploy the flow
-
Look at the debug tab in the right sidebar. It should be displaying a new number every 5 seconds.
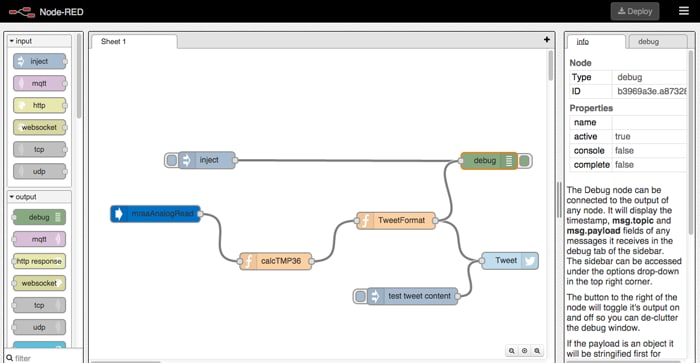
Now we have a reading from an analog sensor coming into Node-RED. Test to see if the value changes when you warm the sensor with your fingertips. This is fine as a proof of concept, let's improve this by formatting the temperature value into something more useful:
-
Add a function node into the workspace.
-
Double click the node to bring up the edit dialogue.
-
Delete the existing line 'return msg;' and replace with the following lines:
	var millivolts = 5000;
	rawTemp = ((msg.payload * (millivolts / 1024) -500) / 10);
	temp = {};
	temp.payload = rawTemp.toFixed(2);
	return temp;
-
Rename the function node to something descriptive like 'calcTMP36'
-
Delete the existing wire between the mraaAnalogRead node and debug node and add in the new 'calcTMP36' function node as shown
-
Deploy the new flow
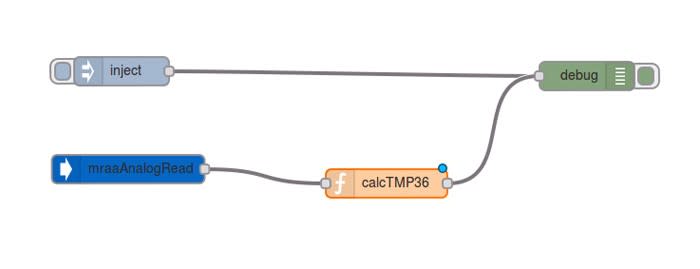
This should give us a reasonable looking value in degrees Centigrade, limited to two decimal places. Now we can send this value to an output node to get our data out of Node-RED. We can also add some additional formatting to our temperature reading to make it more friendly for tweeting.
-
Find the Twitter out node in the left palette and drag it into the workspace
-
Double click the Twitter node and set it up with your chosen Twitter credentials
-
Drag an inject node into the workspace – we will use this to test our Twitter node is working before using our temperature data
-
Double click the inject node, convert the payload type to 'string' in the drop down menu and add some text into the empty field below the drop down
-
Connect this inject node to the Twitter out node
-
Click Deploy
-
Once nodes are successfully deployed click the button on the inject node. This will send the message payload to the Twitter out node and if set up correctly send a tweet out with the payload. Check your Twitter feed to see if your payload message went up successfully.
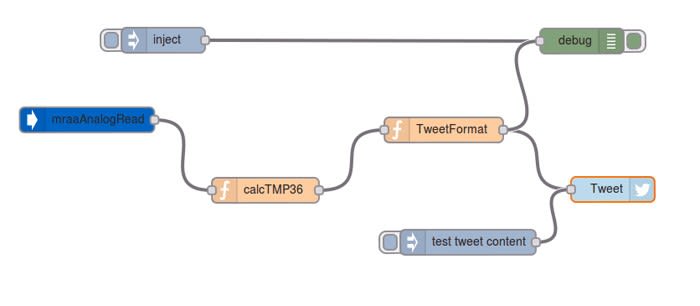
Now we can connect our temperature data to Twitter.
-
Drag another function node into the workspace.
-
Double click the function node and rename it to something descriptive such as 'TweetFormat'
-
Clear the existing lines and replace with:
	tweetText = {};
	tweetText.payload = "Measured Temperature: " + msg.payload + "C";
	return tweetText;
-
Now delete the output wire of the calcTMP36 function node and re-wire to the input of the TweetFormat function node.
-
Connect the TweetFormat function node to the Twitter out node. Connect it to the debug node too so that you can verify what is being sent.
-
Double click the mraaAnalogRead node and change Repeat time to something like 900 (for 15 minutes) to avoid getting blocked by the Twitter API for sending too many messages.
-
Deploy
Note that the Twitter API is set up to stop spamming and avoid misuse. Thus you may experience problems with high frequency tweeting and tweeting the same payload many times. Our example above will return error messages due to duplicate Tweets if your measured temperature is stable – further work to add a unique ID or timestamp will help to avoid this.
You could easily replace the TMP36 sensor with other suitable analog sensors, but may need to modify the function nodes to get useful values. It is also possible to make use of multiple sensors and use different outputs to build more complex flows.