DesignSpark PCB Tips! Power & Ground Symbols & Net References
Follow article
 Dave from DesignSpark
How do you feel about this article? Help us to provide better content for you.
Dave from DesignSpark
Thank you! Your feedback has been received.
Dave from DesignSpark
There was a problem submitting your feedback, please try again later.
Dave from DesignSpark
What do you think of this article?
Zendesk is the support area for all of DesignSpark’s tools, packed with information, videos and guides to help you get the most from your designs. If you are facing a design conundrum take a trip to the Zendesk, we might have just what you need.
Here, we look at solutions for adding Power and Grounding Symbols, and for Net References to your DesignSpark PCB design.
How do I add power & ground symbols to a schematic?
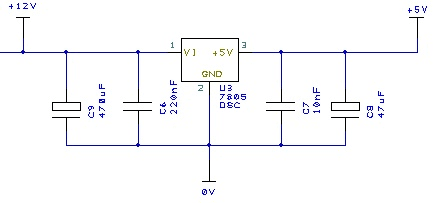
Power and ground symbols are used in a Schematic to indicate a connection to a power source. These symbols are required for aesthetic purposes and are not translated to the PCB (because they do not have PCB footprints associated with them). The signals they represent are connected together at the translate stage by ‘implied’ connectivity. The power & ground symbols themselves can contain inherent net name properties that are automatically used when the symbol is attached to the net.
Adding Power Symbols
You can add power symbols by using the Add Component browser on the Interaction bar <F9>.
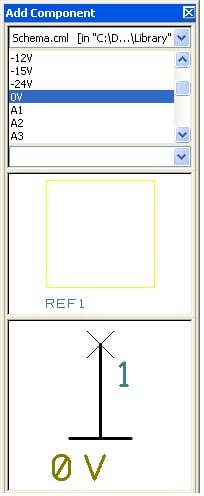
Select the Schema library from the drop-down list. In the Component list select 0V. You will see the symbol selected in the preview box.
For reference, this is a schematic only symbol, the component library and will not have any PCB symbols associated with them.
Drag the 0V symbol into the design from the browser.

Connect it by dragging off the symbol to the existing connection. A confirmation dialogue will be displayed to indicate a non-named net is being connected to a named net. This ensures you aren’t joining nets which you don’t know about.

Read it, leave a comment on it on Zendesk
How can I add Net References?
Net references open the possibility of connecting two pins on opposite sides of the design, which perhaps need to be connected together, but for which you do not need to add a full connection.

Here we will add a short connection for each pin, add a schematic only component as the signal reference and name the net on both ends. This will act as an ‘implied’ connection. Then when the Schematic is translated to PCB, these two points will be connected together.
Using the Add Component browser, from the Schema.cml library, add two To components to the design.

Remember, the intelligence in the implied net is the net name, so now we must name the connection.
Using Net Change
Select the pin on the To symbol. From the shortcut menu, select Change Net.
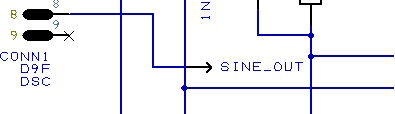
From the dialog, type the Net Name of the net you want to connect, for example SINE_OUT like on the example below.
Depending on the needs leave the Net Class as Signal or change it to one of the other options available. Click OK to exit.
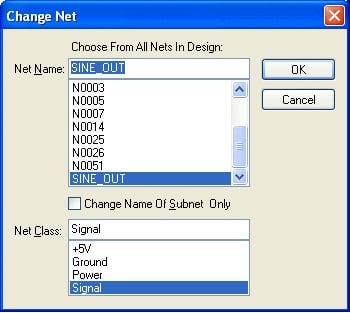
The Net is now named (SINE_OUT), now you need to display it.
Displaying Net Names
Select the connection to the To symbol. Right-click and from the shortcut menu, select Display Net Name.
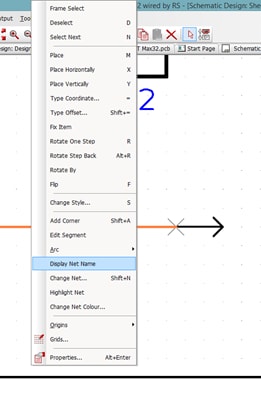
Now that it is displayed, you can select it and move it into the required position.
That is one half of the implied net completed. You must now do this procedure again for the other pin.
Read it, leave a comment on it on Zendesk
You can find tips just like these and much more in the DesignSpark Zendesk, check it out!
If you haven’t tried DesignSpark PCB yet and you are wondering why you are reading this article, why not download DSPCB today and discover for yourself just what you are missing!