Intel景深摄影机Python程序详解2-于NVIDIA Jetson Nano执行RealSense D435 范例
关注文章
 戴夫来自 DesignSpark
你觉得这篇文章怎么样? 帮助我们为您提供更好的内容。
戴夫来自 DesignSpark
Thank you! Your feedback has been received.
戴夫来自 DesignSpark
There was a problem submitting your feedback, please try again later.
戴夫来自 DesignSpark
你觉得这篇文章怎么样?
|
作者 |
张嘉钧 |
|
难度 |
普通 |
|
材料表 |
Intel RealSense D435 X1 NVIDIA Jetson Nano X1 |
目录
對齊RGB跟Depth畫面並去除背景 ( align-depth2color.py )
解決掉幀問題 ( frame_queue_example.py )
讀取預錄好的深度影像方式 ( read_bag_example.py )
对齐RGB跟Depth画面并去除背景 ( align-depth2color.py )
这个范例呈现如何将一公尺以外的内容进行去背,此范例的核心价值在于深度影像跟彩色影像如何对齐,对齐后又该使用什么方式去除背景。
首先,先导入函式库与宣告 RealSense对象 ( pipeline ) 与定义串流对象 ( config ):
# 導入函式庫
import pyrealsense2 as rs
import numpy as np
import cv2
# 建立一個context物件存放所有 RealSense 的處理函示
pipeline = rs.pipeline()
# 配置串流物件
config = rs.config()
接着可以透过wrapper去确认接上去的设备是L500系列还是D400系列,进而去调整RGB摄影机的分辨率,最后定义完就可以开启影像串流,细部的介绍可以参阅上篇程序详解之内容:
# 可以透過下列程式取得設備資訊
# 透過 resolve 確認第一個可用的設備
pipeline_wrapper = rs.pipeline_wrapper(pipeline)
pipeline_profile = config.resolve(pipeline_wrapper)
# 取得該設備資訊
device = pipeline_profile.get_device()
device_product_line = str(device.get_info(rs.camera_info.product_line))
# 建立「深度」影像串流
config.enable_stream(rs.stream.depth, 640, 480, rs.format.z16, 30) # uint 16
# 建立「彩色」影像串流
# 由於 L500 系列的彩色攝影機解析度維 960 x 540 所以才需要取得設備資訊
if device_product_line == 'L500':
    config.enable_stream(rs.stream.color, 960, 540, rs.format.bgr8, 30)
else:
    config.enable_stream(rs.stream.color, 640, 480, rs.format.bgr8, 30)
# 開啟影像串流
profile = pipeline.start(config)
再来就是我们这次范例的重头戏了 – 对齐,这边要对齐的不仅是影像也有深度信息,RealSense传感器获得的深度信息如何转换成实际的公尺单位?深度影像跟RGB影像如何进行画面对齐?
首先,先来处理深度单位的转换,我们先取得深度传感器的对象,透过get_depth_scale取得到「RealSense的深度信息与实际公尺单位的转换比例」,接着我们要求一公尺以外的信息要进行去背,所以定义了 clipping_distance_in_meters,但现在定义的是公尺单位需要转换成深度信息,所以这边会再除以刚刚透过get_depth_scale取得到的数值,这样就能成功转换成对应的RealSense深度数值了:
# 取得深度感測器物件
depth_sensor = profile.get_device().first_depth_sensor()
# 取得深度感測器的 深度資訊與實際公尺之間的 映射尺度
# get_depth_scale -> Retrieves mapping between the units of the depth image and meters
depth_scale = depth_sensor.get_depth_scale()
print("Depth Scale is: " , depth_scale)
# 宣告多少公尺以內的資訊要顯示
clipping_distance_in_meters = 1 #1 meter
# 將 公尺資訊 轉換成 RealSense 的 深度單位
clipping_distance = clipping_distance_in_meters / depth_scale
紧接着就要来处理深度影像跟彩色影像的对齐,当初在opencv_viewer那个范例我们为了显示在一起会使用cv2.resize的方式,但是并不是最好的做法 ( 图片会被压缩变形 ),pyrealsense提供的对齐方式是align,我们可以透过 rs.align()去处理深度影像需要对齐的内容,这边就是以彩色影像 ( rs.stream.color )为基础进行对齐,最后可以使用 process() 来实现对齐的动作,后续会再说明:
# 建立 對齊 物件 ( 以 color 為基準 )
align_to = rs.stream.color
# rs.align 讓 深度圖像 跟 其他圖像 對齊
align = rs.align(align_to)
# 使用 process 來實現剛剛宣告的 align 對齊功能
# aligned_frames = align.process(frames)
上面定义完之后就可以进行实时影像的撷取与处理了,一样透过 wait_for_frames等待最新的复合式影像对象( frames) 包含彩色影像跟深度影像,接着直接使用 align.process 将深度影像对齐彩色影像:
# 串流迴圈
try:
    while True:
        # 等待最新的影像,wait_for_frames返回的是一個合成的影像
        frames = pipeline.wait_for_frames()
        # frames.get_depth_frame() is a 640x360 depth image
        # 使用 process 來實現剛剛宣告的 align 對齊功能
        aligned_frames = align.process(frames)
对齐完之后就可以透过get_depth_frames跟get_color_frames来取得影像了,这边我也取得了原先的影像,最后批注的地方如果解除批注就会看到原先的分辨率跟转换后的分辨率:
        # 取得對齊後的影像
        depth_frame = frames.get_depth_frame()
        aligned_depth_frame = aligned_frames.get_depth_frame() # aligned_depth_frame is a 640x480 depth image
        color_frame = aligned_frames.get_color_frame()
        # 驗證是否都有影像
        if not aligned_depth_frame or not color_frame:
            continue
        # 轉換成 numpy
        depth_image = np.asanyarray(aligned_depth_frame.get_data())
        color_image = np.asanyarray(color_frame.get_data())
        # 顯示解析度
        # print('Org (L500) : ', np.shape(np.asanyarray(depth_frame.get_data())), end='\t')
        # print('After align : ', np.shape(np.asanyarray(aligned_depth_frame.get_data())))
批注掉之后可以发现,分辨率从原本的 640x480变成了 960x540:

紧接着就是去背问题,我们可以直接透过dstack的方式去将一个维度的数据复制成三个维度 (范例结尾有补充说明),这样影像的信息就好比一张灰阶照片,接着使用 np.where即可进行条件去背。这边要注意的是depth_image_3d里面的数值代表的还是属于深度信息;np.where(condition, x, y) 满足 condition 输出 x 否则输出 y,满足距离大于1公尺以及辨识不出来这两个条件的就输出 grey_color,没有满足的就输出 color_image:
        # 刪除背景 : 將背景顏色調整成 灰色
        grey_color = 153
        # 深度影像只有 1 個 channel,透過 dstack 建立 灰階圖 ( 這邊RGB的數值就是 深度訊息 )
        depth_image_3d = np.dstack((depth_image, depth_image, depth_image)) #depth image is 1 channel, color is 3 channels
        # 當 深度大於 1 公尺 或是 偵測不出來 就會 以 grey_color 取代
        bg_removed = np.where((depth_image_3d > clipping_distance) | (depth_image_3d <= 0), grey_color, color_image)
最后将深度图跟去背图合并并且当侦测到按下按钮「q」就会关闭所有窗口:
        # 將深度影像轉換成 彩色影像
        depth_colormap = cv2.applyColorMap(cv2.convertScaleAbs(depth_image, alpha=0.03), cv2.COLORMAP_JET)
        # 合併圖像 左為去背圖,右為深度圖
        images = np.hstack((bg_removed, depth_colormap))
        # cv2.namedWindow('Align Example', cv2.WINDOW_NORMAL)
        cv2.imshow('Align Example', images)
        key = cv2.waitKey(1)
        # Press esc or 'q' to close the image window
        if key & 0xFF == ord('q') or key == 27:
            cv2.destroyAllWindows()
            break
finally:
    pipeline.stop()
到这边这个范例就结束了!
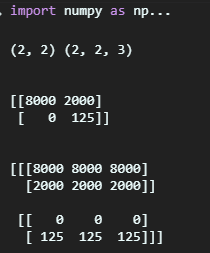
我在稍微针对np.dstack进行补充说明,下列范例是一个2x2的深度影像信息,我们可以透过dstack转换成三维度的影像:
import numpy as np
a = np.asanyarray( [[8000, 2000],
                    [0, 125]])
b = np.dstack((a,a,a))
print(a.shape, b.shape)
print('\n')
print(a)
print('\n')
print(b)
显示的结果如下,原本是 ( 2, 2, 1) 变成了 ( 2, 2, 3):
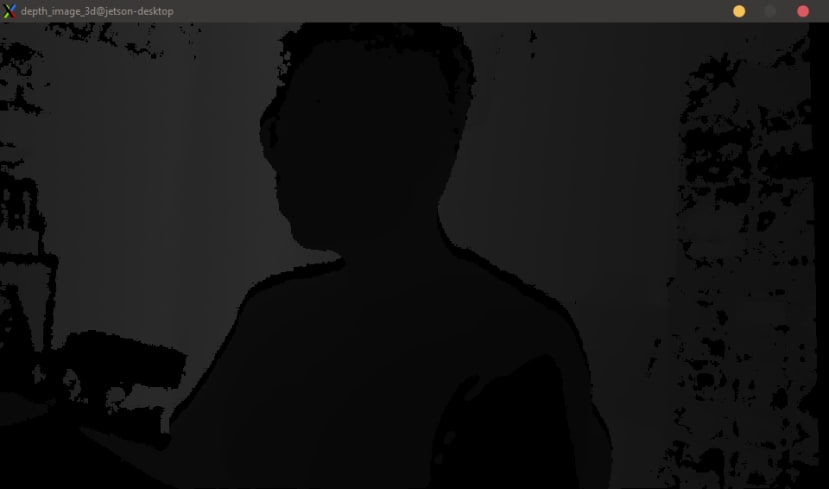
而使用OpenCV显示的话会类似下图:
解决掉帧问题 ( frame_queue_example.py )
当我们在进行多个影像串流的时候总是会发生延迟问题导致掉帧,RealSense也提供了一些简单的方式来处理这个问题。
首先要先制造掉帧的现象,这边撰写了slow_processing、slower_processing来模拟掉帧现象,这边输入的是影像对象,透过get_frame_number可以获取现在的影像是第几帧,于slow_processing我们每20帧就会暂停0.25秒;slower_processing则是每20帧就暂停1秒,用这种方式来模拟掉帧状况:
# First import the library
import pyrealsense2 as rs
import time
# 每20個frame會暫停0.25秒 製造短暫的延遲
def slow_processing(frame):
    n = frame.get_frame_number()
    if n % 20 == 0:
        time.sleep(1/4)
    print(n)
# 製造更延遲的狀況
def slower_processing(frame):
    n = frame.get_frame_number()
    if n % 20 == 0:
        time.sleep(1)
    print(n)
接着与先前一样先取得RealSense的对象并且宣告影像串流对象:
try:
    # Create a pipeline
    pipeline = rs.pipeline()
    # Create a config and configure the pipeline to stream
    #  different resolutions of color and depth streams
    config = rs.config()
    config.enable_stream(rs.stream.depth, 640, 480, rs.format.z16, 30)
接下来会分成几个部分来展示延迟以及改善的方式,一开始我们先确认之前写的延迟程序有无问题,运行 slow_processing 5秒看成效如何:
    print("Slow callback")
    # 開始影像串流
    pipeline.start(config)
    # 讓 slow_processing 運行5秒就好
    start = time.time()
    while time.time() - start < 5:
        # 取得最新的影像物件
        frames = pipeline.wait_for_frames()
        # 運行slow_processing
        slow_processing(frames)
    # 關閉RealSense物件
    pipeline.stop()
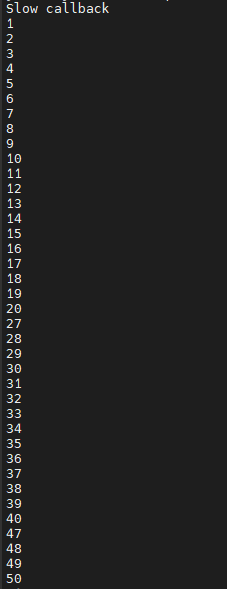
成果如下,可以注意到当frame数到20的时候下一刻会变成27代表这0.25秒中间遗失了7个frame:

接着我们可以加上 queue 来将被丢失的帧存放在内存当中,frame_queue( ) 括号当中的数值代表可以保存的帧数:
    # 加上 queue
    print("Slow callback + queue")
    # frame_queue(n) n 是可以保留多少幀,這邊保留了50幀的空間
    queue = rs.frame_queue(50)
    # 開啟串流
    pipeline.start(config, queue)
    # 執行五秒
    start = time.time()
    while time.time() - start < 5:
        frames = queue.wait_for_frame()
        # 一樣使用 slow_processing
        slow_processing(frames)
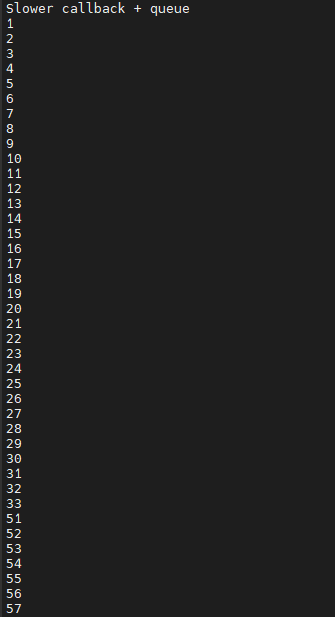
结果如下,可以发现原本的在第20帧的时候会因为延迟而丢失7帧,加上了queue之后就没有这样的问题了,那待我们再来测试一下延迟更久的状况:

一样的程序代码只是我们将slow_processing 改成 slower_processing:
    print("Slower callback + queue")
    queue = rs.frame_queue(50)
    pipeline.start(config, queue)
    start = time.time()
    while time.time() - start < 5:
        frames = queue.wait_for_frame()
        slower_processing(frames)
    pipeline.stop()
结果如下,可以注意到虽然queue设到50但是因为延迟时间太久所以会导致queue无法进行备份最后直接舍弃掉pool里的帧:
最后解决这种问题的方法就是keep_frames,我们在宣告frame_queue的时候加上这个参数,让queue里面的帧会被保留住:
    print("Slower callback + keeping queue")
    queue = rs.frame_queue(50, keep_frames=True)
    pipeline.start(config, queue)
    start = time.time()
    while time.time() - start < 5:
        frames = queue.wait_for_frame()
        slower_processing(frames)
    pipeline.stop()
这个范例如果介绍的有错误或不够清楚,请在下方留言,也可以参考原厂数据:https://intelrealsense.github.io/librealsense/python_docs
录制深度影像 (.bag)
介绍之前先讲一下 rosbag (http://wiki.ros.org/rosbag),他是基于ROS所开发的一个纪录工具,可以记录机器人运行的数据数据以及影像等等的信息。那可能因为RealSense开发者大部分是以机器人为主所以他们也直接使用相关的纪录方式。
要录制深度影响其实非常的简单,你只需要在宣告config之后,在宣告enable_record_to_file() 即可,括号当中应输入文件名,范例如下。
# 建立一個context物件存放所有 RealSense 的處理函示
pipeline = rs.pipeline()
# 配置串流物件
config = rs.config()
# 建立「深度」影像串流
config.enable_stream(rs.stream.depth, 640, 480, rs.format.z16, 30)
# 將影像數據輸出到 test.bag 當中
config.enable_record_to_file('test.bag')
具体程序可以使用opencv_viewer_example.py来修改,成果在read_bag_example的demo可以看到 ( 下一个范例 ),我自己录制的画面。
读取预录好的深度影像方式
( read_bag_example.py )
基本上看到这里一些基本的动作读者们应该都知道了,所以我这边批注会少一些,第一步基本上就是导入函式以及宣告pipeline等等的,比较特别的是这边config要增加一段 enable_device_from_file(config, 'test.bag'),告诉config数据要从这个档案读取,而不是RealSense:
import pyrealsense2 as rs
import numpy as np
import cv2
import argparse
import os.path
try:
    pipeline = rs.pipeline()
    config = rs.config()
    # 告訴 config 資訊從檔案讀取
    rs.config.enable_device_from_file(config, 'test.bag')
    # 一樣要建立深度影像串流
    config.enable_stream(rs.stream.depth, rs.format.z16, 30)
    # 開啟串流
    pipeline.start(config)
    # 宣告著色器 預設是 jet colormap
    colorizer = rs.colorizer();
接着我们就像一般使用一样,取得frames、取得深度影像,转换成numpy,用opencv显示:
    while True:
        frames = pipeline.wait_for_frames()
        depth_frame = frames.get_depth_frame()
        # 將深度影像著色成 jet colormap
        depth_color_frame = colorizer.colorize(depth_frame)
        # 轉換成 numpy array 讓 opencv 顯示
        depth_color_image = np.asanyarray(depth_color_frame.get_data())
        # Opencv 顯示以及按下 q 離開
        cv2.imshow("Depth Stream", depth_color_image)
        key = cv2.waitKey(1)
        if key == 27:
            cv2.destroyAllWindows()
            break
finally:
    pass
成果如下:
结语
我们详解了总共六个范例,相信大部分的状况,读者们都已经可以Handle了!下一次将会介绍我们如何使用对象侦测搭配RealSense。