How much dust is generated from a small woodworking project?
Follow article Dave from DesignSpark
How do you feel about this article? Help us to provide better content for you.
Dave from DesignSpark
Thank you! Your feedback has been received.
Dave from DesignSpark
There was a problem submitting your feedback, please try again later.
Dave from DesignSpark
What do you think of this article?
Introduction
Many of us undertake small build projects which involve working with a variety of materials such as wood, plastics, metals, composites or other. Typically, we are working with these materials in a general-purpose workspace which may be a workshop, maker space, or home garage. When cutting and sanding these materials, we are exposing ourselves to the dust, debris, and fumes generated. And most likely we do not have the highest possible level of dust extraction and filtration available for several reasons such as cost, infrequent use, power and space requirements.
Purpose of this project and article
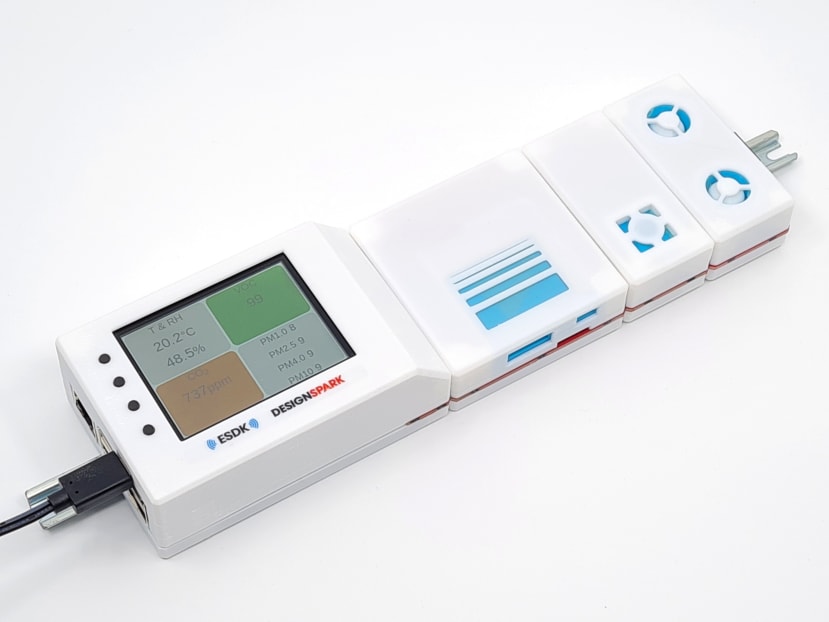
The purpose of this project was to undertake a small build project and use the ESDK to investigate the air quality that I am exposed to at each step in the process. The data is transmitted to the DesignSpark Metrics cloud platform where it can be analysed to quantify the levels of dust and fumes and determine if I am unknowingly exposed to potentially hazardous levels of airborne particles or VOCs.
I have chosen a woodworking project to make these wooden play blocks with the DesignSpark and RS logos. Making these blocks requires tools and processes typically used in woodworking or making. The blocks are just used to demonstrate a small and simple woodworking project that someone might do on the weekend or in their spare time. This article does not go into detail about the specifics of how to make these blocks.

Building the ESDK
But before I can begin, We must build the ESDK
Assembling the ESDK hardware
To assemble the ESDK hardware I followed the comprehensive build instructions here on DesignSpark:
https://www.rs-online.com/designspark/aq-sensor-build-guide-1
I do have one additional tip that I can add regarding the installation of the threaded brass inserts into the plastic housings. If you do not have a small butane torch or soldering iron on hand, I used the kitchen gas cooktop to heat up the inserts. 7 to 10 seconds in the burner flame did the trick. I only mention this as, depending on where you are in the world, gas cooktops may be more prevalent. Or like me, you are assembling this late at night in winter and do not feel like venturing outside in the cold wet weather to the shed in search of tools.
Configuring the ESDK software
I followed the DesignSpark instructions in the project documentation, using balenaEtcher as suggested in the installation guide to flash the SD card on my Windows computer. The latest software image is available here:
https://docs.designspark.io/projects/aq-device/en/latest/installation.html
I also created the aq.toml configuration file using Notepad++ on Windows and copied the file to the MicroSD card. The aq.toml file is explained here:
https://docs.designspark.io/projects/aq-device/en/latest/configuration.html
One issue I foresaw was that the workshop I am using for this project has no internet and no WiFi network. In order to be able to log the data in real-time, I created a wpa_supplicant.conf file which configures the RPi WiFi to connect to the hotspot from my mobile phone. This allowed me to setup the ESDK wherever I was working.
Example wpa_supplicant.conf file:
country=AU # 2-digit country code
ctrl_interface=DIR=/var/run/wpa_supplicant GROUP=netdev
update_config=1
network={
ssid="NetworkSSID"
psk="Password"
}
Full documentation about RaspberryPi network configuration, including adding multiple WiFi networks with different priority levels is here:
https://www.raspberrypi.com/documentation/computers/configuration.html
Woodworking project steps
The project is divided into the following five steps as areas of interest.
- Cut pine wood into blocks with a table saw with and without dust extraction
- Paint wood blocks and check if VOCs are detectable
- Using a computer in an office to 3D model the blocks and program the CNC cutting files whilst measuring CO2 in the room
- Engrave blocks using a CNC router and compare dust inside and outside the machine enclosure
- Sanding the blocks using disc sander with and without dust extraction
1. Cutting
Pine timber is cut into cubic blocks with a table saw. The ESDK is used to measure the dust generated with and without the use of dust extraction.

Note that I also have the roller door open to allow any excess dust to hopefully drift outside. Similar dust-generating cutting equipment that may be in your workshop could be a mitre saw, band saw, circular saw, or jigsaw.
2. Painting
The wooden blocks are painted and the ESDK is used to sense if VOCs are detectable.

The wooden blocks were painted with a water-based non-toxic acrylic paint, specifically with no VOCs, the same craft paint typically found at any stationary or hardware store. As expected, there was no noticeable change in TVOC index when painting, and my own nose could not detect any smell from the paint; However, this is still a valid experiment as it confirms what was suspected. Obviously, if an increase in (perhaps odourless) VOCs was detected, then further investigation to find the source would be required.
Important note about the TVOC sensor
The TVOC index has a range of 1 to 500. A moving average of the measured VOCs (including odourless VOCs) over the past 24 hours is calculated and mapped to the value of 100, with a relative scale above and below 100. VOC greater than 100 means there are currently more VOCs compared to the average, and less than 100 indicates there are fewer VOCs.
Think of it as the TVOC sensor detecting a change in the VOCs, indicating an event has occurred to release VOCs (such as solvents, cleaning products, cooking), or reduce or disperse them (fume extraction, fresh air entering from a door or window). Remember, the TVOC is not providing a quantitative or absolute value of VOCs in the air.
I wanted to highlight this aspect of the TVOC sensor as I had originally planned to use it to measure and quantify the fumes produced when using solvents to glue plastic pipe. So if you are thinking of using the TVOC sensor for your project, I recommend reading up on what the Sensirion SGP40 sensor can detect and the algorithm that calculates the index. There are some excellent application notes in the downloads section of the SGP40 page:
https://sensirion.com/products/catalog/SGP40/
This application note is specifically about the VOC index:
https://sensirion.com/media/documents/02232963/6294E043/Info_Note_VOC_Index.pdf
3. CAD/CAM programming
Okay, I understand that jumping into 3D CAD and CAM may not be the obvious next step for any woodworking purists reading this. But CAD software really is an important tool for any modern maker or fabricator, whether it be machining/routing, laser cutting, casting, 3D printing, or any other computer-aided manufacturing process.
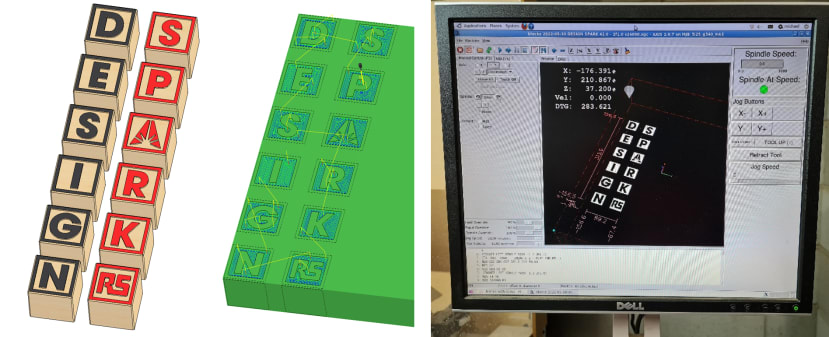
I sat at a computer in an office to create the 3D CAD and CAM software to model program the CNC cutting files, with the ESDK monitoring the CO2 levels. This office is approximately 70 m2 (~750 ft2) in area, which includes a separate lunch room. There were 5 people at desks that day with a comfortable space of 2 to 3 metres between desks.
Ignore the spikes in the data where my co-workers were blowing on the ESDK as they walked past, waiting for me to react when I saw the CO2 peak on the Metrics. The plot below shows the work day with the office door closed all morning with CO2 rising to ~1400 PPM. Then with just one door opened to outside after lunch, the CO2 dropped quickly down to ~500 PPM.

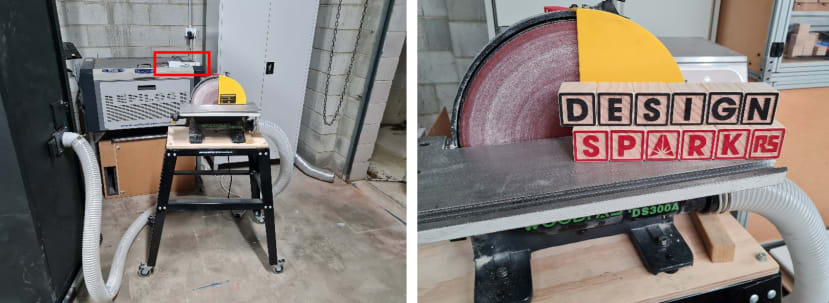
4. CNC routing
The wooden blocks were engraved using a CNC router. The CNC router is contained inside an enclosure to reduce the noise and dust dispersed into the surrounding workspace. The ESDK measured particulate matter levels inside and outside the enclosure during routing/engraving. (measurements inside and outside were taken at different times during cutting).

5. Sanding
The wooden blocks were given a light sanding on all sides and corners using a disc sander. The ESDK measured the dust levels with and without using a dust extraction system connected to the sander.
Whilst I am using a disc sander here, the results would apply to other abrasive sanding equipment such as belt sanders, and various handheld power sanders. Remember that the volume of material that is removed is being converted to dust.
Dust Results
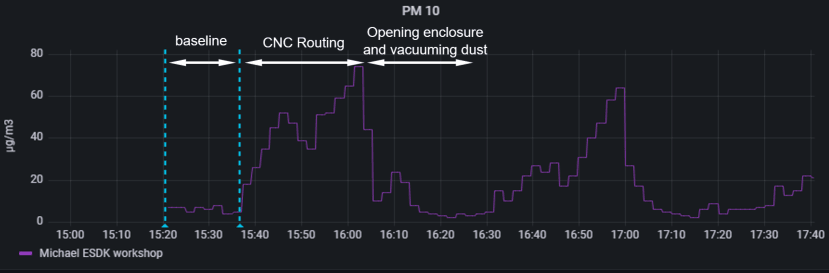
Data displayed on the DesignSpark Metrics platform
As an example, this is the PM 10 data from the Metrics platform for CNC routing with the ESDK mounted inside the enclosure. The platform allows me to add annotations and mark time stamps for later analysis. You can see in the plot below how
Dust data compared for each process
I thought it was beneficial to have the dust results for the three processes displayed side-by-side for comparison. To simplify the presentation of the data, the peak measured values for the particulate matter sizes 1.0, 2.5, 4.0, 10 μm during each step of the process are shown together.

Discussion and what I discovered
As it can be seen, the CNC router enclosure retains the dust very well. If you have a hobby-type CNC router on a bench without an enclosure, I would strongly consider building an enclosure for the safety, dust, and noise benefits.
As for cutting and sanding. Clearly, the use of a dust extractor (high-powered vacuum in this case) dramatically reduces the dust in the air. I already knew this was the case but it is interesting to see it quantified here. Abrasive processes like sanding in particular eject very fine particles which are suspended in the air and take longer to settle.
The peak value of PM10 when sanding for a short time of 10 minutes was 116 μg/m3. As a comparison, in 2020 the workplace safety authority SafeWorkSA in Australia where I am, made an adjustment to the workplace exposure Total Weighted Average (TWA) for softwood dust to 500 μg/m3, down from 5,000 μg/m3 previously set in 1991. The numbers are not directly comparable as TWA is averaged over an 8-hour work day. But you can see that just sanding these blocks for just 10 minutes already elevated the dust level to ~23% of that exposure limit.
Further work could be done to analyse the dust particle sizes produced by different processes and materials.
As you can see, even a small woodworking project such as this can produce quite a significant amount of dust in a short period of time if no precautions are taken. Any attempt to capture the dust at the source as it is generated is beneficial.
What other sensors could be added?
Having the data from all the sensors time stamped and aligned in one window on DesignSpark Metrics made it very easy to analyse what was taking place. When testing the ESDK I did think about the following sensors that may compliment those currently in the ESDK.
CO carbon monoxide – CO is colourless and odourless and associated with combustion. Exposure to CO is relevant to many aspects of our lives and could be used to detect vehicle activity or exposure to combustion sources such as gas heaters.
dB/noise level/vibration - This could be used in a workshop setting to gauge the level of activity or detect a significantly noisy event (or lack of noise after the event). A further extension of this is taking the FFT of recorded audio to gauge what activity is happening (machines, music, humans talking, vehicles).
Voice recognition – This is starting to stray from the original intent but adding voice recognition to control projects or adjust settings could be beneficial, of course, this could also be done with a local computer or mobile phone. A humorous project could be a virtual swear jar that detects each time I make a mistake when I’m working and swear.
How can this drive change?
This ESDK is a great tool that makes it more accessible for people to start monitoring the air quality of their environment. Combine this with the DesignSpark Metrics cloud platform which provides live data that can be used to make real-time decisions and actively control elements of your project. The design is also open source, allowing anyone to modify and expand on the current capabilities.
As more users are inspired to build on the ideas presented in these DesignSpark articles, the features, capabilities, and applications of the ESDK will only improve with time.