Building distributed Node-RED applications with MQTT
Follow article
 Dave from DesignSpark
How do you feel about this article? Help us to provide better content for you.
Dave from DesignSpark
Thank you! Your feedback has been received.
Dave from DesignSpark
There was a problem submitting your feedback, please try again later.
Dave from DesignSpark
What do you think of this article?
MQTT or 'Message Queueing Telemetry Transport' is a Machine-to-Machine (M2M) or Internet of Things (IoT) connectivity protocol that was designed to be extremely lightweight and useful when battery power and network bandwidth is at a premium and connection quality can be unreliable. It was invented in 1999 by Dr Andy Stanford-Clark and Arlen Nipper and is now an Oasis Standard.
In this example we are going to use MQTT to enable us to build distributed Node-RED applications. We will install Mosquitto, an open source message broker for MQTT 3.1 and 3.1.1, publishing messages from one Raspberry Pi and subscribing to those messages with another.
For this tutorial we will assume that you are running an up-to-date version of Raspbian on a Pi 2, you can SSH into your Pi and have Node-RED installed and configured. You can refer to a previous post for information on setting this up.
Installing Mosquitto
Firstly SSH into your Pi.
Now we can add the Mosquitto Debian Repository (instructions taken from here):
$ curl -O http://repo.mosquitto.org/debian/mosquitto-repo.gpg.key
$ sudo apt-key add mosquitto-repo.gpg.key
$ rm mosquitto-repo.gpg.key
$ cd /etc/apt/sources.list.d/
$ sudo curl -O http://repo.mosquitto.org/debian/mosquitto-repo.list
$ sudo apt-get update
Next install the broker and command line clients:
- mosquitto – MQTT broker
- mosquitto-clients – command-line clients
$ sudo apt-get install mosquitto mosquitto-clients
Once downloaded the Mosquitto broker starts straight away so we will stop it to make some changes first:
$ sudo /etc/init.d/mosquitto stop
Now that the MQTT broker is installed on the Pi we will add some basic security.
Create a config file:
$ cd /etc/mosquitto/conf.d/
$ sudo nano mosquitto.conf
Let's stop anonymous clients connecting to our broker by adding a few lines to your config file. To control client access to the broker we also need to define valid client names and passwords. Add the lines:
allow_anonymous false
password_file /etc/mosquitto/conf.d/passwd
require_certificate false
Save and exit your editor (nano in this case).
For a comprehensive list of config options see http://mosquitto.org/man/mosquitto-conf-5.html
From the current /conf.d directory, create an empty password file:
$ sudo touch passwd
We will to use the mosquitto_passwd tool to create a password hash for user pi:
$ sudo mosquitto_passwd -c /etc/mosquitto/conf.d/passwd pi
You will be asked to enter your password twice. Enter the password you wish to use for the user you defined.
Testing Mosquitto

Now that Mosquitto is installed we can perform a local test to see if it is working:
Open three terminal windows. In one, make sure the Mosquitto broker is running:
$ mosquitto
In the next terminal, run the command line subscriber:
$ mosquitto_sub -v -t 'topic/test'
You should see the first terminal window echo that a new client is connected.
In the next terminal, run the command line publisher:
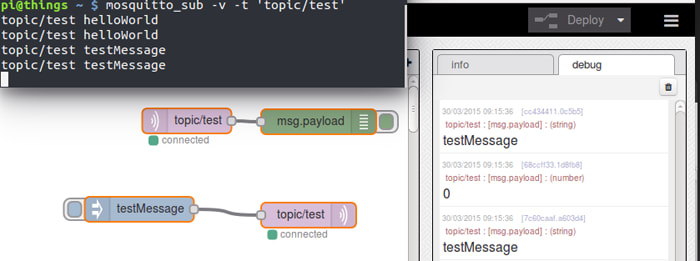
$ mosquitto_pub -t 'topic/test' -m 'helloWorld'
You should see another message in the first terminal window saying another client is connected. You should also see this message in the subscriber terminal:
topic/test helloWorld
We have shown that Mosquitto is configured correctly and we can both publish and subscribe to a topic.
MQTT and Node-RED on the same Pi
Now we know the broker is working we can look at sending messages to and from Node-RED. Open new browser tab and go to the Node-RED flow editor that is running on your Pi (this should be :1880). Start a new flow by clicking the black + symbol at the top right of the flow workspace. Find the MQTT input node in the input section of the toolbar to the left of the screen and drag an instance of the node into the workspace. Note that there are two MQTT nodes that come with Node-RED by default: input and output.

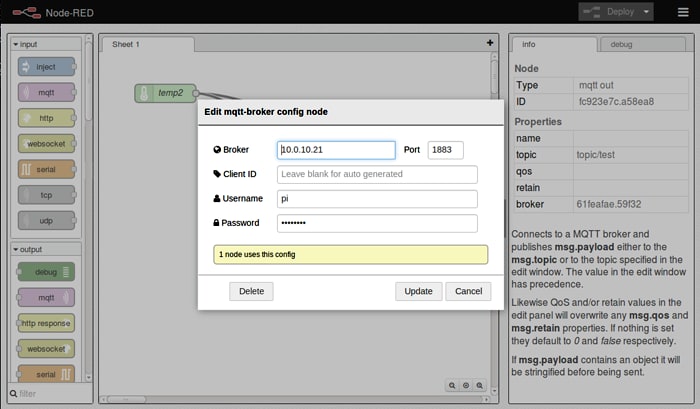
Double-click the MQTT input node to edit the configuration.
For this first test we will input the broker details: localhost and port 1883. Also make sure to change the Topic to the same as we used before: topic/test. Ensure that you also input the user name and password that we configured earlier. Click OK to save.
Drag in a debug node and connect the two nodes. Click the Deploy button. If all is working correctly you should see a small green connected indicator underneath the MQTT node. Go to the terminal window in which the Mosquitto broker is running. There will be indication of a new client connection.
Go to the terminal window where you originally ran the mosquitto_pub command and run it again. Now check the debug output panel in the Node-RED GUI and you should be able to see the helloWorld message.

Next we will test to see if we can publish messages from Node-RED to the MQTT broker. Drag in an MQTT output node from the output section of the toolbar to the left of the screen. Double-click the node and enter the same parameters as before.
Save the node and drag in an Inject node. Connect the two nodes and deploy. If all the settings are correct you should see a green Connected indicator appear underneath the MQTT output node. Click the button on the left of the Inject node.
Go back to the terminal window where you originally ran the mosquitto_sub command. It should show the message sent from the Inject node to the MQTT output node in Node-RED.
This is a great proof of concept but at present all simply running on the same Pi. Now we can look at sending messages between different devices.
Sending messages from one Pi to another
Configure another Pi 2 and SSH into it.
Add the Mosquitto package repository as before. Install the Mosquitto clients:
$ sudo apt-get install mosquitto-clients
Connect the second Pi to the same network as the first Pi and execute the following command:
$ mosquitto_sub -v -t 'topic/test' -h ''
e.g.
$ mosquitto_sub -v -t 'topic/test' -h '10.0.10.21'
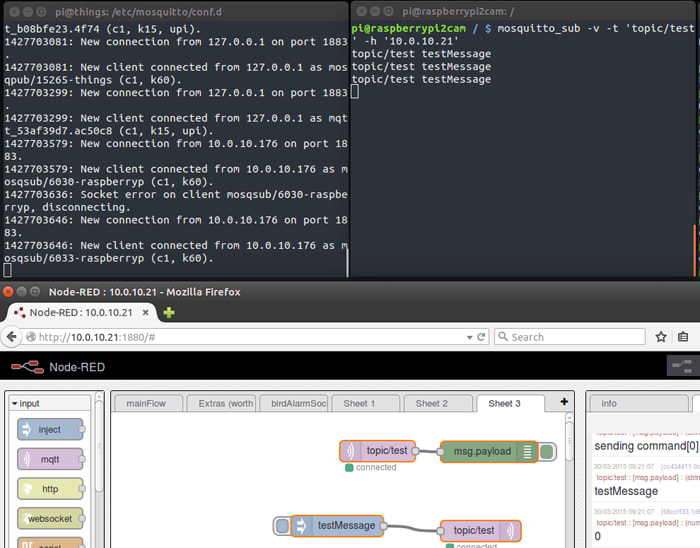
This will subscribe the second Pi to the test topic from before. Go back to the original terminal where we ran the Mosquitto broker. There will be indication that the second Pi has connected as a client. To test if the second Pi can receive messages, head back to your Node-RED MQTT testing flow and click the button on the left side of the Inject node. As well as being displayed in the Node-RED debug terminal you should also be able to see the message displayed in the terminal window on the second Pi.
We now have a second Pi on the network that can subscribe to messages published by the first. This is a fairly trivial yet useful example showing initial steps in what could easily scale with many other devices connected as publishers and subscribers.
Publishing sensor data
Now we will use the second Pi to publish temperature data to an MQTT topic and subscribe to it using the first Pi. See a previous post for how to connect a DS18B20 temperature sensor and install the necessary dependencies.
Once you are reading temperature data into Node-RED we can publish it to a new MQTT topic:
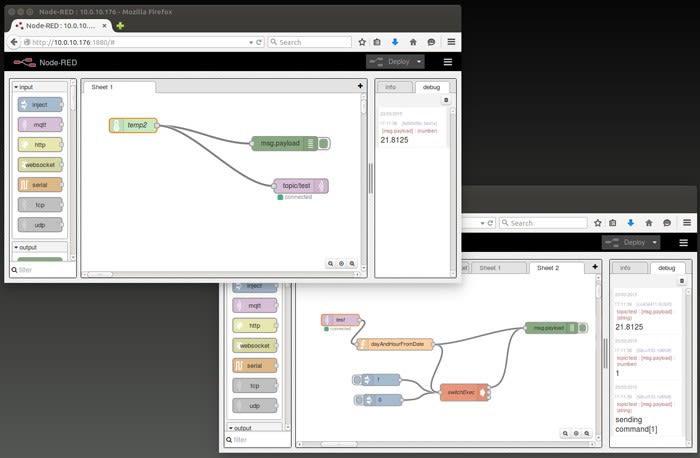
Add a new MQTT output node to the flow. Double-click the node to add the broker and topic details. In the broker field, input the IP address of the first Pi, port 1883.
Connect the DS18B20 node to the MQTT output node and deploy the flow. You should see the now familiar green 'connected' indicator appear below the MQTT output node. If you switch to the Node-RED GUI on the first Pi you should now see temperature data messages sent from the second Pi appearing in the debug window.
Final thoughts
We could add more sensors, topics and additional Pis to scale out our system.
It is also possible to use other platforms such as Arduino and Intel Edison to publish and subscribe to MQTT topics. The Pi is a great platform for running Mosquitto and together with Node-RED provides us with a powerful, easy to use tool for building scalable Internet of Things applications.