Building a Spresense Powered Smart Security Device Part 2: SDK Setup, Structure and First Example
Follow article
 Dave from DesignSpark
How do you feel about this article? Help us to provide better content for you.
Dave from DesignSpark
Thank you! Your feedback has been received.
Dave from DesignSpark
There was a problem submitting your feedback, please try again later.
Dave from DesignSpark
What do you think of this article?

This series of posts demonstrates how the advanced capabilities of the Sony Spresense can be put to use in creating a low power security device for asset monitoring and tracking.
In Part 1 we introduced the project and in this post, we’ll start by setting up the software development environment, following which we will run our first example and then proceed to take a look at the SDK structure and its configuration.
NuttX
The Spresense SDK is built on top of NuttX, an open-source “real-time operating system with an emphasis on standards compliance and small footprint”. While Spresense also has Arduino IDE support, NuttX gives us many more advanced features, such as preemptible multitasking, SMP, message queues, signals, mutexes, file system support and a BSD socket interface. As such NuttX is a great fit for the multi-core and sensor interfacing rich Spresense hardware.
SDK setup
It’s clear that a lot of thought, time and effort has gone into creating a great developer experience for the Spresense platform and this is immediately apparent with the documentation. We’ll be following the Getting Started Guide for setting up the software development kit (SDK) and noting the main steps involved here, but please refer to the official documentation for full details.
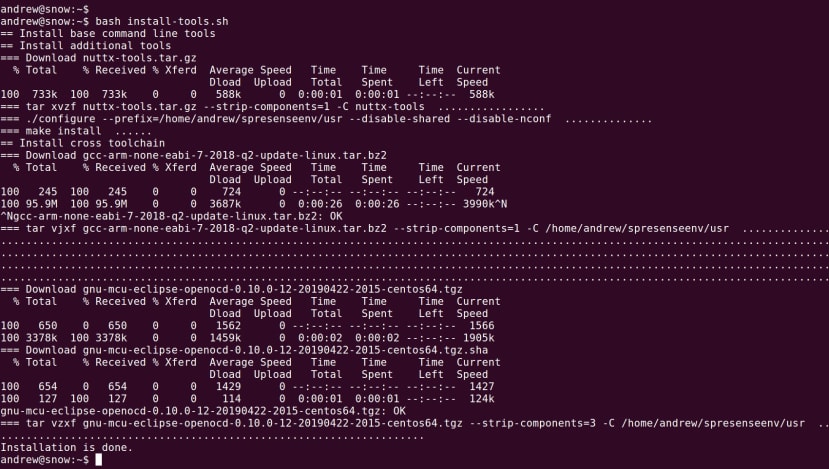
With Linux, the first step is to make sure that your user is in the dialout group so that it can access the USB UART which is used to program the Spresense. Next, the tools are installed with:
$ wget https://raw.githubusercontent.com/sonydevworld/spresense/master/install-tools.sh$ bash install-tools.shAmongst other things, this script installs autoconf, automake, bison, flex, a GCC Arm cross-compiler, NuttX tools, and the OpenOCD on-chip debugger/programmer software.
To set our environment up to use the tools we need to source a shell script.
$ source ~/spresenseenv/setupWe can obtain the Spresense SDK sources using git.
$ git clone --recursive https://github.com/sonydevworld/spresense.git
If the SDK gets updated on GitHub, we can then simply update our copy with:
$ git pull Running the first example
Now we can follow the instructions to run the “Hello, World!” example. Two steps, first to set the initial NuttX kernel configuration and then the SDK.
$ tools/config.py --kernel release$ tools/config.py examples/hello
At this point, we were told that we should update the loader on our board and a URL is provided where we can download a ZIP file. Since we must accept a EULA, we cannot use wget on the command line and must instead use a web browser.
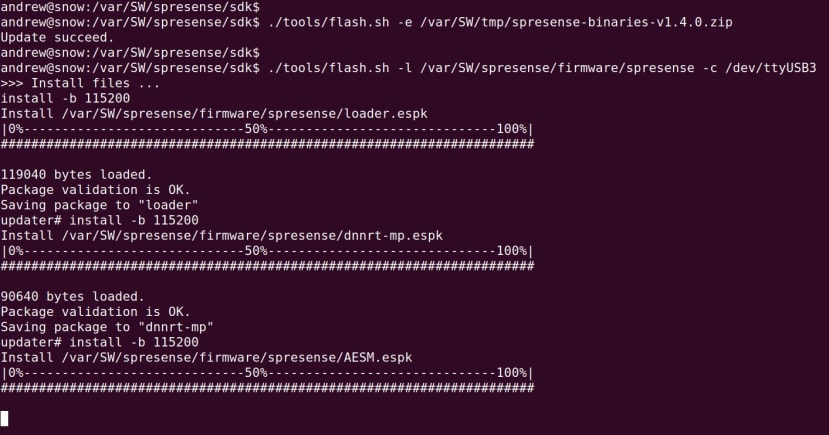
Two commands later and our board has the latest loader installed.
Now we can re-run the step to configure the SDK.
$ tools/config.py examples/helloThis time it completes without error and so we proceed to building.
$ make buildkernel$ make
We now have our NuttX-based “Hello, World!” and it’s time to flash it to the board.
$ tools/flash.sh -c /dev/ttyUSB3 nuttx.spk
We then use screen to connect to the serial port.
$ screen /dev/ttyUSB3 115200At which point we are greeted by the NuttShell and can enter “hello” to run the example.

Configuration
import os
import sys
import logging
import glob
import shutil
import re

import eula

MODE_MENUCONFIG = "menuconfig"
MODE_QCONFIG = "qconfig"
MODE_GCONFIG = "gconfig"

CAT_ROOT     = "configroot"
CAT_KERNEL   = "kernel"
CAT_BOARD    = "board"
CAT_FEATURE  = "feature"
CAT_DEVICE   = "device"
CAT_EXAMPLES = "examples"
CAT_MYAPP    = "myapp"
Now that the tools are set up and we have successfully built our first example, let’s take a closer look at how the SDK is configured. Above we can see a code fragment from the config.py Python script which we ran earlier when building “Hello, World”. The name menuconfig will be familiar to long-time Linux users and embedded systems developers, as the build automation tool used to configure the Linux kernel to support different options, subsystems, and devices, etc.
While for a desktop Linux user today it’s rare that you would have to configure a custom kernel, this was commonplace back in the days when memory was at a premium and loading unneeded device drivers was something to be avoided. Similarly, when building for embedded Linux systems, there is little point in having support for a large number of irrelevant features and peripherals. The same is also true for the Spresense board and menuconfig gives us a convenient way of customising our NuttX configuration to configure the options that are appropriate for our application.
We can run menuconfig with:
$ tools/config.py -m
Following which we will be presented with a menu as shown above, from where we can configure Spresense SDK options such as SoC peripherals, drivers and support for Bluetooth, for example. When we eventually save and exit, the configuration will then be written to a file.
#
# Automatically generated file; DO NOT EDIT.
# SPRESENSE SDK Configuration
#

#
# General
#
CONFIG_SDK_USER_ENTRYPOINT="nsh_main"

#
# Board Configuration
#
CONFIG_BOARD_SPRESENSE=y
# CONFIG_BOARD_CORVO is not set
# CONFIG_BOARD_COLLET is not set

#
# Board-Specific Options
#
CONFIG_BOARD_NAME="spresense"
CONFIG_BOARD_CUSTOM_PINCONFIG=y
CONFIG_BOARD_USB_DISABLE_IN_DEEP_SLEEPING=y
CONFIG_CXD56_SPIFLASHSIZE=0x400000
CONFIG_SDCARD_TXS02612=y
CONFIG_SDCARD_TXS02612_PORT0=y
# CONFIG_SDCARD_TXS02612_PORT1 is not set
Above we can see a fragment of the .config file (note the dot prefix) which is written to in the sdk directory.
Note how when we earlier configured our NuttX build with the “Hello, World” example, we didn’t use menuconfig and instead simply entered:
$ tools/config.py examples/helloWhat this did was to use the contents of the examples/hello directory as a predefined “defconfig” to configure the build and include the example. In here we can find:
- hello_main.c (our example application)
- Makefile (how to compile it)
- Kconfig (adds the example and its defaults to menuconfig)
We can list all the available defconfigs with:
$ tools/config.py -lSDK Structure

The SDK is delivered as a layer on top of NuttX, which provides the kernel and is itself included in the SDK GitHub repository as a sub-module. This is why when we clone this we need to give the --recursive option. Along with the examples, the SDK adds the board support package (BSP), configurations, device drivers and modules, plus system, build and configuration tools.
When we run menuconfig we have the option of configuring either the Spresense SDK (default) or by including the -k option, configuring the NuttX kernel instead.
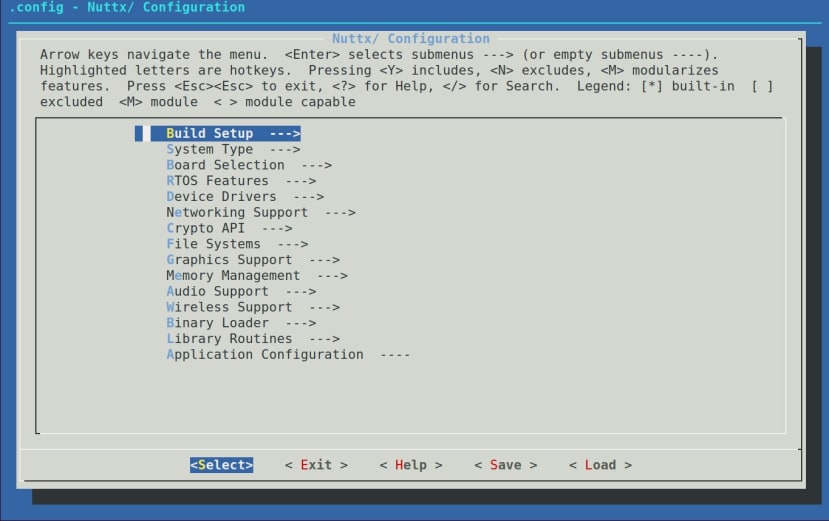
Above we can see the top-level menu in NuttX configuration, where we can configure, amongst other things, RTOS features such as clocks and timers, tasks and scheduling, signals and message queues, for example.
The SDK provides a pretty complex stack, with many components, numerous APIs and advanced capabilities, such as custom audio DSP, camera control/interfacing and sensor fusion. We’ll cover some of these in future posts and for comprehensive details, see the Developer Guide.
Next steps
In the next post, we’ll take a look at sensor interfacing and following which processing data with the Sensor Control Unit (SCU), which enables initial processing to take place in hardware and as such offload the application processor and in turn deliver greater energy efficiency.