*WINNING ENTRY* Leak killer Design Challenge
Follow article
 Dave from DesignSpark
How do you feel about this article? Help us to provide better content for you.
Dave from DesignSpark
Thank you! Your feedback has been received.
Dave from DesignSpark
There was a problem submitting your feedback, please try again later.
Dave from DesignSpark
What do you think of this article?
In this Design Challenge, I will be using a couple of Particle Electrons and Raspberry Pi 3 as my base electronics. I will add a Basic BOM (Bill of Materials). I am also designing a DIY Open Source Security system into the Challenge as well as simple Heating Control sketch.
With this system, you will be able to go on holiday and rest easy that your home is safe and secure (with no leaks).
|
Bill Of Materials |
Description |
Bought From |
Costs |
|
Raspberry Pi Zero |
Basic Micro Computer |
$10 CAD |
|
|
Particle Photon |
Micro Controller |
$19 USD |
|
|
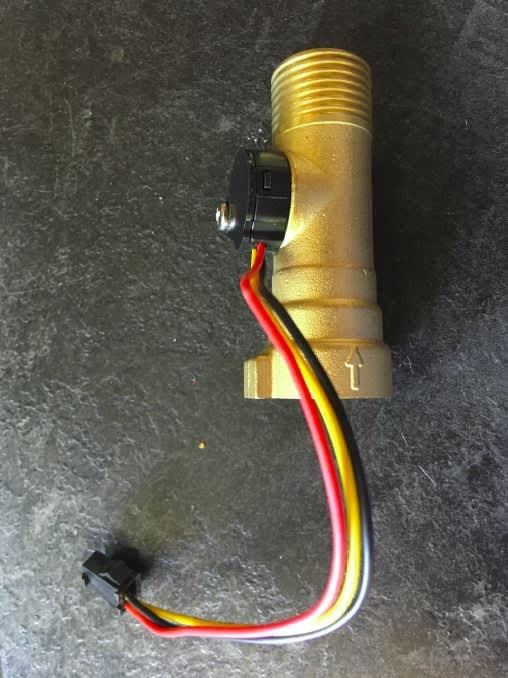
Liquid Flowmeter |
1/2 NPT Brass Flow meter |
Adafruit
|
$25 USD |
|
Solenoid valve |
1/2NPT Plastic Solenoid |
$25 USD |
|
|
Waterproof Boxes |
Buy them anywhere, I bought mine from Amazon |
$3 USD Each |
|
|
Security Box |
Buy them anywhere, I bought mine from Amazon |
$25 CAD |
That's the expensive stuff
The following are the products and programs I used to design my boards and have them made:
|
Products |
Description |
Costs |
Comments |
|
Manufacturer of the relays I'm using |
$2.00 Each |
|
|
|
Web IDE for programming |
Free |
|
|
|
SMS messaging service |
Really cheap |
|
|
|
Open source home automation program for Linux, Windows and Mac |
Open source… Free |
Cool OpenHAB phone app to control and monitor |
|
|
Open source |
Included in Raspi Programming |
|
|
|
Analytics site |
Free for this type of project |
|
The Board Designs
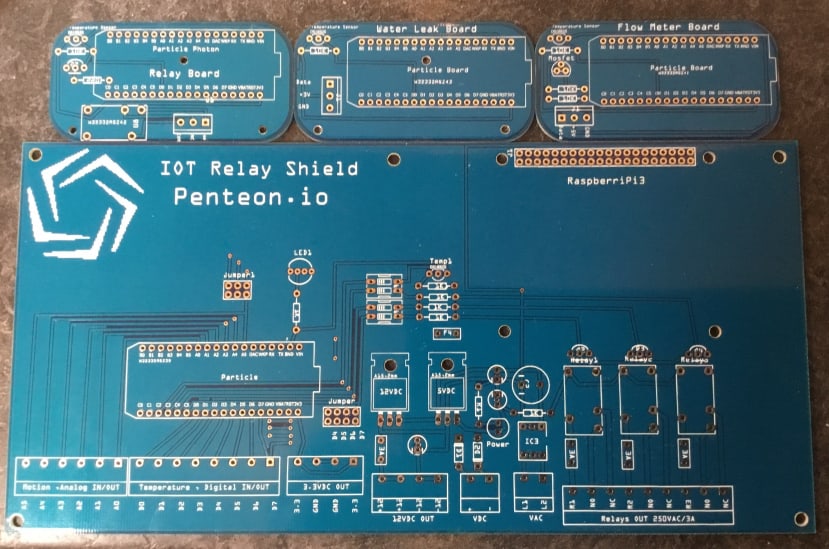
Main Control Board
For the Main Control Board that sits in the control cabinet, I have included a Gerber File for the enthusiast that doesn’t want to go through the hassle of doing a total design work up.
I have 3 relays designed into the board:
- 1 can be used as an alarm bell
- 1 can be used for turning on and off the solenoid
- 1 can be used for turning heating or air conditioning on and off
The Raspberry Pi Zero can be soldered into place in the spots provided to get power from the board.

Soldering the board… work your way from the inside to the outside of the board briefly touching the pins to be soldered. Don't linger too long as you may melt the pieces above you on the other side of the board. You just want to wait long enough for the solder to liquefy that you are touching to the iron and the piece at the same time. If you are not sure what you are doing, practice on a blank board with some cheap resistors until you’re comfortable.
Water Flow Meter Board
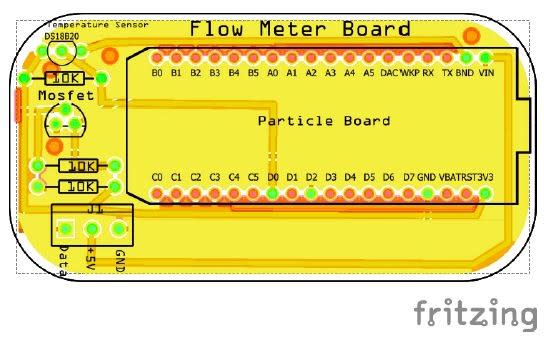
Flow Meter Board
The remote Water Flow Meter Board that sits on your main intake pipe after the flow meter and shutoff. I have included a Gerber file for this board as well. It requires power to operate. Either a battery setup can be included in it or regular power from the USB. I will be using the USB power block as it's easier to design into the board and junction box.
Water Leak Board

Water Leak Board
The Remote Water Leak Board sits on the floor of your water closet or mechanical room, or even in the bathroom where you might have a leaky toilet. A Gerber file is attached for this one as well.
Sensor Board
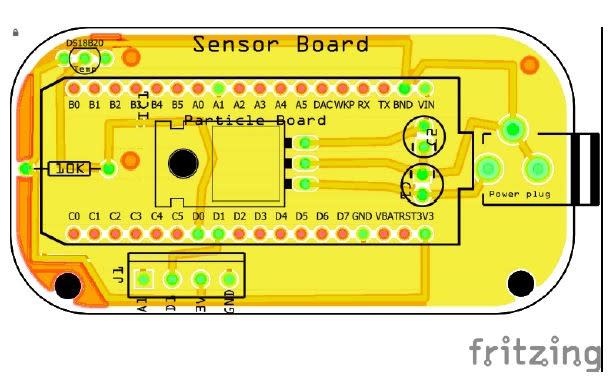
Sensor Board
The Sensor Board is for the piezo sensor and any other sensors you want to implement, including motion detection.
Relay Board

Particle Photon Relay Board
The Remote Relay Board this mounts near the Solenoid shutoff your water or mechanical room or even in the bathroom where you might have a leaky toilet. A Gerber file is attached for this one as well.
You might have noticed the sensor boards are all exactly the same size. I did that on purpose so as to only have one box type for all sensors.
Penteon IO Board

Penteon IO Board
This is the flagship of my board collection. It has dual voltage AC or DC inputs up to 30VDC. Two relays and all inputs and outputs present. It’s a little larger but great for the flow and solenoid valve and sensors.
Bills of materials for each individual shield
Security Panel BOM
|
Label |
Part Type |
Properties |
|
12VDC |
Voltage Regulator |
chip 78005; variant side; voltage 12V; package 78xxl |
|
12VDC OUT |
Camdenboss CTB0158-4 |
hole size 2.7mm; variant 90° 4 connector; pins 4; package THT; pin spacing 0.2in (5.08mm); part # CTB0158-4 |
|
1K |
1KΩ Resistor |
resistance 1KΩ; bands 4; tolerance ±5%; package THT; pin spacing 400 mil |
|
1K |
1KΩ Resistor |
resistance 1KΩ; bands 4; tolerance ±5%; package THT; pin spacing 400 mil |
|
1K |
1KΩ Resistor |
resistance 1KΩ; bands 4; tolerance ±5%; package THT; pin spacing 400 mil |
|
1K |
1KΩ Resistor |
resistance 1KΩ; bands 4; tolerance ±5%; package THT; pin spacing 400 mil |
|
1K |
1KΩ Resistor |
resistance 1KΩ; bands 4; tolerance ±5%; package THT; pin spacing 400 mil |
|
1K1 |
1KΩ Resistor |
resistance 1KΩ; bands 4; tolerance ±5%; package THT; pin spacing 400 mil |
|
3.3VDC OUT |
Camdenboss CTB0158-4 |
hole size 2.7mm; variant 90° 4 connector; pins 4; package THT; pin spacing 0.2in (5.08mm); part # CTB0158-4 |
|
3A |
Resettable Fuse PTC |
variant pth; package ptc |
|
3A |
Resettable Fuse PTC |
variant pth; package ptc |
|
3A |
Resettable Fuse PTC |
variant pth; package ptc |
|
3A |
Resettable Fuse PTC |
variant pth; package ptc |
|
5VDC |
Voltage Regulator |
chip 78005; variant side; voltage 5V; package 78xxl |
|
C2 |
Electrolytic Capacitor |
voltage 50V; package 200 mil [THT, electrolytic]; capacitance 47μF |
|
C3 |
Electrolytic Capacitor |
voltage 50V; package 100 mil [THT, electrolytic]; capacitance 0.1μF |
|
C4 |
Electrolytic Capacitor |
voltage 50V; package 100 mil [THT, electrolytic]; capacitance 0.1μF |
|
C5 |
Electrolytic Capacitor |
voltage 50V; package 100 mil [THT, electrolytic]; capacitance 0.1μF |
|
D1 |
Rectifier Diode |
type Rectifier; package 300 mil [THT]; part #1N4001 |
|
D2 |
Rectifier Diode |
type Rectifier; package 300 mil [THT]; part #1N4001 |
|
F4 |
Resettable Fuse PTC |
variant pth; package ptc |
|
IC3 |
IC |
hole size 1.0mm,0.508mm; chip label IC; pins 6; package DIP (Dual Inline) [THT]; pin spacing 300mil; true |
|
Jumper |
Generic double row male header - 8 pins |
hole size 1.0mm,0.508mm; pins 8; form ♂ (male); row double; package THT; pin spacing 0.1in (2.54mm) |
|
Jumper1 |
Generic double row male header - 6 pins |
hole size 1.0mm,0.508mm; pins 6; form ♂ (male); row double; package THT; pin spacing 0.1in (2.54mm) |
|
LED1 |
RGB LED (com. cathode, rgb) |
pin order rgb; polarity common cathode; rgb RGB; package 5 mm [THT] |
|
Motion ,Analog IN/OUT |
Camdenboss CTB0158-6 |
hole size 2.7mm; variant 90° 6 connector; pins 6; package THT; pin spacing 0.2in (5.08mm); part # CTB0158-6 |
|
Particle |
Electron |
variant variant 5; pins 36; manufacturer Particle; name Electron; version 1.0.0 |
|
Power |
Red (633nm) LED |
leg yes; color Red (633nm); package 5 mm [THT] |
|
Q2 |
NPN-Transistor |
type NPN (EBC); package TO92 [THT] |
|
Q3 |
NPN-Transistor |
type NPN (EBC); package TO92 [THT] |
|
Q4 |
NPN-Transistor |
type NPN (EBC); package TO92 [THT] |
|
R1 |
220Ω Resistor |
resistance 220Ω; bands 4; tolerance ±5%; package THT; pin spacing 400 mil |
|
Relay1 |
RELAY |
variant pth4; package relay-jzc |
|
Relay2 |
RELAY |
variant pth4; package relay-jzc |
|
Relay3 |
RELAY |
variant pth4; package relay-jzc |
|
Relays OUT 250VAC/3A |
Camdenboss CTB0158-9 |
hole size 2.7mm; variant 90° 9 connector; pins 9; package THT; pin spacing 0.2in (5.08mm); part # CTB0158-9 |
|
SW3 |
DIP SWITCH |
channels 1; package dipswitch-02 |
|
SW4 |
DIP SWITCH |
channels 1; package dipswitch-02 |
|
Temp1 |
DS18B20 1-Wire Temperature Sensor |
part # DS18B20 |
|
Temperature , Digital IN/OUT |
Camdenboss CTB0158-8 |
hole size 2.7mm; variant 90° 8 connector; pins 8; package THT; pin spacing 0.2in (5.08mm); part # CTB0158-8 |
|
VAC |
Camdenboss CTB0158-2 |
hole size 2.7mm; variant 90° 2 connector; pins 2; package THT; pin spacing 0.2in (5.08mm); part # CTB0158-2 |
|
VDC |
Camdenboss CTB0158-2 |
hole size 2.7mm; variant 90° 2 connector; pins 2; package THT; pin spacing 0.2in (5.08mm); part # CTB0158-2 |
Water Leak Board BOM
|
Label |
Part Type |
Properties |
|
10K |
10KΩ Resistor |
resistance 10KΩ; bands 4; tolerance ±5%; package THT; pin spacing 400 mil |
|
J1 |
Screw terminal - 3 pins |
hole size 1.0mm,0.508mm; pins 3; package THT; pin spacing 0.137in (3.5mm) |
|
Particle Board |
Electron |
variant variant 5; pins 36; manufacturer Particle; name Electron; version 1.0.0 |
|
Temperature Sensor |
DS18B20 1-Wire Temperature Sensor |
part # DS18B20 |
Flow Meter Board BOM
|
Label |
Part Type |
Properties |
|
10K |
10KΩ Resistor |
resistance 220Ω; pin spacing 400 mil; package THT; bands 4; tolerance ±5% |
|
10K |
10KΩ Resistor |
resistance 220Ω; pin spacing 400 mil; package THT; bands 4; tolerance ±5% |
|
10K |
10KΩ Resistor |
resistance 220Ω; pin spacing 400 mil; package THT; bands 4; tolerance ±5% |
|
J1 |
Screw terminal - 3 pins |
pins 3; pin spacing 0.137in (3.5mm); package THT; hole size 1.0mm,0.508mm |
|
Mosfet |
MOSFET-NCHANNEL |
variant pth; package to-92 |
|
Particle Board |
Electron |
variant variant 5; manufacturer Particle; pins 36; name Electron; version 1.0.0 |
|
Temperature Sensor |
DS18B20 1-Wire Temperature Sensor |
part # DS18B20 |
Relay Board BOM
|
Label |
Part Type |
Properties |
|
10K |
10KΩ Resistor |
resistance 10KΩ; bands 4; tolerance ±5%; package THT; pin spacing 400 mil |
|
220ohm |
220Ω Resistor |
resistance 220Ω; bands 4; tolerance ±5%; package THT; pin spacing 400 mil |
|
J1 |
Screw terminal - 3 pins |
hole size 1.0mm,0.508mm; pins 3; package THT; pin spacing 0.137in (3.5mm) |
|
Particle Photon |
Electron |
variant variant 5; pins 36; manufacturer Particle; name Electron; version 1.0.0 |
|
Q2 |
NPN-Transistor |
type NPN (EBC); package TO92 [THT] |
|
Temperature Sensor |
DS18B20 1-Wire Temperature Sensor |
part # DS18B20 |
|
U8 |
RELAY |
variant pth4; package relay-jzc |
So now, after you've ordered all your parts, they have come in and you’ve soldered them. Let’s put them in their boxes and power them up.
The following pages are dedicated to building your boxes and programming the shut-off valve and flow meter.
Building the boxes


The Boards
Soldered sensor boards


Special Design Considerations

The Piezo vibration sensor was implemented for the non-penetration water flow part of the design challenge. I wanted to have the Piezo sensor detect vibration from the flowing water. To do that I designed a simple mechanical vibration magnification system which would amplify the vibrations of flowing water to readable levels. It will pick up environmental vibrations as well, such as people walking across floors, earthquakes, heavy construction nearby etc.

Figure 1
Fitting the boards into the boxes and wiring them up
I started by soldering longer wires to the flow meter to accommodate better placement.


The first box soldered up
Remember to test all your devices for faults and grounds before you plug your powered-up device into it!


The Particle Program for the Vibration Sensor (Particle IDE)
// This #include statement was automatically added by the Particle IDE.
#include <OneWire.h>
#include "DS18.h"
const int MOTION_TIMEOUT = 5000UL;
const int ledPin = D7;
const int MOTION_TIMEOUT1 = 5000UL;
DS18 sensor(D0);
unsigned long oldTime;
volatile unsigned int WaterPulseCount = 0;
const float pulsesPerLiter = 485;
const float pulsesPerLiter1 = 485;
#define WATER_SENSOR_PIN A1
#define WATER_SENSOR_PIN1 D2
float input_voltage = 0.0;
double VRaw;
float Vib =0;
float VibS =0;
float liters = 0;
char liters_S[6];
char freq[6];
int PezioPulseCount=0;
//
int PezioPulseCount1=0;
void WaterPulseCounter(void)
{
WaterPulseCount++;
}
void PezioPulseCounter(void)
{
PezioPulseCount++;
}
void setup()
{
Serial.begin(9600);
Particle.variable("Vib", freq, STRING);
Particle.variable("litersS", liters_S, STRING);
pinMode(WATER_SENSOR_PIN, INPUT);
attachInterrupt(WATER_SENSOR_PIN, WaterPulseCounter, FALLING) ;
oldTime = millis();
} void loop() {
char message[120];
String data = String (20);
if (sensor.read()) {
Serial.printf("Temperature %.2f C %.2f F ", sensor.celsius(), sensor.fahrenheit());
Particle.publish("Underside_Temperature", String(sensor.celsius()), PRIVATE);//You can adjust
("Temperature") to say what you want
delay(2500);
}
else {
if (sensor.searchDone()) {
Serial.println("No more addresses.");
} else {
}
}
unsigned long t;
static unsigned int pc;
t = (millis() - oldTime);
if(t >= 1000) {
//Read water sensor pulse count and process
if (WaterPulseCount != 0) // Do nothing if water is not flowing!
{
detachInterrupt (WATER_SENSOR_PIN);
liters = (WaterPulseCount / pulsesPerLiter) * (t / 100);
oldTime = millis();
pc = WaterPulseCount;
WaterPulseCount = 0;
attachInterrupt(WATER_SENSOR_PIN, WaterPulseCounter, FALLING);
sprintf(liters_S, "%4.3f", liters);
Particle.publish("Vibration_Level",liters_S,60,PRIVATE);
}
}
}
Testing the Program
Flash the Particle and flick the sensor a few times to see if it appears on the Particle screen.
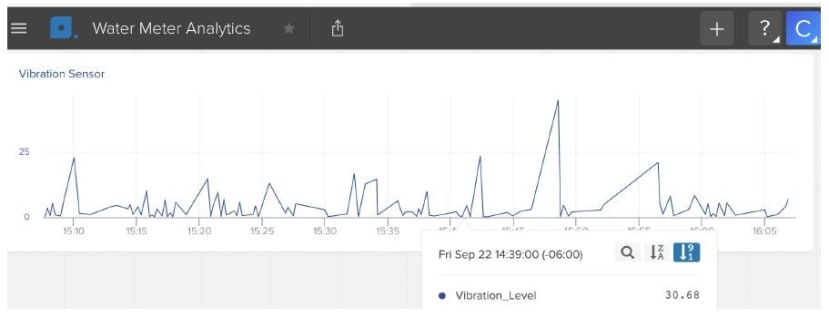
Vibration Test using Librato
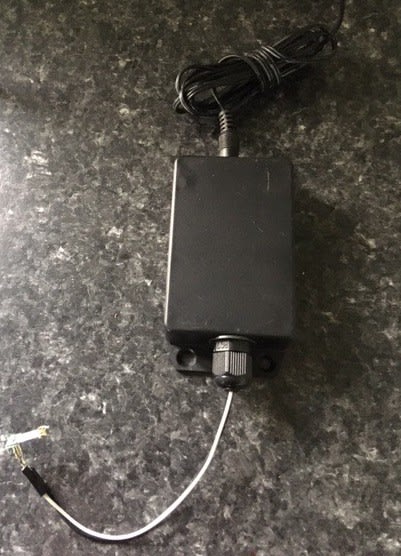
Water Vibration Sensor Box

Micro Vibration Sensor $7.00CAD
Sensor Shield with Power input without the Particle. Up to 20VDC Integral Temperature Sensor, Analog and Digital inputs.
Costs:
- Board $2
- Voltage Regulator $5
- Power input $2
- Temperature Sensor $11
- 4 pin Screw Connector $2
- Vibration Sensor $7
- Particle $19
- 18 Pin female headers $2
Total for Water Leak Sensor $49 CAD
The Battery Version is slightly more expensive but still within budget. The sketch differs a bit in that the Particle will sleep until there is an event… Then go back to sleep.

Costs:
- Board $2
- Voltage Regulator $5
- Power input $2
- Temperature Sensor $11
- 4 pin Screw Connector $2
- Vibration Sensor $7
- Particle $69
- 18 Pin female headers $2
Total for Water Leak Sensor $110 CAD
Particle Sensor Shield Powering up
Real analytics of vibration sensor mounted on water pipe:


Water Leak Sensor
Building the sensor box was relatively easy using small 10/32 bolts and nuts along with some stakeons. I made the box to sense small amounts of water. The following pictures show how it was built.

The sensors on the box bottom
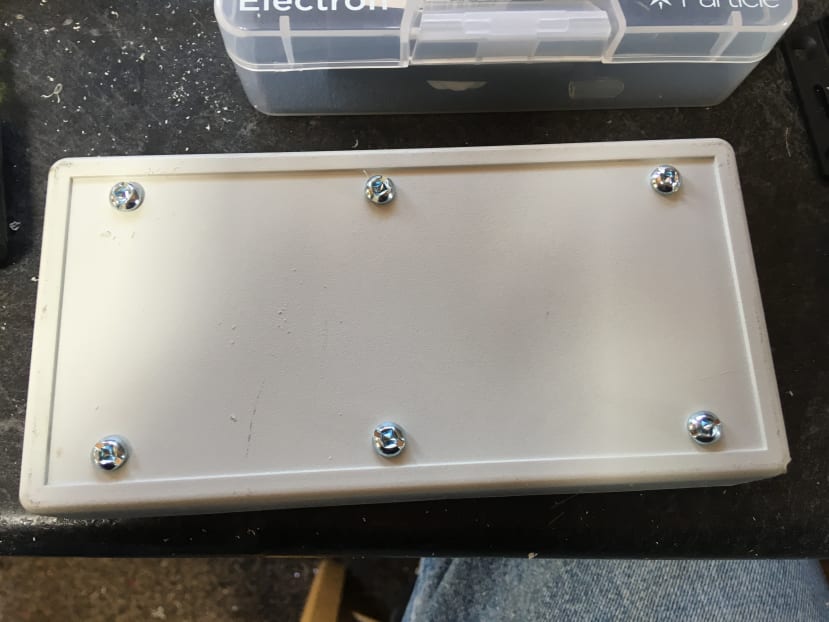
The completed box


Box sleeping and ready to transmit trouble
Alert Video
Security Shield and Program
The Security Shield is a basic design with up to 24VAC or 24VDC power input capability with
12VDC and 3.3VDC outputs and inputs to various devices. This unit is supplying power to four security PIRs, a battery and the water shut off solenoid under the house.

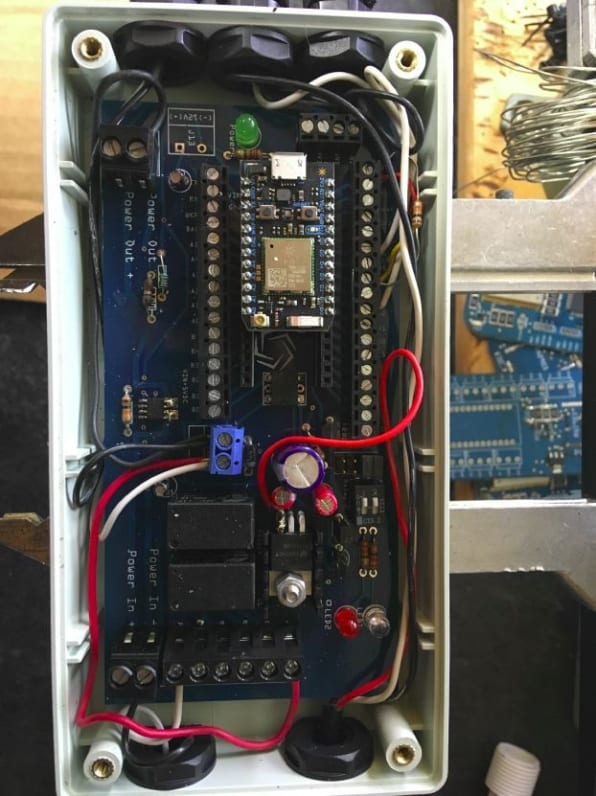
Security Shield with Raspberry Pi Zero mounted on it. The Pi is powered by the security shield. Its main function is to run the OpenHAB program and the Node-Red Program.

It's handy to have them both powered but the shield space is limited in a control cabinet.
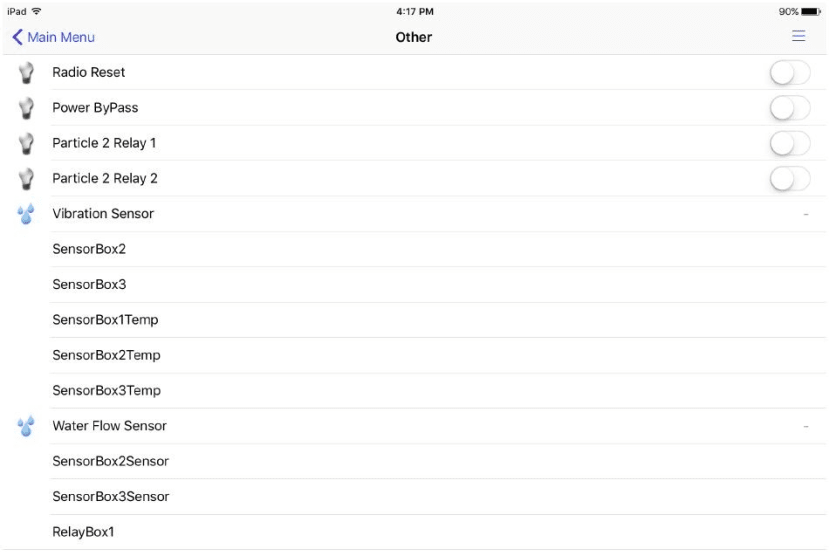
Screenshots of OpenHAB Program running on an IPad:

Links to tutorials for installing and running OpenHAB:


Node-Red

Node-Red is a simple intermediary between OpenHAB and the Particle Publish web cloud. This enables Particle and the Raspberry Pi Zero to do their work without using MQTT in the
Sketch, which I found was a little buggy at times. Both are programmed to start after reboot so it is self-starting following a reboot.
Thank you for considering my designs.