Google Coral USB Accelerator搭配树莓派4运行Embedded Teachable Machine – 上篇
关注文章
 戴夫来自 DesignSpark
你觉得这篇文章怎么样? 帮助我们为您提供更好的内容。
戴夫来自 DesignSpark
Thank you! Your feedback has been received.
戴夫来自 DesignSpark
There was a problem submitting your feedback, please try again later.
戴夫来自 DesignSpark
你觉得这篇文章怎么样?
|
作者 |
张嘉钧 |
|
难度 |
普通 |
|
材料表 |
树莓派4、Google Coral USB Accelerator |
Google Coral USB Accelerator
在我们分享的小项目中常常使用到树莓派来做AI的应用,但是树莓派终究没有个人计算机的效能强,所以我们常常需要使用额外的方式来加速它。常见的可能是软件加速,使用 Tflite、Onnx 等轻量化的模型、结构来减低硬件的负担,除此之外硬件也需要加速,我们以往最常使用的就是Intel Movidius以及Google Coral USB Accelerator,这两个产品都是可以透过USB端口连接到树莓派上协助AI加速,而我们今天就是要使用Coral USB Accelerator帮助我们树莓派运行AI。

我们总共提供了两个小范例让大家进行实作,第一个是透过之前一直在推的Teachable Machine网站来自己训练神经网络模型并且下载到树莓派进行Inference;第二个则是Teachable Machine搭配Coral推出的互动项目叫做Embedded Teachable Machine,透过迁移式学习的原理只需要使用少量data即可完成训练( 实测大概拍3~4张就可以完成 )。
Teachable Machine 介绍与使用
我们在RS文章中也曾撰写过
使用Google Teachable Machine 来实现树莓派4的影像分类推论
https://www.rs-online.com/designspark/google-teachable-machine-raspberry-pi-4-cn
但我们今天要着重在树莓派4 透过Coral加速Inference的部分,详细操作可以参考上面连结,这边将只会简单带过,在主要的差别只在于导出模型的部分。
前往Teachable Machine的网站,点选Get Started:

选择 Image Project:

进入之后将原本Class1、Class2的卷标改成想辨识的卷标,可以选择用Webcam拍照或是Upload照片的方式搜集数据:

我使用摄影机拍照的方式,而我的范例是有无口罩,按下「Hold to Record」即可开始拍照:

搜集完照片之后就可以进行训练了,将Advanced打开可以修改一些超参数,修改好就可以按下 Train Model按钮了:

接着可以稍微验收一下正确率:

接着可以点击Export Model进行汇出,这次我们选择的是Tensorflow Lite并且勾选EdgeTPU,按下Download Model之后,它会在云端进行转换最后下载完记得将压缩文件放到树莓派当中:

可以看到压缩文件的名称应该与我相符「converted_edgetpu.zip」,解压缩之后会获得两个档案,「model_edgetpu.tflite」、「labels.txt」,与以往导出tflite的模型不仅仅是名称上有不同结构也不同了。

如果要使用coral加速需要透过他们提供的方式将Tensorflow模型转换成EdgeTPU可用的模型,从下面的流程图就可以看到,我们训练完模型之后会进行导出的动作来取出最后的模型 (Frozen Gragh),接着使用Tensorflow Lite转换器进行转换变成Tensorflow Lite,再使用EdgeTPU编译程序进行编译成可兼容EdgeTPU的模型,最后才能使用Coral加速。
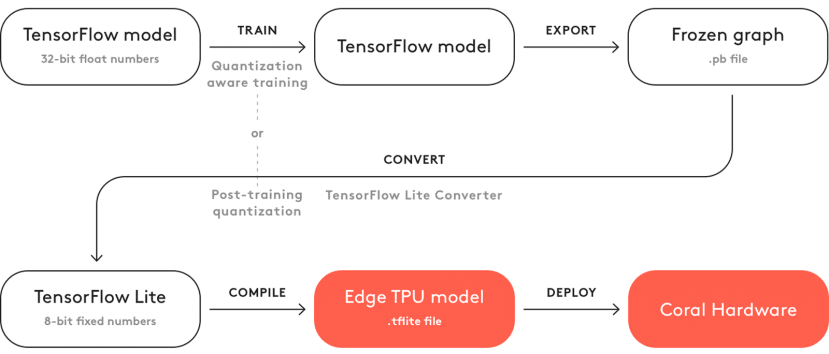
圖片取自Google coral原廠網站
是否相当的复杂?额且Tflite to EdgeTPU这段还只支持Linux的操作系统,所以如果选择要体验我一定会用Teachable Machine来运行,因为它在汇出的时候可以帮助我们完成上述繁琐的步骤。
回到正题,我们可以将刚刚解压缩的档案放到树莓派当中了,要写程序之前我们需要先进行安装edgetpu,详细的方式可以参考官网已经整理好给Debain用的流程。
先加入套件来源到系统当中:
echo "deb https://packages.cloud.google.com/apt coral-edgetpu-stable main" | sudo tee /etc/apt/sources.list.d/coral-edgetpu.list
curl https://packages.cloud.google.com/apt/doc/apt-key.gpg | sudo apt-key add -
sudo apt-get update
接着就可以进行安装了:
sudo apt-get install libedgetpu1-std
sudo apt-get install python3-pycoral
sudo apt-get install libedgetpu1-max
接着我们看到回到网页上使用它提供的范例程序,直接新增档案、复制贴上、稍微修改就可以用了!这边我新增了一个程序叫tm2_edgetpu.py并且将刚刚的数据都放进edgetpu_model文件夹当中;另外的程序是为了测试fps。

一开始先导入相关套件以及撰写常用副函式,loadLabels是负责读取标签文件并且输出对应的字典:
from edgetpu.classification.engine import ClassificationEngine
from PIL import Image
import cv2
import re
import os
# the TFLite converted to be used with edgetpu
modelPath = 'test/model_edgetpu.tflite'
# The path to labels.txt that was downloaded with your model
labelPath = 'test/labels.txt'
# This function parses the labels.txt and puts it in a python dictionary
def loadLabels(labelPath):
    p = re.compile(r'\s*(\d+)(.+)')
    with open(labelPath, 'r', encoding='utf-8') as labelFile:
        lines = (p.match(line).groups() for line in labelFile.readlines())
        return {int(num): text.strip() for num, text in lines}
classifyImage则是进行辨识,

edgetpu已经帮我们包装的很好了,有提供classification、detection两种引擎,详细的信息可以上他们的官方文件查看,在这里我们只需要呼叫它提供的图片分类引擎即可进行辨识:
# This function takes in a PIL Image from any source or path you choose
def classifyImage(image_path, engine):
    # Load and format your image for use with TM2 model
    # image is reformated to a square to match training
    # image = Image.open(image_path)
    image = image_path
    image.resize((224, 224))
    # Classify and ouptut inference
    classifications = engine.classify_with_image(image)
    return classifications
接着在main的部分整个个流程就是,宣告edgetpu的引擎、取得卷标的字典、宣告摄影机、将每一张的图片转换成模型可以输入的格式 (PIL格式、苏放大小、翻转)、丢进TPU引擎取得结果、将结果放置在影像上并且显示出来,接着计算FPS并且侦测是否按下q会离开循环。
def main():
    # Load your model onto your Coral Edgetpu
    engine = ClassificationEngine(modelPath)
    labels = loadLabels(labelPath)
    # 取得 CPU的频率,为了取得最准确的fps,最后要除以cpu的频率才正确
    freq = cv2.getTickFrequency()
    # 用于储存FPS的变量
    frame_rate_calc = 0
    # 取得摄影机对象
    cap = cv2.VideoCapture(0)
    # 如果摄影机开启
    while cap.isOpened():
        # 先储存一开始的时间
        t1 = cv2.getTickCount()
        # 取得画面,如果没有画面就跳出while
        ret, frame = cap.read()
        if not ret:
            break
        # 转成 PIL 格式,通常神经网络模型都是吃 PIL 格式
        cv2_im = frame.copy()
        pil_im = Image.fromarray(cv2_im)
        # 缩放到模型输入大小,并且水平反转与训练时相同
        pil_im.resize((224, 224))
        pil_im.transpose(Image.FLIP_LEFT_RIGHT)
        # 进行辨识,最后获得结果
        results = classifyImage(pil_im, engine)[0]
        # 遇显示在影像上的内容
        print_res = f'FPS: {frame_rate_calc:.2f} , Lable: {labels[results[0]]}'
        # 将 FPS 画在影像上并显示
        cv2.putText(frame, print_res, (30,50),cv2.FONT_HERSHEY_SIMPLEX,1,(255,255,0),2,cv2.LINE_AA)
        cv2.imshow('frame', frame)
        # 计算 FPS (framerate)
        t2 = cv2.getTickCount()
        time1 = (t2-t1)/freq
        frame_rate_calc= 1/time1
        if cv2.waitKey(1) & 0xFF == ord('q'):
            break
    cap.release()
    cv2.destroyAllWindows()
if __name__ == '__main__':
    main()
运行的结果如下,基本上FPS如果在30以上人眼就会觉得顺畅了:

同时,我们也与tflite的版本进行对比,可以看到有没有加Coral的差距式显著的,FPS平均会降到15左右,可以明显感受到延迟:

结语
使用Teachable Machine来练习Coral是不是相当的容易呢?程序代码的地方也是相当的简单,只需要汇入edgetpu的函式库就可以轻松搞定。让我们中场休息一下,下一篇我们再使用另一个交互式的小项目来练习!
相关文章
用 Google Coral USB Accelerator 搭配 Raspberry Pi 实作 Teachable Machine