DesignSpark PCB Routing Hints and Tips
Follow article
 Dave from DesignSpark
How do you feel about this article? Help us to provide better content for you.
Dave from DesignSpark
Thank you! Your feedback has been received.
Dave from DesignSpark
There was a problem submitting your feedback, please try again later.
Dave from DesignSpark
What do you think of this article?
You are busily creating a design using your free copy of DesignSpark PCB, but you can’t remember how to deal with routing? Fresh from the pages of DSPCB Zendesk are a few hints and tips that might help you out of your predicament.
How can I route my PCB?
Your design can be routed manually or automatically. This is the process of converting the electrical point-to-point connections into physical copper ‘tracks’.
Automatic Routing
The Auto route option is used to convert your nets into electrical tracks as you can with manual routing. However, in dense designs, it can save you many hours or days of work. The auto-router can often take an unrouted design and route it within minutes.
You can use the auto-router in many modes; on All Nets in the design, on Browsed Nets, Browsed Net Classes, on selected nets and on components.
TO USE THE AUTO-ROUTER
From the Tools menu under Auto Route Nets >, select All Nets.
Leave the default settings as they are:
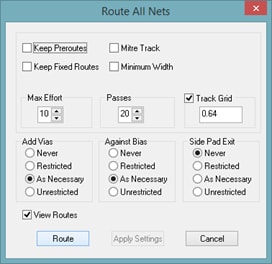
Simply click the Route button at the bottom of the dialogue to start the router.
The results are quickly displayed:
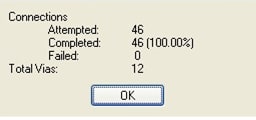
Click OK to close the report dialogue box and view the routes.
Manual Routing
DesignSpark PCB has a set of powerful manual routing tools to aid this process. These tools allow you to swap layers, automatically add vias on layer swaps and edit track thickness.
TO START ROUTING TRACKS MANUALLY
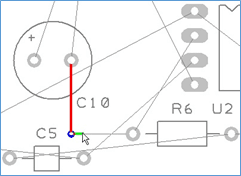
To start adding tracks, double-click on a connection, this is the quickest method to start routing, other methods are available.
Alternatively, you can click on the icon in the left pane menu:


Click the mouse once, this places the first track segment. This is temporarily ‘locked’ in place for this routing session. It can be moved or edited later on.

Now we will add a track layer change.

Press the ‘L’ key on the keyboard and the Track Layer dialogue is displayed. During normal routing where a layer change from one side to the other is required, a simple ‘L’ followed by <Enter> is all that is required. The Enter button is the same as clicking OK on the dialogue. In time you will be able to change layers without looking at the dialogue.
A via has been added automatically and the track layer is now on the bottom side. This will be displayed on the Status bar at the bottom of the DesignSpark window.
When over the target pad, click once to finish the track editing for this connection. Note the track colour is now red again, showing it is on the top layer.
After the track has been added, it can always be modified afterwards by picking and dragging the track or by double-clicking on the track to edit it.
Read and comment on the original article on DS PCB Zendesk
How can I change routing modes?
During routing, the mode can be changed by accessing the routing mode menu. Select the Segment Mode > from the shortcut menu and choose the mode from the choice of five available (Free, Orthogonal, Right-Angle, Mitre & Filet).

If using the Mitre mode for routing, it may now look like this:

View on Zendesk
How can I unroute my PCB?
You may sometimes have a requirement to unroute all or part of the design. Unrouting is the process of removing tracks leaving only the connections remaining.
The Unroute Nets > option is available within the Tools menu, offering three options to control the required amount of unrouting.
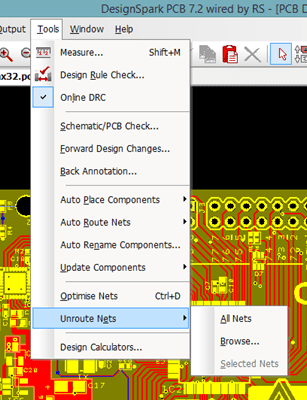
You can choose between unrouting all nets, choosing exactly what net you would like to unroute or unroute the net (or nets) you previously selected. To select more than one net you need to click on the nets you want to select while pressing Ctrl key.
View on Zendesk
How can I unroute the design?
Select the Unroute Nets > All Nets option on the Tools menu to unroute the whole design removing all of the tracks already routed. Three Unroute options are available to control the amount of unrouting required – All Nets, Browse and Selected Nets.
Don’t forget, once unrouted, you can always restore the previous routes using Undo <Ctrl-Z>.