Zerynth Brings Python Convenience to PSoC 6 Wi-Fi BT Pioneer
Follow article
 Dave from DesignSpark
How do you feel about this article? Help us to provide better content for you.
Dave from DesignSpark
Thank you! Your feedback has been received.
Dave from DesignSpark
There was a problem submitting your feedback, please try again later.
Dave from DesignSpark
What do you think of this article?

First look at recently announced Zerynth support for featured packed PSoC 6 kit.
The combination of Cypress PSoC and Zerynth middleware provides a powerful platform for rapid IoT development, that benefits from advanced hardware capabilities, Python ease-of-use and expansive ecosystem, a real-time O/S with multithreading, cloud integration, and OTA updates.
PSoC Primer

Image source: Cypress Roadmap: PSoC and MCU Portfolio.
The Cypress PSoC (programmable system-on-chip) combines an MCU with configurable analogue and digital peripherals, to create a powerful platform for highly integrated, low power solutions. As such it has proved popular in mass market consumer electronics, such as Apple AirPods.

Image source: Cypress Roadmap: PSoC and MCU Portfolio.
PSoC 6 is the latest family of devices and specifically targets wearables and IoT applications, featuring an Arm Cortex-M4 main application processor, paired with a low power Cortex-M0+ that can be used for functions such as running a BLE stack and capacitive touch sense. Plus of course configurable analogue and digital blocks, along with programmable I/O routing and interconnect.
This combination of resources makes it possible to reduce the bill of materials and physically shrink solutions, while simultaneously reducing power consumption as functions are implemented in the most efficient way, be it on the main or auxiliary processor, else via hard analogue or digital blocks.
PSoC 6 Wi-Fi BT Pioneer kit
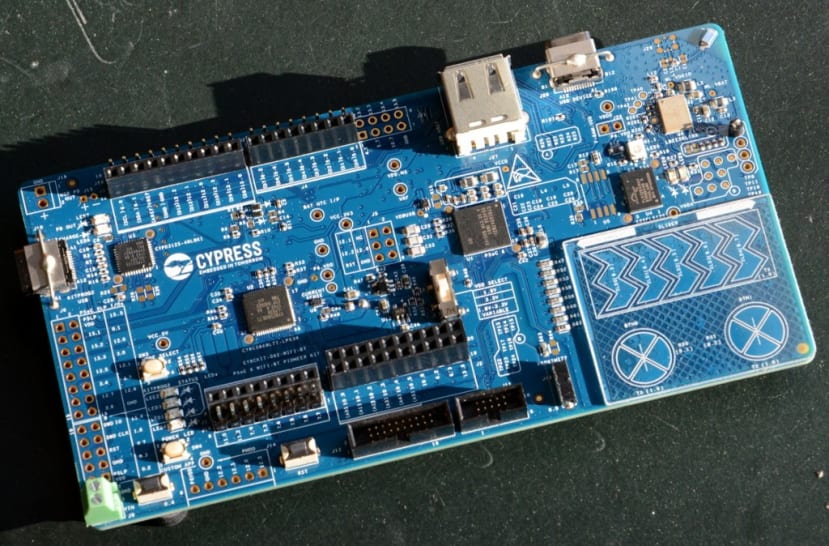
In addition to a PSoC 6 the Wi-Fi BT Pioneer kit (175-4669) key features include:
- Expansion headers that are compatible with Arduino Uno 3.3-V shields1 and Digilent® Pmod™ modules.
- Type 1DX ultra-small 2.4-GHz WLAN and Bluetooth functionality module.
- 12-Mbit external quad-SPI NOR flash that provides a fast, expandable memory for data and code.
- KitProg2 onboard programmer/debugger with mass storage programming, USB to UART/I2C/SPI bridge functionality, and custom applications support.
- EZ-PD CCG3 USB Type-C power delivery (PD) system with rechargeable lithium-ion polymer (Li-Po) battery support.
- CapSense touch-sensing slider (five elements) and two buttons, all of which are capable of both self-capacitance (CSD) and mutual-capacitance (CSX) operation, and a CSD proximity sensor that allows you to evaluate Cypress’ fourth-generation CapSense technology.

The kit also comes supplied with an Arduino shield that packages a 2.4” TFT display together with 3-axis accelerometer/gyroscope, PDM microphone input, 32-bit stereo codec and more.
The standard development options are PSoC Creator IDE and WICED Studio, both of which use a C toolchain. However, we are interested in the brand new support for Python-based development via Zerynth and next we’ll take a look at setting up the development tools.
Zerynth Studio

What follows is a summary of the steps taken to install the Zerynth Studio on Ubuntu Linux, but note that it can also be installed on MS Windows and Mac OS.
We started by creating a new directory:
$ mkdir ZerynthThen downloaded the software and saved it to this location. Following which extracted the archive and started installation.
$ cd Zerynth

$ tar xvf zerynth.tar.xz

$ ./zerynth
We then chose to perform an online installation, selected the latest version and once this had completed, launched the application. A Zerynth user account is required and handily we can log in with a DesignSpark account!
A couple of additional steps were required to configure udev for device access. First a new rules file was created.
$ sudo vi /etc/udev/rules.d/99-kitprog2.rulesWith the contents:
# Match KP2 PID/VID

SUBSYSTEMS=="usb", ATTRS{idVendor}=="04b4", ATTRS{idProduct}=="f148", ENV{CY_KP2_PID_VID}="f148:04b4"

# Match KP2 CMSIS-DAP

SUBSYSTEMS=="usb", ATTRS{interface}=="KitProg2 CMSIS-DAP", ENV{CY_KP2_PID_VID}=="f148:04b4", MODE="0666"
Following which the udev rules were reloaded.
$ sudo udevadm control --reload-rules && udevadm triggerAt this point the board was plugged in and this resulted in a file manager window opening as the on-board flash was mounted as USB storage. More importantly, in the Device field at the top of Zerynth Studio, we could select the drop down list and find PSoC6 WiFi-Bt Pioneer Kit available under Physical Devices.
Easy as 1-2-3
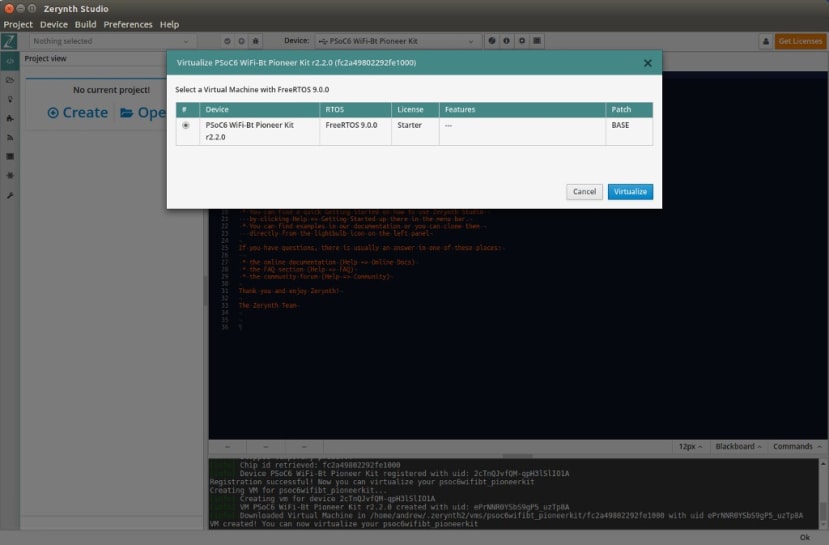
There are three initial steps that must be performed in readiness for loading an application and these are all carried out via the the same toolbar button with a Z icon, located to the right of the Device drop-down. On first press this puts a registration firmware on the target, obtains a unique ID for the microcontroller and then registers it with the Zerynth backend.
On the second press we are prompted to create a virtual machine (VM).
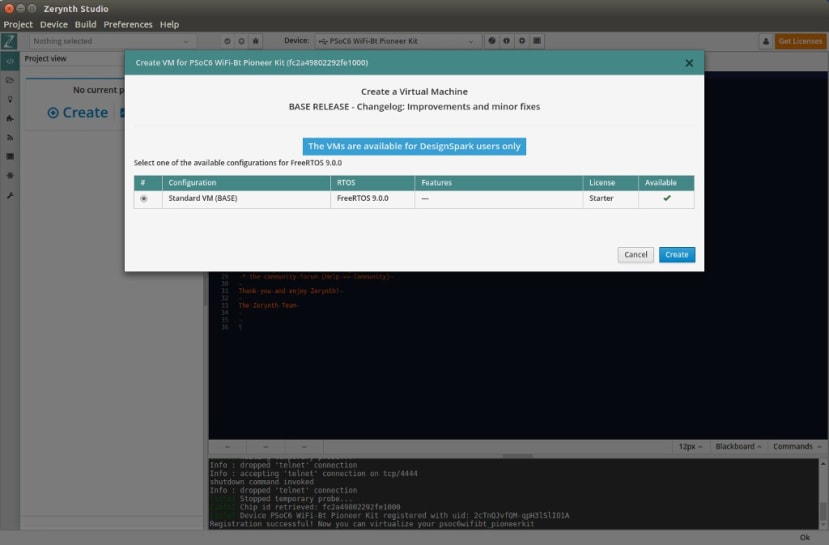
Finally, on third press we select the VM that we would like to use.
Now we are ready to run our first Zerynth application!
First steps

A selection of examples are accessible via the light bulb icon in the left-hand toolbar and these include both a classic Hello World — which uses the serial console for output — and the more typical for embedded platforms, LED blink. Upon clicking on an example the project description and contents of main.py are displayed, following which you can select to clone a copy locally.
pinMode(LED0,OUTPUT)

# loop forever
while True:
    digitalWrite(LED0, HIGH)  # turn the LED ON by setting the voltage HIGH
    sleep(1000)               # wait for a second
    digitalWrite(LED0, LOW)   # turn the LED OFF by setting the voltage LOW
    sleep(1000)               # wait for a second
Above we can see the blink example, which should look reassuringly familiar to anyone who has worked with Arduino and the Programming Guide explains how this was an inspiration when it came to pin and function naming.
To verify our project we click the tick mark icon in the top toolbar and following which can load this onto the target by pressing the Uplink button with the up-arrow icon.

Sure enough, after a short delay LED5 starts to flash.
Other basic examples include digital and ADC read, along with more advanced examples which demonstrate use of multi-threading and timers, for example.
Getting more advanced

At the time of writing there is a single PSoC-specific example, which demonstrates how to read the CapSense buttons and slider on the Pioneer kit. Along with this there is also a healthy selection of more advanced generic examples which show off Zerynth Standard Library capabilities, such as RTC and filesystem support, interrupts, cryptography, power saving, and the C language interface which allows mixing C and Python code in the same project.
There are also Official Libraries which add support for a variety of IoT platforms, Ethereum Blockchain, various sensors, along with incredibly handy standards such as Modbus and MQTT. There is also support for publishing Community Libraries to, and installing them from, GitHub.
One particularly neat capability that we’ll save for a future post is the Zerynth Advanced Device Manager (ADM), which provides high level functionality for managed Over The Air (OTA) updates, remote procedure call — where a hosted JSON RPC interface can be used to remotely call a Python function on the device! — and per device user interfaces.
Of course, something else that we’ve not explored yet is the configurable analogue and digital blocks that the PSoC platform is noted for. It appears as though, at the present time at least, these would need to be configured using the official Cypress tools. However, this aspect of the device configuration would presumably be far more static in configuration than the firmware.