Raspberry Pi Hand Detector Switch
Follow article
 Dave from DesignSpark
How do you feel about this article? Help us to provide better content for you.
Dave from DesignSpark
Thank you! Your feedback has been received.
Dave from DesignSpark
There was a problem submitting your feedback, please try again later.
Dave from DesignSpark
What do you think of this article?
| Author | Dan |
| Difficulty | Moderate |
| Time required | 1.5 hours |
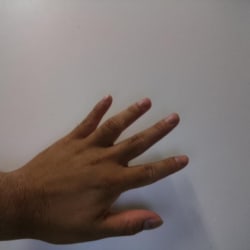
In recent years, the use of Raspberry Pi in different applications rapidly evolved. Now, people are starting to study more mature topics, such as using Raspberry Pi for deep learning applications. In this article, we want to learn how to use Raspberry Pi for a basic deep learning application such as image classification. As a very simple example, we pre-trained a simple hand recognition model using convolutional neural networks (CNN). Here are the sample training images:
 |
 |
| Hand | Others |
The goal of this article is to demonstrate a sample deep learning application using Raspberry Pi for processing the images. We want to recognize the images seen by the Raspberry Pi camera and classify them into hand or others. In this case, others are any other objects that are in front of the white background. Once we detect the hand, we can turn on/off a relay to switch on/off an electrical device.
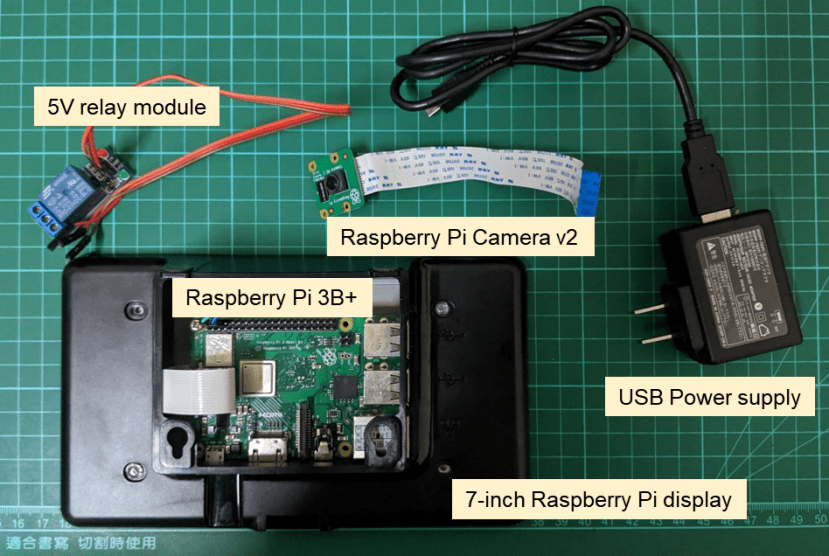
Here are the components that we will use for this project:
Materials and components
- Raspberry Pi 3B+ (137-3331)
- Raspberry Pi Camera v2 (913-2664)
- 16GB (or 32GB) SD Card (blank)
- USB power supply
- 7-inch Raspberry Pi display (111-5927)
- 5V relay board
Miscellaneous:
- SD card reader
Instructions:
STEP 1: Clone our Raspbian OS img
To avoid spending too much time with the installation of libraries, packages, etc., we prepared a backup .img file that can be copied directly to your SD card. This is more advisable since the installation of Python libraries in Raspberry Pi can be very tedious and time-consuming.
1.1 First, download our .img file :
https://drive.google.com/drive/folders/1BHYqwTJtz7ipFddYJ2rRp8wxOiB0yinK?usp=sharing
1.2 After doing so, download Win32 Disk Imager if you haven’t done so.
https://sourceforge.net/projects/win32diskimager/
1.3 After installing Win32 Disk Imager, open it and insert your SD card reader to your computer. Using its GUI, find and select our .img file. For the device option, use the drive letter of the SD card you have just inserted. WARNING: Make sure the drive letter corresponds to your SD card, otherwise you might erase your hard drive data. Afterward, click the Write button and wait for it to finish. This process may take 20-25 minutes depending on the read/write speed of your SD card and SD card reader.

STEP 2: Preparing and connecting the hardware
2.1 This time, insert your newly copied SD card to your Raspberry Pi. Better do this before assembling the screen or else you have to open the screen case again. Also, connect the Raspberry Pi Camera to your Raspberry through its camera slot like this:

2.2 Reassemble and close your screen case (you may refer to our previous articles for this part) and put the camera on the top camera holder of your screen case. This comes in very handy so that you don’t have to buy a separate camera case for your Raspberry Pi camera.
2.3 Next, connect your relay board to your Raspberry Pi following the pinouts shown in this image:

Depending on your relay board, the VCC, GND, and IN should be almost the same. For the Raspberry Pi GPIO, you can always switch it to another pin besides GPIO17 if you already have something else connected and change it in the program codes.
STEP 3: Demo time
3.1 Since we are skipping the time-consuming steps of installing libraries in Raspberry Pi, we go straight to testing our program. Turn on your Raspberry Pi and wait until the desktop shows up and see something like this:

From here on, open your File Manager.

3.2 Go to /home/pi/hand_switch/ and open hand_switch_demo.py using Spyder3 or any other IDE you prefer.

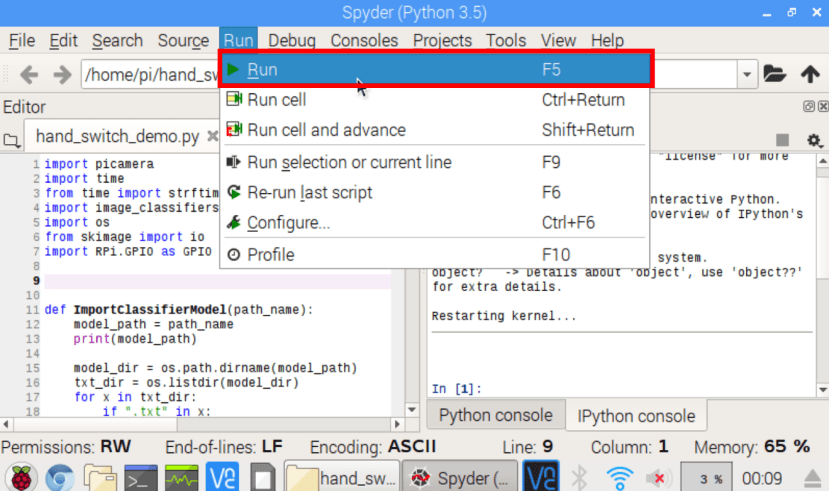
3.3 Once your IDE is open, go and click Run -> Run
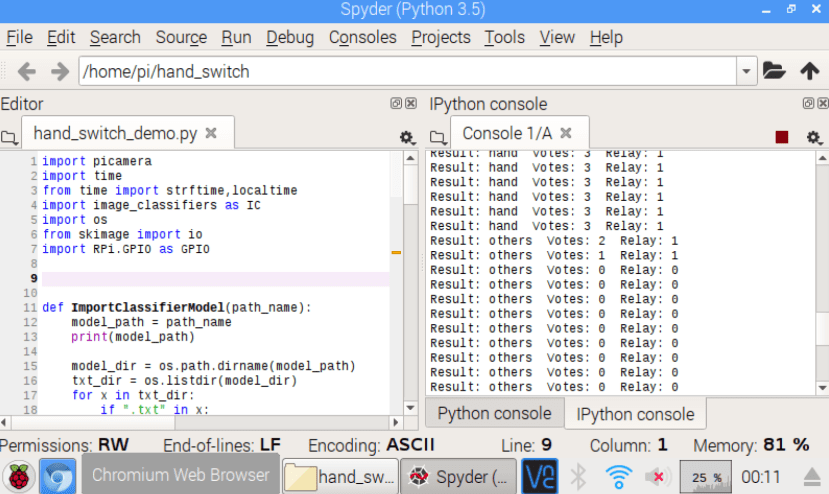
3.4 Check the output from your console and try putting your hand in front of the camera. The current model used in this demo is trained with hand images in front of a white background. So do not expect the model to be very accurate in other kinds of images. A sample video is also provided in this article.
STEP 4: Theory and code explanation
To develop this project, we had to prepare a convolutional neural network (CNN) model to identify the hand. Here are the step-by-step procedures:
1. Collect images using the Raspberry Pi v2 camera
- We collected 150 hand images and 150 other images
2. Trained a CNN model using the sorted images
- We trained the model using a desktop PC with GPU by the support of Keras and Tensorflow in Python 3.5
3. Copied the trained model to the Raspberry Pi
These steps are quite complex and may take some time to learn. An in-depth explanation about these parts shall be shown in our future article.
In summary, this is how the program we’ve made works:

The original image is an image obtained by the Raspberry Pi every second. The image is then resized into a 128 x 128 image to be processed using the CNN model. The CNN model identifies whether the image is a hand or not.
Here are the codes, together with some annotations:
# Calls necessary Python libraries
import picamera
import time
from time import strftime,localtime
import image_classifiers as IC
import os
from skimage import io
import RPi.GPIO as GPIO


# Function to load the CNN model and its label .txt file
def ImportClassifierModel(path_name):
    model_path = path_name
    print(model_path)

    model_dir = os.path.dirname(model_path)
    txt_dir = os.listdir(model_dir)
    for x in txt_dir:
        if ".txt" in x:
            txt_fname, extension = os.path.splitext(x)
            if txt_fname in model_path:
                label_path = model_dir + "/" + txt_fname + ".txt"
    print(label_path)

    model = ""
    try:
        model = IC.ImportGraph(model_path)
        class_names = IC.load_labels(label_path)
    except Exception as e:
        print(e)
    return model, class_names


# Load classifier model and class names
PATH_TO_CLASSIFIER = "/home/pi/hand_switch/hand_cnn_22.h5"
target_model, class_names = ImportClassifierModel(PATH_TO_CLASSIFIER)

# Initializes camera
try:
    camera.close()
except:
    pass
camera = picamera.PiCamera()
camera.resolution = (640, 640)

# Set up gpio
RELAY = 17
GPIO.setmode(GPIO.BCM)
GPIO.setup(RELAY, GPIO.OUT)


# Other variables
# required_votes is a variable you can set to set the sensitivity of the switch.
# This means that after 3 hand consecutive classifications, the switch is turned on.
# This prevents the program to keep on switching on and off such as breaking your connected device.
second_prev = 0
hand_votes = 0
required_votes = 3

while 1:
    time_now = strftime("%Y/%m/%d %H:%M:%S", localtime())
    img_filename = strftime("%Y_%m_%d %H_%M_%S", localtime())
    second_now = strftime("%S", localtime())


    # Runs the classification every second
    if (second_now != second_prev) and (int(second_now) % 1) == 0:
        time.sleep(0.01)
        FILENAME = "/home/pi/hand_switch/input.jpg"
        camera.capture(FILENAME, resize=(640, 640))

        input_image = io.imread(FILENAME)
        input_image = (input_image[:,:,::-1])
        image_tensor = IC.load_classify_image(input_image, 128)

        image_class, score = target_model.predict_by_cnn(image_tensor, 0.5, class_names[0:(len(class_names))])

        if image_class == "hand":
            hand_votes = hand_votes + 1
        else:
            hand_votes = hand_votes - 1
        hand_votes = max(hand_votes, 0)
        hand_votes = min(hand_votes, required_votes)

        if hand_votes >= required_votes:
            GPIO.output(RELAY, 1)
        if hand_votes <= 0:
            GPIO.output(RELAY, 0)
        RELAY_STAT = GPIO.input(RELAY)

        print("Result: " + image_class, " Votes: " + str(hand_votes), " Relay: " + str(RELAY_STAT))


    second_prev = second_now
Check out our next article taking you through how to perform hand classifier model training, now!