Pop-Up Particle Pavilion Part 3: Build your own & Reflections
Follow article Dave from DesignSpark
How do you feel about this article? Help us to provide better content for you.
Dave from DesignSpark
Thank you! Your feedback has been received.
Dave from DesignSpark
There was a problem submitting your feedback, please try again later.
Dave from DesignSpark
What do you think of this article?
This is the third and final article about my air quality pop-up pavilion, and what a journey it has been.
Below you find my reflections on the project as well as the pavilion assembly instruction files, the components/wiring up diagram, links to the code used, the links to the various platforms & download sites that were used, and the GitHub link where the whole project including the design files can be found.
My Reflections
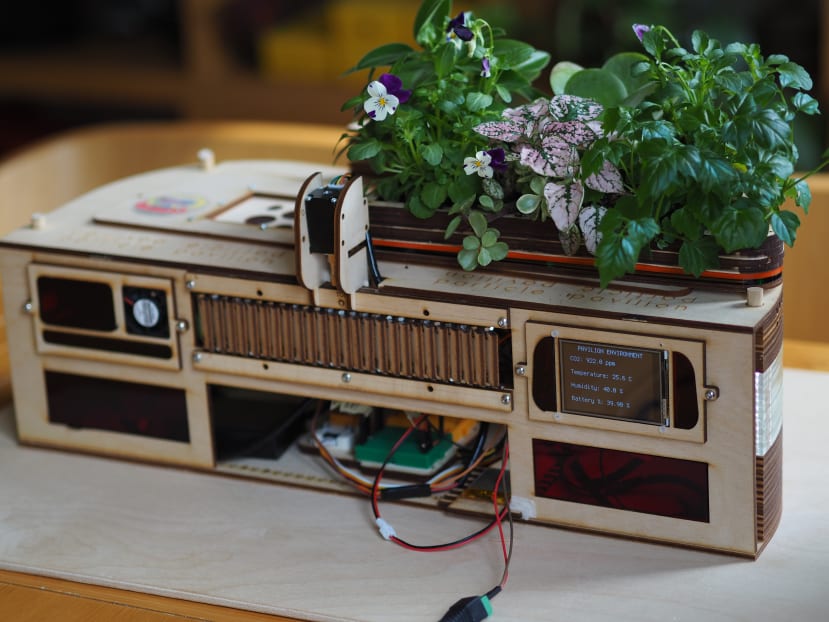
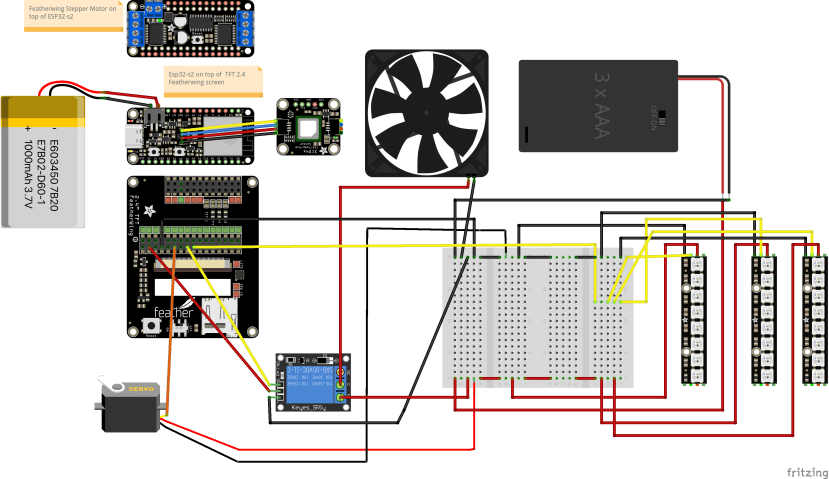
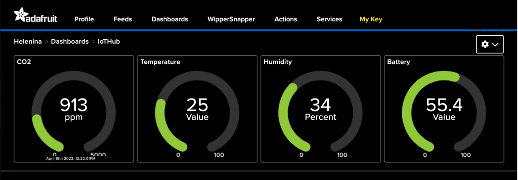
I produced a scaled-down pavilion that uses an internal sensor to monitor & then trigger various reactions to the CO2 levels from inside. The reactions include opening & closing motorised shutter walls, an automatic sliding skylight, a ventilation fan & colour-coded CO2 level warning lights. I have used stepper motors & servos to generate the movement and an Adafruit ESP 32-S2 as the brain stacked with a TFT screen to display the air quality data from the wall of the pavilion. The data is also visualised via IoT on Adafruit IO. In the end, the design worked as expected but I had to experiment with several different stepper motors and ways of mounting them until I found a good combination. I leant about linkages & couplings and designed several laser cut components & mechanisms which I will be able to use in the development of a more streamlined kit version of the pavilion that I will use to deliver workshops to other young people.
I coded the project using Circuit Python to control the stepper motors, the servos, the Neopixels, the fan, the CO2 sensor and the TFT screen. I also used CircuitPython to code the visualisation of the date on Adafruit IO.
I worked on the project in short but regular sessions over a four-month period and was able to dedicate longer periods of time to it during school breaks.
I think I should have reached out to organisations/companies that specialise in stepper motors, this would have helped me to find appropriate motors quicker, perhaps finding smaller or more efficient motors.
Testing my finished pavilion was done by altering the internal CO2 levels (a lot of heavy breathing through the pavilion windows). The code had to be tweaked several times to achieve the correct fully open and fully closed positions for the moving shutter walls and the sliding skylight.
I am considering adding a sound alert for the workshop version of the pavilion.
I will definitely continue to develop the project into a workshop format to engage other young people. A streamlined version of the scaled-down pavilion model has the potential to go to market as an educational tool.
I designed lots of individual parts, for exam[ple the stepper motor mounts/housing, these can be used to secure similar stepper motors to other projects/products. The moving shutter walls can be scaled up or down and applied to future ideas & projects, and so can the sliding skylight mechanism.
I developed some very useful joining techniques that allowed me to create large components from several small pieces of material, making use of scrap materials whilst reducing waste.
I became more aware of good & bad CO2 levels and the importance of good ventilation.
I experimented with a lot of new functions on the CAD software, some of which I applied while designing the different components.
I used a lot of cardboard models to help visualise the different sections of the pavilion structure, so my modelling skills have definitely improved. I really enjoyed seeing my cardboard mock-ups develop into neat, precise laser-cut components, and seeing the shutter walls opening & closing on their own was satisfying.
My overall problem-solving skills were tested as there were so many different elements that needed to fit together properly and the code to work altogether.
I would like to collaborate with groups or individuals in order to build a small human-sized version of the pavilion which could be tested in a real situation.
It was very challenging to design the pavilion in a way that all of the different features & main electronic components could be easily accessed without having to do a lot of major dismantling. Making several cardboard sketch models help me to gradually figure out and quickly try out ideas, and then make modifications.
My advice to anyone considering a similar project is to ask the industry specialist to share their insights. This is something that I’ll definitely do on my next project!
Assembling the Pavilion
The design for assembling the Pavilion can be found in the Design files folder:
https://github.com/Avmaker/Pavilion/tree/main/Design%20files
The Wiring

Running CircuitPython on Adafruit ESP32-S2 Feather
Guide on how to get CircuitPython running on the ESP32-S2 board
https://learn.adafruit.com/adafruit-esp32-s2-feather/circuitpython
Install CircuitPython 7.2.5:
Guide:
https://circuitpython.org/board/adafruit_feather_esp32s2/
Install Mu Editor
Mu is a simple code editor that works with the Adafruit CircuitPython boards. It's written in Python and works on Windows, macOS, Linux, and Raspberry Pi.
Download Mu from https://codewith.mu.
The CIRCUITPY Drive
https://learn.adafruit.com/adafruit-esp32-s2-feather/the-circuitpy-drive
The CIRCUITPY drive is where your code and the necessary libraries and files will live. You can edit your code directly on this drive and when you save it, it will run automatically. When you create and edit code, you'll save your code in a code.py file located on the CIRCUITPY drive.
With a fresh CircuitPython install, on your CIRCUITPY drive, you'll find a code.py file containing print("Hello World!") and an empty lib folder.
CircuitPython looks for code.py and executes the code within the file automatically when the board starts up or resets. Following a change to the contents of CIRCUITPY, such as making a change to the code.py file, the board will reset, and the code will be run.

CircuitPython Libraries needed for the Pavilion Project
Libraries are stored on your CIRCUITPY drive in a folder called lib.
You can download the latest Adafruit CircuitPython Library Bundle here: https://circuitpython.org/libraries
Download Bundle for Version 7.x
The libraries that will be needed for the Pavillion project are listed below. Copy them from the bundle and include them into your lib folder.

The Code
https://github.com/Avmaker/Pavilion/blob/main/Code/code.py
Data visualisation - Display data in real-time, online
https://github.com/Avmaker/Pavilion/blob/main/Code/pavilion_iot.py
(to run, change name to code.py)
Adafruit Platform
You will need to create an account on adafruit.com
Secrets.py File
It allows you to store your WiFi network's SSID and password, along with other sensitive information, separately from your main program, so that you don't accidentally share your info when sharing your code.
Head to io.adafruit.com and simply click the View AIO Key link on the left-hand side of the Adafruit IO page to get this information.
You will need your network information, as well as an Adafruit IO account. Your Adafruit AIO information and your location will also be placed in the file.
Using Mu or any text editor, you should add your Adafruit IO Username and Adafruit IO Key to the secrets.py file.
Once you have logged into your account, there is information you'll need to place in your secrets.py file: Adafruit IO username, Adafruit IO key, broker, MQTT port, MQTT username and MQTT password in the secrets.py file.
Your secrets.py file should look similar to this:
secrets = {
    ‘ssid’ : ‘your SSID here’,
    ‘password’ : ‘Your password here’,
     ‘aio_username’ : ‘your aio username’,
    ‘aio_key’ : ‘your aio key’,
    ‘broker’: “io.adafruit.com” ,
    ‘mqtt_port’: 8883,
    ‘mqtt_username’: ‘your aio_username’,
    ‘mqtt_password’: ‘your aio_key’,
    }
Save your secrets.py file in your CIRCUITPY root file
Adafruit IO set up
https://learn.adafruit.com/welcome-to-adafruit-io/getting-started-with-adafruit-io
Head over to io.adafruit.com and click Sign In to log into IO using your Adafruit account. It's free and fast to join.
Create Feeds & Dashboard
Feeds
- Follow the Adafruit guide here: https://learn.adafruit.com/adafruit-io-basics-feeds

Dashboards
- Follow Adafruit guide here: https://learn.adafruit.com/adafruit-io-basics-dashboards
The Code
https://github.com/Avmaker/Pavilion/blob/main/Code/pavilion_iot.py
The GitHub Project Link
https://github.com/Avmaker/Pavilion
Thank you!
It has been intense, fun & a fantastic learning opportunity. A huge thank you to DesignSpark for the opportunity, and to my parents for all of their support throughout the project.