Kickstart Kamper: Building a Sink Unit with Electric Water Heater
Follow article
 Dave from DesignSpark
How do you feel about this article? Help us to provide better content for you.
Dave from DesignSpark
Thank you! Your feedback has been received.
Dave from DesignSpark
There was a problem submitting your feedback, please try again later.
Dave from DesignSpark
What do you think of this article?
Water is a valuable and seemingly limitless resource that is often taken for granted in the developed world. The convenience of having clean drinking water literally on-tap means we don’t have to worry about consumption, but at what cost? In a previous article, we touched on the topic of water quality and the intense range of processes required to produce safe drinking water. In much the same way, the treatment of wastewater is also an area of concern, where these processes have been shown to have a profound effect on the environment where poorly managed.
In the UK, market forces have shown that it is more cost-effective for privately operated water utilities to discharge untreated wastewater overflows into native waterways than it is to invest in updated infrastructure. While accepting any personal responsibility for this behaviour as a consumer would be greenwashing, it is nonetheless interesting to consider the environmental cost of clean water.
In this regard, we rarely talk about water as a finite resource, so I would like to create an environment where it is. To do this, I am building an off-grid water system as part of the Kickstart Kamper project, where this particular article will focus on building a sink unit and water heater in the interest of studying water processing and consumption in a more controlled environment. This article also aims to explore the feasibility of low-impact water systems and their ability to produce hot and cold water as a reliable alternative to mains infrastructure.
VLOG
Subscribe to the Kickstart Kamper Youtube channel for more updates.
Parts List
- Aluminium 30mm profile
- Cube connectors
- M6x12 countersunk screws
- M6 T-slot nuts
- Magnetic snaps
- Plastic insert
- 3mm plywood
- 12mm plywood
- Sink basin
- Under sink water heater
- 3D print filament
Designing the Sink Unit
In a previous article, we built a compact kitchen unit that allowed us to mount our cooking equipment securely while on the move. In much the same way, we now need to design a compact sink unit that will complement the kitchen and supply hot and cold water on demand, while providing a convenient, modular platform to closely monitor our day-to-day water consumption.

Exploded subframes in DesignSpark Mechanical with 3D printed tabs
Sticking with a common design theme for the interior, we will be using aluminium profile again to create a superstructure for the sink unit that is both strong and lightweight. The easiest way to work with aluminium profile is in right-angles, so the sink unit will be composed of two rigid subframes. One is a generic storage unit that forms part of the bed frame underneath, and the other holds both the sink basin and water heater on top. We can assemble the subframes separately and then clamp them together as a single superstructure using four 3D printed tabs on each corner.
Sink unit structure with wooden cladding and door
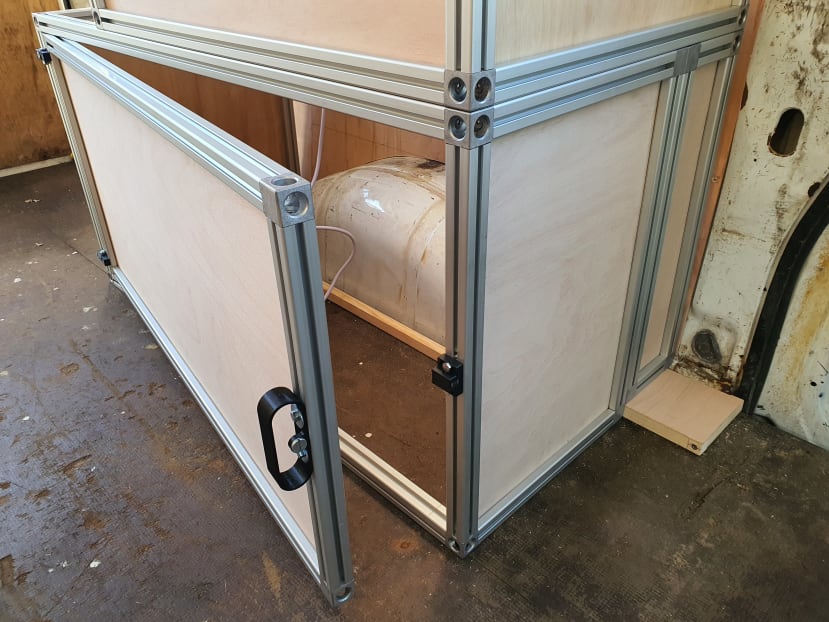
Working in right angles also allows the use of three-way cube connectors that will not only make the structure incredibly strong and easily serviceable, but also make it look a lot more professional. Once we have tapped and assembled the sections of aluminium with the cube connectors and countersunk screws, we can neatly clad the structure with some 3.6mm plywood slotted into the grooves of the profile and use the special plastic inserts to stop it rattling around while driving along.
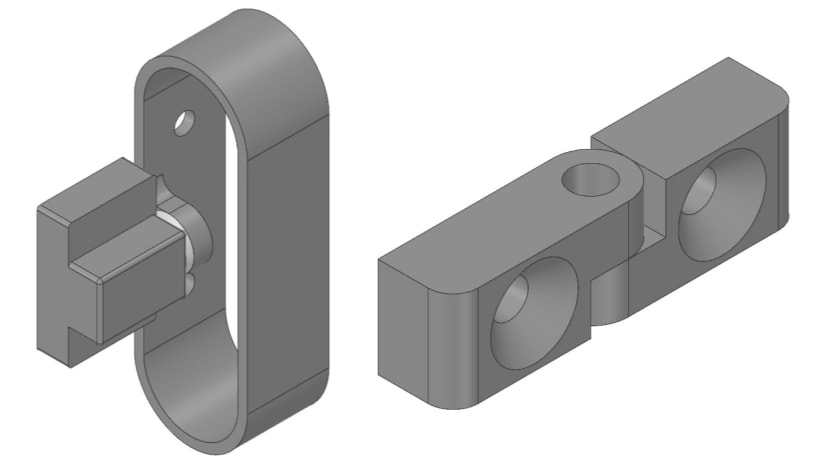
3D printed handle with magnetic catch, and 3D printed hinge
In the same way as before, we can build a door panel inset into the lower frame that will create a secure storage space under the sink. The door can open and close using a set of specially designed 3D printed hinges and is secured using a 3D printed handle that doubles as a magnetic latch which will stop the door from opening unexpectedly under driving conditions. Once we are happy with the layout, we can bolt the frame to the floor of the van using some 30mm steel angle section. This will be completed later once we are happy with the furniture layout and I have taken delivery of the floor.
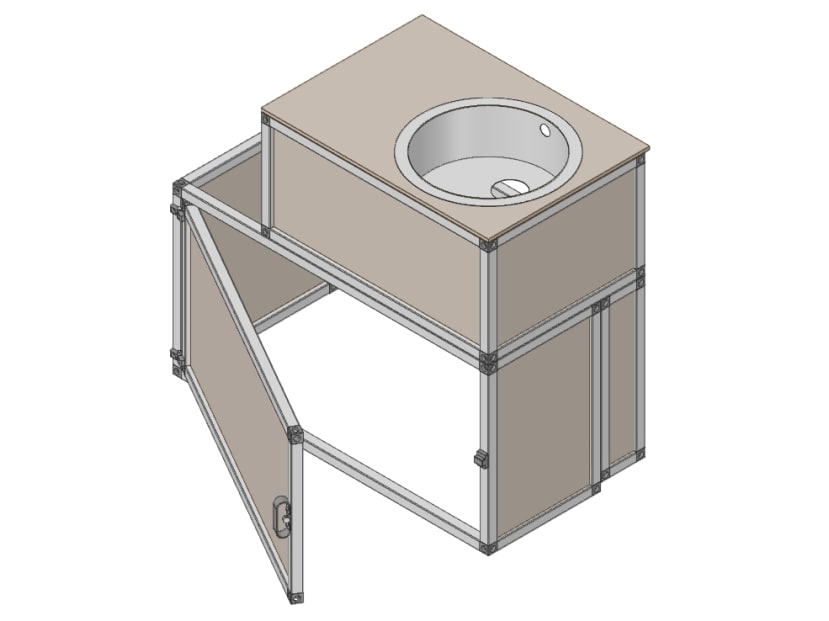
Model of sink unit frame with wooden cladding and door components
With the sink unit structure complete, we next need to install the water heater that will supply our sink unit with hot water on demand. For this project, we will be using a six-litre electric under sink water heater that will sit adjacent to the underside of the sink basin so as to make the best use of space and the immediately available hot water.
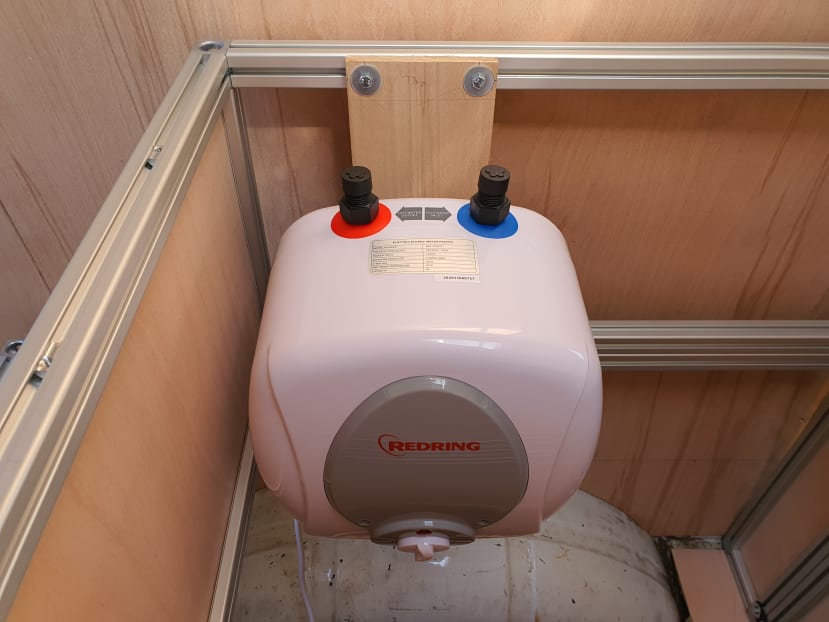
Water heater mounted to the top subframe
Naturally, it is important to mount the water heater securely to negate any chance of it coming loose under driving conditions. We can achieve this by attaching it to a piece of 12mm plywood that sits between the top and bottom of the aluminium subframe and fixing it with four M6 machine screws. The hot water system is now ready for any subsequent plumbing work, and with this it's complete, we can think about installing the sink.

My surprisingly successful homemade compass
The last step then is to add the sink basin to the top of the unit structure. To do this, we will be using another piece of 12mm plywood, which will also allow us the strength to use it as a generic work surface. The sink can then be easily installed using a jigsaw to cut the profile of the sink out of the plywood and secured with the provided mountings. Finish the unit off with the drain fixtures and our sink should be ready to use once we finish the plumbing in a future article.
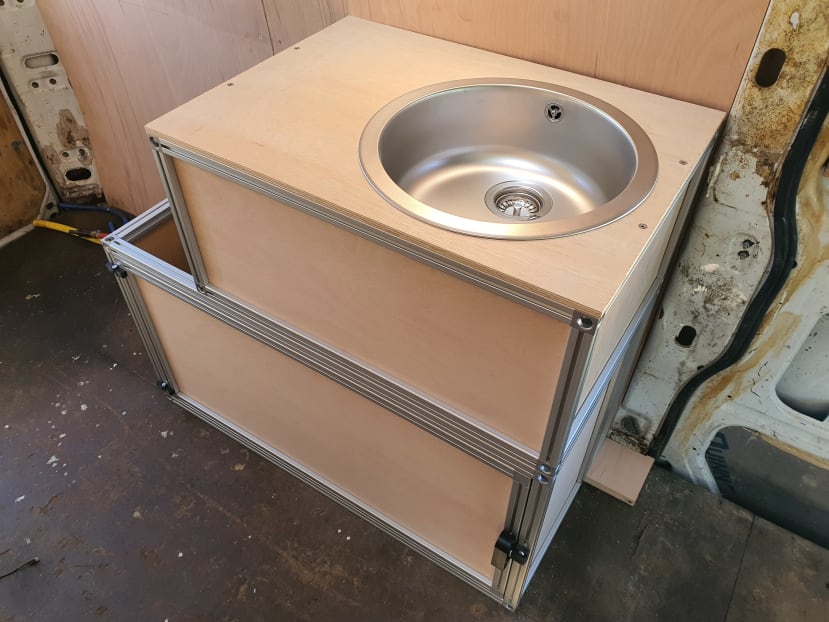
Completed sink unit with sink basin installed
Conclusions
Building a compact sink unit in the campervan will allow me to closely monitor my average water consumption in the interest of studying the potential environmental effects, especially as I literally have a finite amount of water stored in the tanks under the van. It is also worth mentioning that I currently have both clean water and greywater underslung tanks already installed and I am keen to investigate the processes of both topping up and how to dispose of wastewater sustainably.
The sink unit is still in need of some vital plumbing additions like a hot and cold tap that I intend to add in a future article. Alongside the filter and the water pump from a previous article, as well as my rainwater collector, these additions will eventually link the whole system to my underslung water tanks as a complete and fully functional off-grid system.