Investigating the arcane world of Bluetooth 4.2 Low Energy (BLE)
Follow article
 Dave from DesignSpark
How do you feel about this article? Help us to provide better content for you.
Dave from DesignSpark
Thank you! Your feedback has been received.
Dave from DesignSpark
There was a problem submitting your feedback, please try again later.
Dave from DesignSpark
What do you think of this article?

It can seem like absolutely everything is wireless-enabled and ‘smart’ these days. When your smart gear isn’t busy taking part in DDoS attacks on Brian Krebs, it can be a lot of fun to take a look under the hood at how it all operates. In this episode of ‘What you can do in a day’ we will be having some (low cost) fun with Bluetooth Low Energy (BLE).
Bluetooth 4.2 Low Energy (BLE)
So just what is BLE (AKA Bluetooth Smart) when it’s at home? If you are already a Bluetooth veteran, you can probably skip this section and head down to Peeking under the hood; otherwise, buckle up for the Executive Précis™.
The first thing to appreciate about BLE is that, although it operates in the license-free 2.4GHz frequency band like Classic Bluetooth, it is actually a light-weight subset of Bluetooth 4.2 with a different pedigree to the core specification (it was developed from the Nokia ‘Wibree’ protocol) and BLE is therefore not compatible with Classic Bluetooth in short-range wireless applications.
What makes BLE attractive to designers is its simplicity (including far fewer legal hoops to jump through to get a product to market) and its emphasis on low power consumption. BLE devices spend most of their time asleep. When they do wake up to send data they use a very simple link layer – designed for quick connections – and they spend only a few milliseconds (compared to 100ms for Classic Bluetooth) transmitting adjustable-length messages with a duty cycle that can be as low as 0.1%. This all adds up to an incredibly low current draw and a much longer-lasting battery: think years rather than hours or days.
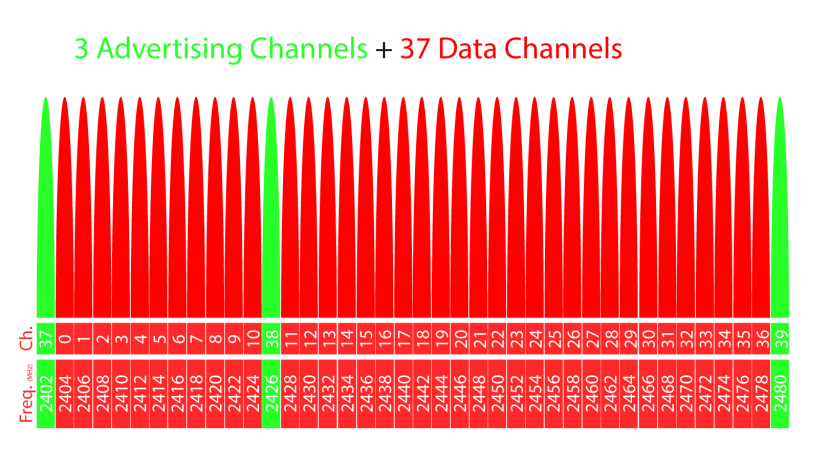
Figure 1
BLE splits the 2.4 GHZ band (2402MHz - 2480Mz) into 40 channels (3 ‘advertisement’ channels and 37 data channels) with a 2MHz spacing, using Gaussian Frequency Shift Keying (GSFK) modulation and adaptive channel hopping.
BLE Connections
There are two actors in a BLE connection: a peripheral device and a central device. The peripheral (usually a sensor or monitor of some kind) indicates its presence on the advertising channels to any devices that might be looking to make a connection. The peripheral is a protocol slave, running a server to dish out the data it is generating. The central device (usually something like a smartphone or tablet) scans advertising channels for peripherals with which to connect. A central device is a protocol initiator, running a client to receive the data sent by the peripheral. Precisely how the devices interact at this stage is defined by the Generic Access Profile (GAP).
Once a connection has been made, it is exclusive (a peripheral can only connect to one central device at a time) so the peripheral stops advertising itself. The central device will establish the connecting parameters between itself and the peripheral device. This interaction is defined by the Generic Attribute (GATT) profile that controls the data flow.
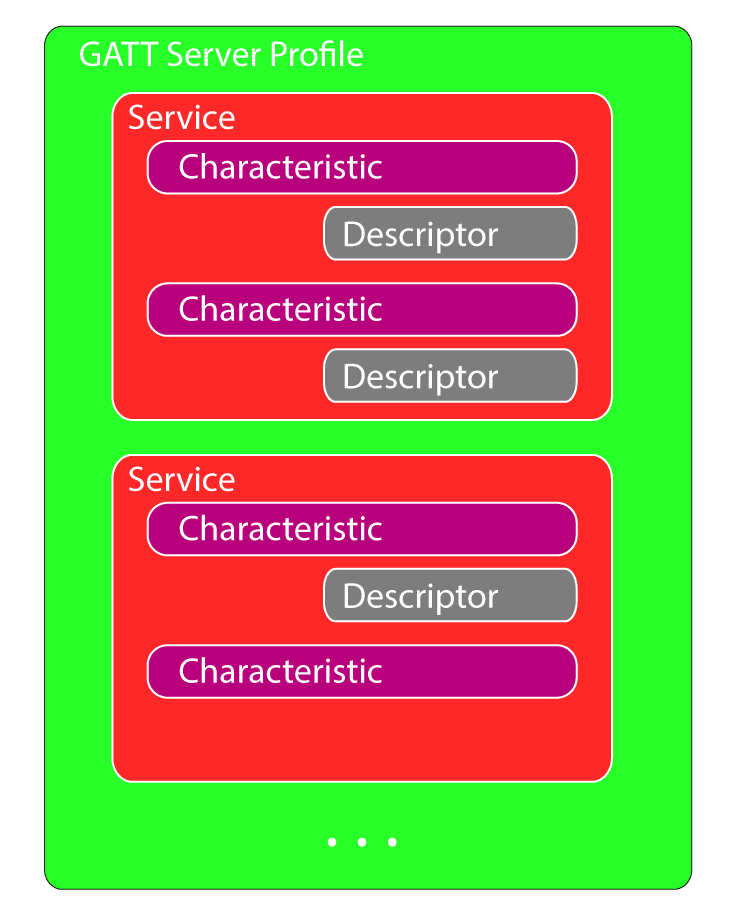
Figure 2
Services, characteristics and their descriptors are collectively referred to as attributes, and identified by universally unique identifiers (UUIDs).
UUIDs are either 128-bit values (e.g.126e4589-e87b-12d3-a456-926344550000) but can be 16-bit (e.g. e87b) for Bluetooth SIG standard profiles.
The central device finds out what data the peripheral has on offer by performing a service discovery. What the central device gets back is a profile, which is essentially an envelope for one or more services (the types of data on offer) which in turn are made up of characteristics (which can optionally have one or more descriptors). You can think of characteristics as containers for the data that we are after while descriptors are labels for that data. Characteristics always include at least two attributes: the characteristic declaration (which provides metadata about the actual data) and the characteristic value (the actual data), which are addressed by their handles. Don’t worry, this will all make a lot more sense when we look at our real-world example, a bit later.
To aid interoperability, the Bluetooth Special Interests Group (SIG) has specified a number of standard profiles for distinct application types. There are standard profiles for environmental sensing, heart rate, glucose measurement and find-me (for locating pesky lost keys etc.) amongst many others. Of course, custom profiles can also be created.
As an example, consider the Heart Rate Profile. This profile has two services: Heart Rate service and Device Information service. In the Heart rate service you will find: a heart rate measurement characteristic, a body sensor location characteristic and a heart rate control point characteristic.
Peeking under the hood
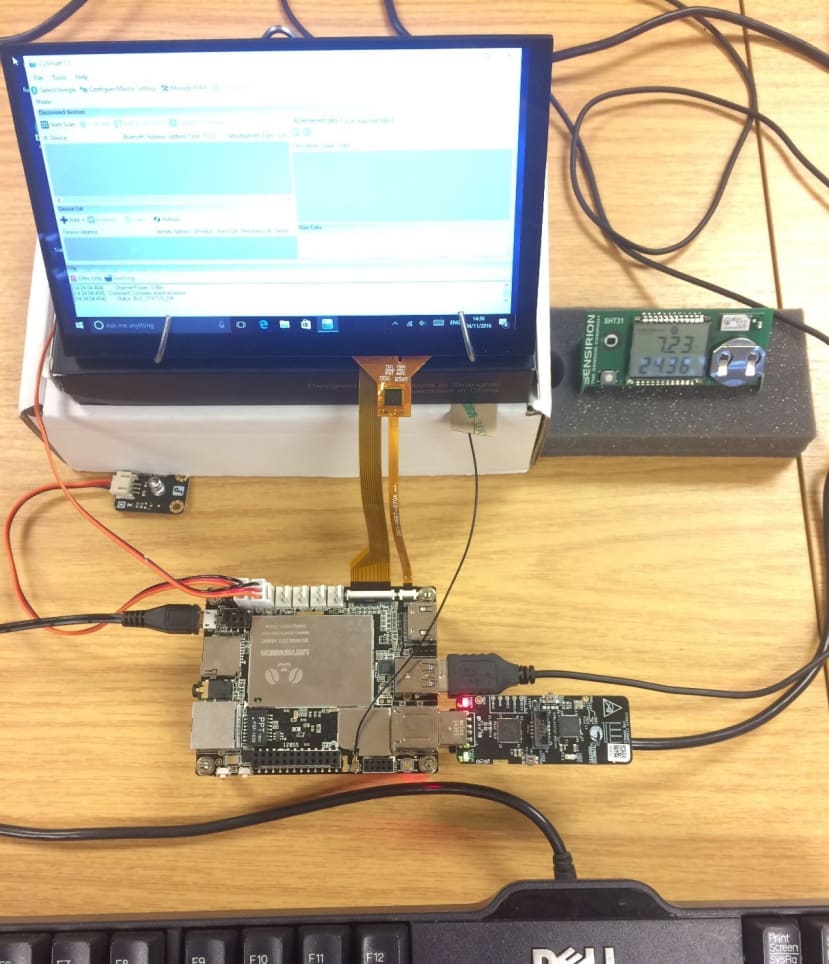
For our little hands-on, we are using a LattePanda sporting a Cypress CY5677 USB Dongle as our central device. Our peripheral is a Sensirion SHT31 smart Humigadget.
“Why are we using a LattePanda?” I can hear you thinking. Well, there are two reasons: 1. I think they are pretty cute as Windows 10 PCs for under £100 a go and 2: our little excursion answers the usual LattePanda question which goes along the lines of: “yeah it’s cute, but can I actually do anything useful with it?” So this is our test rig:
Getting Started
The first thing we will need to do is download the free Cysmart software from the Cypress website.
You will need to register on the site and set up the Akamai NetSession Interface Software that Cypress use as the download manager:
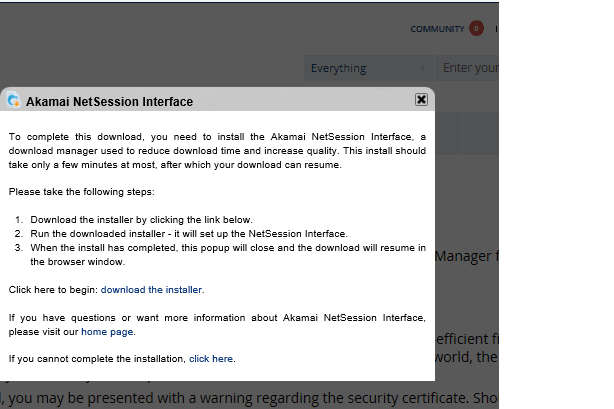
Figure 3
You will also need to make sure the.NET Framework 3.5 is enabled for this software to run:
- Press [Windows key] + [R] on the keyboard to bring up the run command box.
- Type “appwiz.cpl” in the ‘Open’ command box and press [ENTER].
- In the 'Programs and Features' window that pops up, click on the link towards the top left marked 'Turn Windows features on or off'.
- A 'Windows Features' box will open. Check if the '.NET Framework 3.5 (includes .NET 2.0 and 3.0)' option is enabled and click 'OK'.
Once you have installed your Cysmart software and inserted your dongle into the USB port you are ready to fire it all up. However, you may find (like I did) that your dongle is sporting some old firmware:
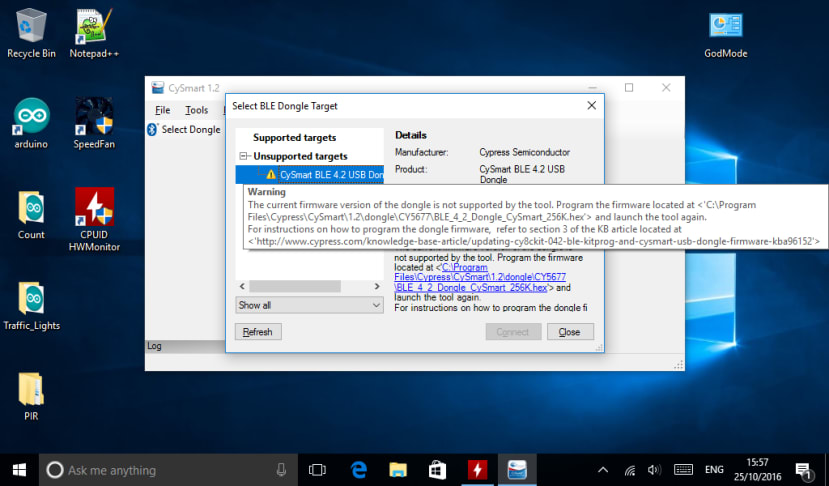
Figure 4
If that is the case, you will need to download the PSoC Programmer software and install it to reprogram your dongle firmware to the latest version:
Run up the PSoC programmer.
- Click File > Load (or hit [F4]) to load the hex file.
- Select the file in C:\Program Files\Cypress\CySmart\1.2\dongle\CY5677\BLE_4_2_Dongle_CySmart_256K.hex
- Click File > Program (or hit [F5]) to program the firmware.
With all that done, we are ready to start seeing BLE in action.
Using Cysmart
When we first run up the software we find a window that looks like this:
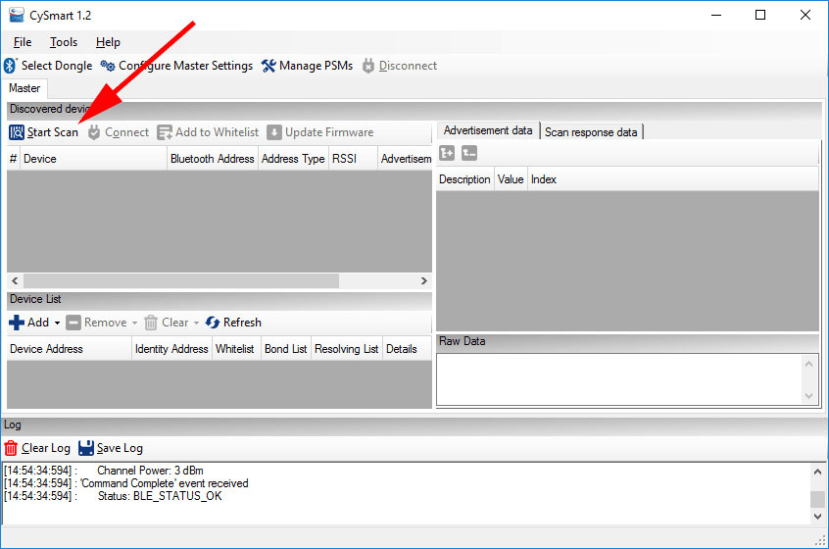
Figure 5
Before we hit the ‘Start Scan’ button to see what is available to connect to, we should make sure we set up our Sensirion SHT31 sensor device to start advertising its presence on BLE. We do that by holding the button on the front down until ‘rFon’ can be seen on the LCD display. There will also be a 4 digit number displayed to help identify which device we are using, should there be more than one of them about. So, let’s start scanning:
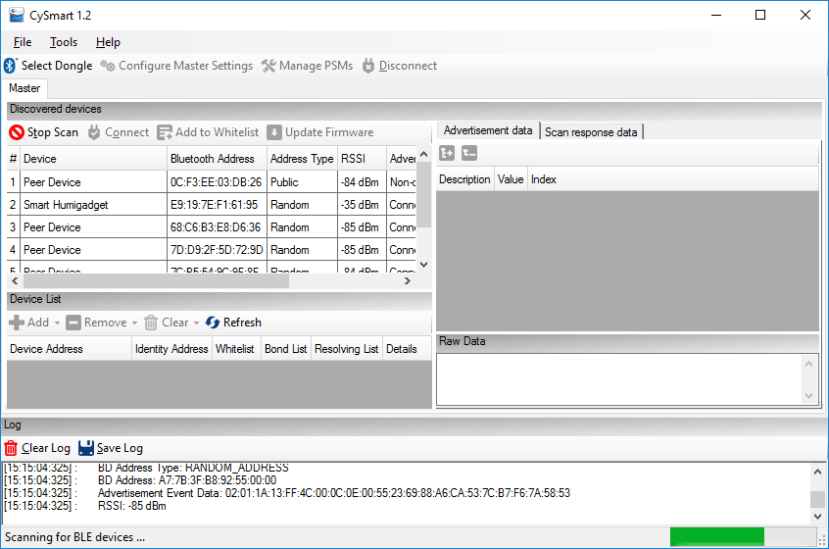
Figure 6
Once we have the list of available devices we can stop the scan. Looks like there are a few other Bluetooth devices around (phones, mostly), besides our peripheral device. If we select our Smart Humigadget we can have a look at what it is advertising.
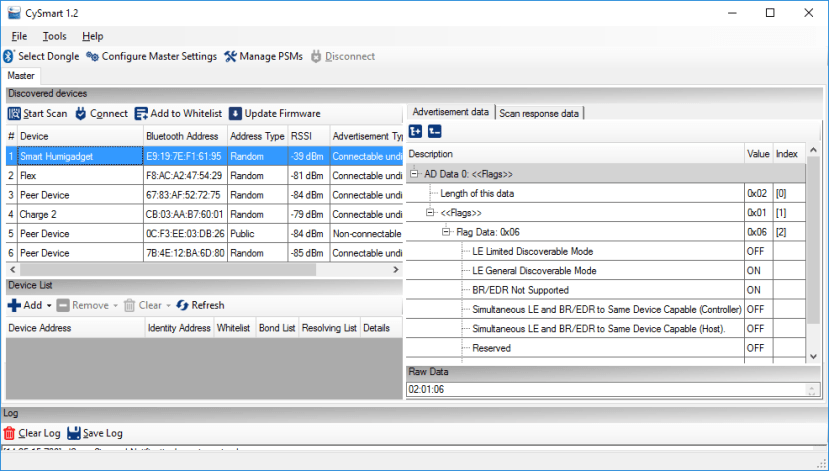
Figure 7
Looking at the advertisement data tab on the right, we can see that there is a ‘Flags’ data byte letting scanning devices know what connections are available. In this case, we are advertising 0x06 which, when we look at the description below, tells us that the Humigadget operates Bluetooth LE General discovery mode and doesn’t support BR/EDR (Basic Rate/Enhanced Data Rate) i.e. the core Bluetooth specification. In other words, the device is saying: “I speak BLE but not Classic Bluetooth”.
If we look at one of the phones in our range, we can see that it supports the full range of Bluetooth specifications and (as it supports ‘Simultaneous LE and BR/EDR to Same Device Capable (Controller + Host)) it is a central device rather than a lowly peripheral like our Humigadget:
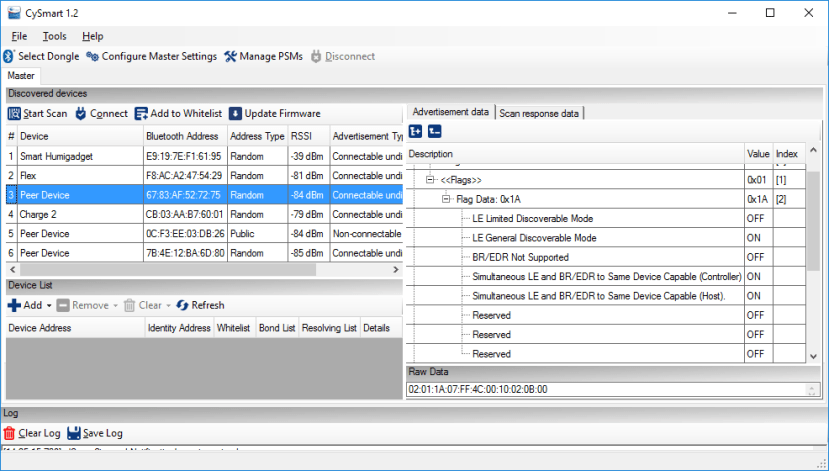
Figure 8
When we go back and look at the ‘Scan Response Data’ tab for our Humigadget, we can see that this is how the device tells us what it is called. In the first byte, we can see the ‘characteristic declaration’ – this is the metadata that tells the central device how much data is in the ‘Complete Local Name’ characteristic: 0x11 (or 17 in decimal) bytes.

Figure 9
If we now hit the ‘Connect’ button, we can create our exclusive connection to the Humigadget:
We can see from the display on the Humigadget that it is no longer advertising itself. To get a profile from the Humigadget we need to hit the ‘Discover All Attributes’ button. This can take a few moments, but what we get back is a lovely profile for our Humigadget:
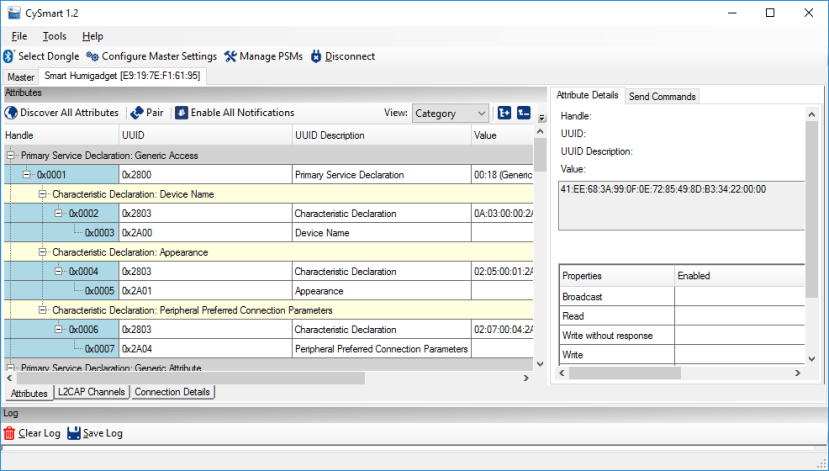
Figure 10
This display shows how a profile is made up. Right at the top, we can see the first service in the profile being declared. This is a primary service governing access to the device and (along with the following Generic attribute service) is a mandatory service for BLE devices. Inside this service, we can see each characteristic (and that each characteristic always has a declaration followed by characteristic values – i.e. the data).
We can also see that each attribute is addressed by an incrementing handle and has a UUID (universally unique identifier). As these early attributes are all part of the Bluetooth SIG’s predefined attributes, they are only 2-bytes (16-bits) long. For example, you will notice the UUID 0x2803 appearing more than once in our images. This is the assigned UUID number for a GATT Characteristic Declaration.
If we now click the ‘Pair’ button followed by the ‘Enable All Notifications’, our central device will pair with the peripheral. When we scroll down the page we can find our data being updated:
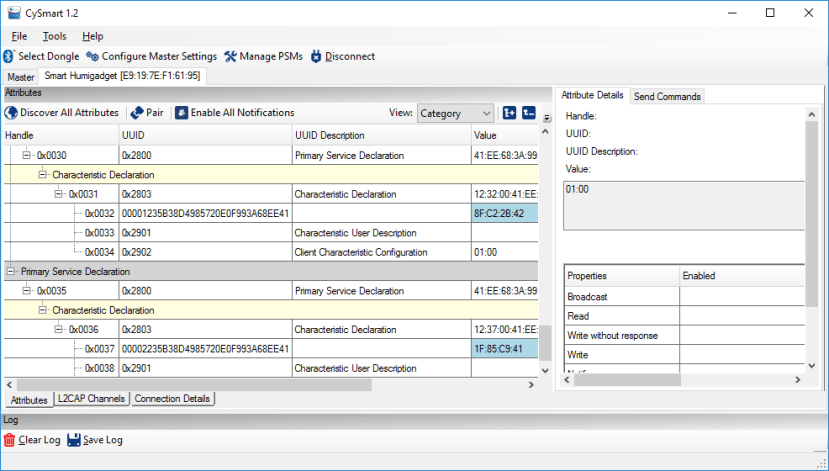
Figure 11
Of course, the raw data being received by our central device (highlighted in blue) is displayed in hex by the debugger. If we want to make it human-usable we would need to convert it in the app we create to read out our data on a phone or tablet.
Note the 128-bit UUIDs for our service data as we are using custom characteristics. Each one is made up of a 16-bit service UUID and the base UUID. In our case the base UUID is 0000-xxxx-B38D-4985-720E-0F99-3A68-EE41, while the service UUIDs we are using are 0x1235 and 0x2235 respectively.
Conclusion
There is, of course, loads more investigation that you can do from this point – and from there it is a relatively small jump to getting a BLE enabled dev kit and creating your own BLE applications. I hope this little introduction to BLE has whetted your appetite for participating in this brave new world. The barriers to taking part in this wireless revolution have been lowered significantly in terms of the technical expertise needed and cost involved. So, what’s stopping you?