How to Build a Smart Lamp with Analog Discovery Pro and Pmods
Follow article Dave from DesignSpark
How do you feel about this article? Help us to provide better content for you.
Dave from DesignSpark
Thank you! Your feedback has been received.
Dave from DesignSpark
There was a problem submitting your feedback, please try again later.
Dave from DesignSpark
What do you think of this article?
This project is about turning on and off a lamp and changing its colour through an application running on an Android smartphone over Bluetooth Low Energy (BLE). The lamp is powered by a battery, which can be charged from Digilent’s Analog Discovery Pro (AD Pro) (222-2677) .
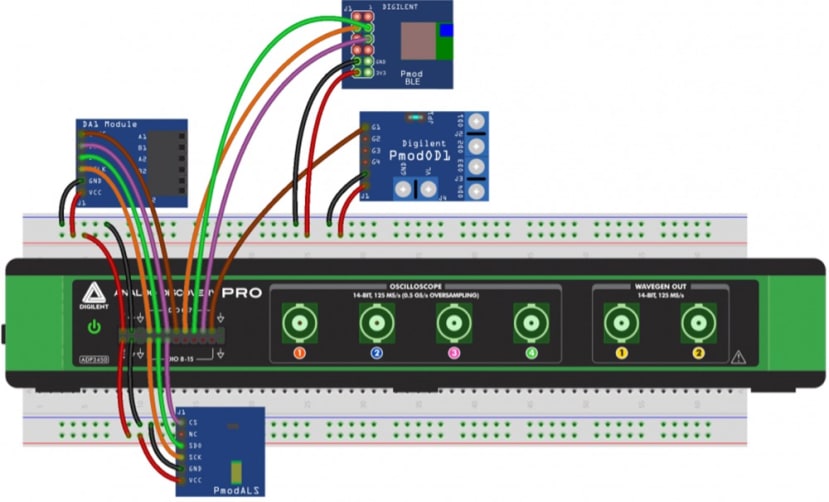
The project employs a 5 mm RGB LED as a lamp, a Pmod BLE (175-2110) for communication, and a Pmod ALS (134-6463) for the ambient light measurement. Additionally, a Pmod DA1 and a Pmod OD1 are used for the control circuit. Other parts, like a USB connector, a programmable current source, an operational amplifier, and a couple of resistors are required as well. The free WaveForms software from Digilent is needed for testing and debugging.

Downloading and Testing the Libraries
The first step is to download the hardware abstraction layer (HAL) library for the Analog Discovery Pro. AD Pro is controlled by a Python script through the WaveForms SDK (Software Development Kit). You can download the library from Digilent’s website. Copy all files to a new folder of your choice. Please note that not all the functions inside the modules have been tested, so there might be errors. Use the packages responsibly.
Next, copy the dwfconstants.py file from the WaveForms installation path to the folder as well. This file contains all the constants required for every WaveForms instrument. After this, download the library files for the Pmods, which control the hardware. Place the files in a new folder.
Now, it is time to test the libraries. The necessary test scripts are available here. Place them in the same folder as the HAL and Pmod folders and run them. While testing the Pmod BLE, make sure that you run the BLE Scanner application to detect the MAC address and the UUID of the Pmod BLE.
Make a note of it, as you will need them later on.
Designing the Mobile Phone Application
Now it is time to create the Android application. With the help of the MIT App Inventor, design a user interface (UI) by dragging and dropping the desired UI elements onto the virtual phone. If you prefer not to do all yourself, you can download the project file or the final application.
Once the UI is ready, import the Bluetooth Low Energy by MIT extension from the Extension menu of the App Inventor. Drag and drop the BLE component on the virtual phone’s screen and use the MAC address and UUID noted before to establish the connection. In Block view, create the event logic of your application. Finally, build the application and install it on the phone. Make sure that your phone’s settings allow the installation from unknown sources.

Setting Up the Hardware
First, connect the Pmods to the Analog Discovery Pro. Once done, link the three output channels of the Pmod DA1 to the inverting inputs of the OP484 and the second channel of the waveform generator to the non-inverting input to create the PWM waveforms. Then wire the outputs of the comparators to the remaining MOSFET gates.
Now, test the PWM: Enable the Supplies instrument in WaveForms and generate a sawtooth signal with a 500 mV offset and a 500 mV amplitude. Then use the SPI Master tool in the Protocol instrument to display the produced waveform. Subsequently, send the data words for the desired voltages. Finally, build the charger circuit, which allows charging the battery from AD Pro.
Once everything is set up and working as expected, connect the RGB LED together with the current limiter resistors between the positive lead of the battery and the remaining three MOSFETs of the Pmod OD1.
Setting Up the Software
Now download the main program file. It contains all the routines necessary to run the project. Next, start the script and the application on your phone. Once the phone discovers the Pmod BLE, connect to it and set the lamp colour and luminosity with the sliders of the application.
More information about the project and the functionalities implemented in the various library files can be found here