Begin Your IoT Cloud Computing Adventures With An Imagination Technologies Creator Ci40 Kit
Follow article
 Dave from DesignSpark
How do you feel about this article? Help us to provide better content for you.
Dave from DesignSpark
Thank you! Your feedback has been received.
Dave from DesignSpark
There was a problem submitting your feedback, please try again later.
Dave from DesignSpark
What do you think of this article?
Safely joining the IoT revolution

A veritable slew of low-cost 64-bit SBCs (Single Board Computers) has appeared in the wake of Raspberry Pi’s success, all looking to cash in on the market that the Pi has trail-blazed. However, when it comes to contenders for serious IoT (Internet of Things) projects, the field is pretty narrow. If you are going to avoid adding another zombie to the growing botnet that makes up the Internet of Tat™ then you need an SBC that has been designed from the ground up to operate securely with a software framework to support that secure operation for your application. Among the rarefied group of products that can offer this to developers, a strong challenger for the top spot is the Imagination Technologies Creator Ci40 kit.

Introducing the Creator Ci40 Kit
The kit is based around a strikingly purple development board that provides the user with:
MIPS CPU
550 MHz dual-core, dual-thread interAptiv
2 x 32/32 KB L1 cache
1x 512 KB L2 cache
Floating point unit
OpenWRT Linux OS
Connectivity
802.11 AC 2 x 2 WiFi
802.15.4 6LoWPAN
Bluetooth (LE & Classic)
1 x RJ45 Ethernet port
1 x USB
IO Expansion
2 x MikroElektronika Click interfaces
1 x Raspberry Pi interface (40-pin header type)
Security
Infineon TPM (Trusted Platform Module) for certificate storage
Memory
2 MB Boot NOR Flash
512 MB NAND Flash
256 MB DDR3 SDRAM
SD card slot
Power Inputs
Micro-USB or 9 V dc
The MikroElektronika Click interfaces make it very simple to add sensor or actuator functionality to the application. There is a huge (and expanding) range of click boards available covering everything from accelerometers to Wi-Fi. There is even a prototyping click board, in case you don’t find one that fits the bill. This all shaves valuable time off getting your proof-of-concept application up and running.
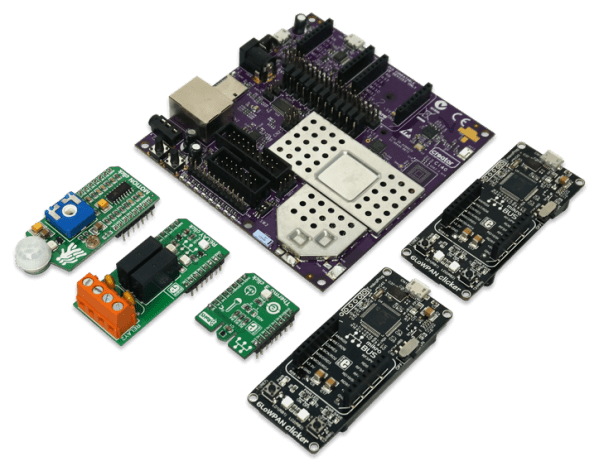
To get you up to speed quicker than superfast broadband, the kit box includes:
1 x Creator Ci40 development board
2 x MikroElektronika 6LoWPAN Clicker boards
3 x MikroElektronika Click boards (Thermo, Motion & Relay)
1 x microUSB cable
Software Framework
Where the Creator Kit really stands out is in the depth of Open Source software support for IoT applications.
The development board is supplied running OpenWRT Linux.
Device management is provided by an implementation (called Awa) of the Open Mobile Alliance Lightweight Machine to Machine (LWM2M) standard and simplifies securely communicating with cloud-based servers.
The Internet Protocol for Smart Objects (IPSO) specification provides a standardised object model for sensors and actuators:


Let’s make no bones about it: there is a lot of API documentation to get your head around that will take much more than a day to absorb. However, to fast-track the process of cramming this into your brain, there is a straightforward Quick Start Guide in the online support that leads on to some engaging workshops based around the clicker boards in the kit. With these workshops, you can at least try out the concepts of secure IoT in a day.
Workshop 1 uses the onboard switch to send simple count data (for the number of times the switch button has been pressed) to the cloud-based developer console. The extension of this workshop uses the PIR motion sensor click board, in place of the switch, to demonstrate how simple it is to modify your code to send a count of motion detections instead.
There is also a pre-release of a workshop that creates a Temperature logger example. At the time of writing, there isn’t a 6LoWPAN clicker example available yet.
It is worth taking your time – take the whole morning – with the quick start guide and first workshop to fully get to grips with the board and software. If you find yourself breezing through these, I suggest that you also try getting to grips with re-flashing your board. I found it quite edifying to flash an OpenWRT image to a microSD card and get that running.
My Kingdom for a Remote Activated Relay
There is something quite satisfying about hearing a relay click, knowing you could just as easily activate the relay from your local coffee shop – or indeed anywhere else in the world with free Wi-Fi coverage.
Workshop 2 provides all this exhilaration and more, making it a great way to spend an afternoon. My afternoon with the relay module is detailed below, but before we get into it, I want to avoid confusion and clarify that:
- Commands run on the Ci40 OpenWRT Linux command line are prefaced with ‘#’, whereas
- Commands run on my Linux Mint 18.1 Cinnamon virtual machine are prefaced with ‘$’.
I started by remotely logging into the Ci40:
$ ssh root@ipaddr
Where ‘ipaddr’ is the ip address of your Ci40. Once in, the first thing I checked was the version of LetMeCreate that was running:
# opkg list-installed letmecreate
My version was 1.1.0 rather than the 1.3.0 (or later) that we needed. As it happened, version 1.4.0 had been released onto Github a few days earlier, so I downloaded the newer version and installed it on the Ci40. The easiest way to do that is probably the following:
1. Use Firefox (or whatever browser you prefer) on your Linux distro to download the file from Github.
2. On your terminal’s command line, change directory to your Downloads directory:
$ cd Downloads
3. SCP the file to your Ci40 root directory:
$ scp4.0-1_pistachio.ipk root@ipaddr:/
4. Install the package on the Ci40:
# opkg install /letmecreate_1.4.0-1_pistachio.ipk
When you’re done, you may want to delete the .ipk file from your root directory. Now that I was up to date, I could get on with actually setting up the application. I did that by changing directory to the ‘myworkspace’ directory that I had set up earlier that morning, which in my case was:
$ cd /home/redstone/Projects/Ci40/myworkspace
Then we cloned the project files from Github:
$ git clone https://github.com/creatordev/w2-remoterelay
The next step was to update the OpenWRT feeds to detect the new application:
$ cd ../openwrt-sdk$
./scripts/feeds update -a && ./scripts/feeds install -a
Finally, we built it:
$ make package/w2-remoterelay/compile
By the magic of makefiles, our remoterelay_1.0.0-1_pistachio.ipk file appeared in the
openwrt-sdk/bin/pistachio/packages/myworkspace
folder. To get this onto our dev board, we change directory to where the application file now resides and fire up scp again:
$ scp remoterelay_1.0.0-1_pistachio.ipk root@ipaddr:/
All that remained was to install and run the app:
# opkg install remoterelay_1.0.0-1_pistachio.ipk
# /bin/remoterelay
Now the app is running, the next port of call is to fire up a browser on any machine you fancy and navigate to the Imagination Technologies Developer Console. Here we can find our devices that have connected to the Creator cloud servers.
The Imagination Technologies people are probably more generous than I would be with how much stuff they will allow you to connect to their cloud servers – as long as the number could be considered ‘fair and reasonable’ – which is lots. But in this case, there is only one device we are looking for: object ID 3201.

If we click on this device, we can bring up various nuggets of IPSO standardised information about the state of our device.

If we click on the pencil icon (highlighted by the arrow) we can then modify the state of the device.


The next layer of useful tools for us to try in this example comes in the form of webhooks. In layman's terms, a webhook allows an event in one part of the internet to trigger a pre-determined response somewhere else. In our case, we can send data about our relays to a web page when the relays change state. The page used to demonstrate this in action is requestb.in.
If, when you get to this page you click on the big green 'Create a RequestBin' button you are taken to a page that looks like this:

Copy the bin URL and go back to the Developer console. Click on the link below ‘Devices’ called ‘Subscriptions’ where we can add the webhook data we want to be informed about:

If we then go back into ‘Devices’ and toggle our relays we can flip over to http://requestb.in/ and refresh the page to see that we have some news from our IoT device telling us about the state change that has occurred and when it happened:

If you are interested in taking this example further, there is also an Android app and some lovely Node.js to try out with the relay workshop. I didn’t get into these final parts, as by this time, my smart stomach had alerted me to the fact that it was dinner time. But skimming through the instructions it becomes obvious that developers can take these examples and run with them on the basis of their own real-world applications.
Conclusions
I don’t think it is news to most of us that the reputation of the whole IoT concept is under threat from poorly conceived and executed insecure products. The Ci40 kit has been put together with the idea of facilitating the development of properly engineered, scalable solutions for connected devices rather than the one-off hacks you can do with just about any SBC.
The thoroughly tested, well-engineered product is an important mindset to spread among IoT developers if IoT is to blossom into trusted technology that enhances people’s lives. The Ci40 kit is a great starting point for developers who already understand this.
Appendix A – Cloud Computing
‘The Cloud’ has become a pretty ubiquitous term over the last five years or so but what is it and why should you care? In its broadest sense, cloud computing is any computer process that happens somewhere other than on your local machine (that’s the Mac, PC or laptop you happen to be using right now) and the term is ultimately derived from those old sales-presentation whiteboard diagrams (and telco schematics) that had various processes connecting to an ‘over there’ somewhere – represented by big red arrows to and from the fluffy cloud that was used to obfuscate the complexities of long-distance wide-area-networking.
In practice, when IT people refer to cloud computing, they tend to mean the ‘public cloud model’ where storage and/or processing is accessed over the internet. Obvious examples of cloud storage include services like Dropbox or Microsoft’s OneDrive but Facebook and Youtube (where people upload and share vast quantities of images, video and other data) also qualify as cloud storage services.
But the cloud isn’t just about storage: another rapidly growing area of the cloud is offloading processor workload to vast server farms. In many cases, this is simply running database software on the provider’s servers rather than your own; but at its extreme, it can be great for companies with inconsistently heavy computing needs: they can scale cloud processing up as their computing needs increase and scale down again when demand tails off. If you collect buzz-words, this is known as ‘cloud bursting’ and it saves the company from massive investments in IT infrastructure which may well sit idle most of the time.
It is not just business that benefits from offloading processing to the cloud. All of those voice-activated consumer products that include the likes of Siri and Alexa do very little in the way of processing on the device you speak to – the complex (and processor demanding) technologies like Automatic Speech Recognition and Natural Language Understanding are handled by Apple and Amazon servers in the cloud.
There are a few other terms that you will hear bandied about such as ‘Software as a Service’ (SaaS) – think Microsoft Office 365 – and ‘Platform as a Service’ (PaaS) – think posh web hosting – but these are all essentially some combination of storage and processing hosted in the cloud, on someone else’s servers.
When it comes to why you should care, cloud services present users with some quandaries about the extent to which you may want to integrate them into your life. The most obvious questions relate to what you do when you can’t get online access (thanks to things like DDoS attacks on your service provider or the End of the World™) and data security for information that is available 24/7 for hackers to try and get access to. Locally synchronised files and 256-bit encryption will help, but they aren’t a panacea. Less obvious questions arise about who owns the rights to the data you (intentionally or not) put onto the cloud and what various parties are allowed to do with said data. These are the kind of questions that you probably ought to answer for yourself as cloud computing works its way into more corners of your life.