Raspberry Pi GPIO Digital I/O Exercises
Follow article
 Dave from DesignSpark
How do you feel about this article? Help us to provide better content for you.
Dave from DesignSpark
Thank you! Your feedback has been received.
Dave from DesignSpark
There was a problem submitting your feedback, please try again later.
Dave from DesignSpark
What do you think of this article?
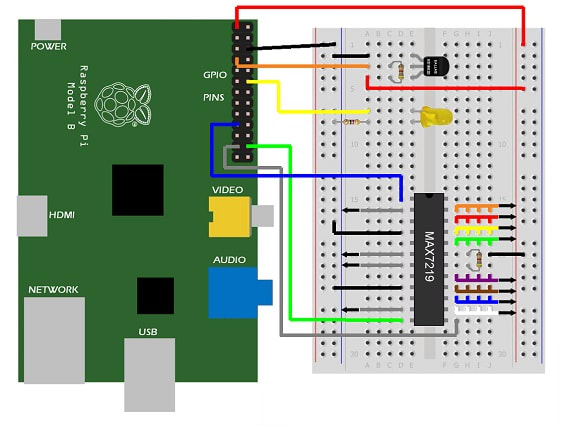
The aim of this exercise is to show students how to program the Raspberry Pi to measure temperature using a digital “1-wire” sensor connected directly to one of its GPIO pins, how the measured temperature may be used to control a digital output, and how the Raspberry Pi may be used in conjunction with a LED driver chip to display the measured temperature on a multiple digit LED display.
Learning Objectives
The exercise is split in to three “Steps” of increasing complexity
Step 1 introduces the student to 1-wire digital sensor technology and demonstrates how such digital sensors may be easily interfaced with the GPIO port on the Raspberry Pi.
Step 2 introduces the student to the IDLE integrated development environment and to the Python programming language, and introduces the concept of creating a file containing a series of Python commands, saving this file as a “computer program”, and “running” the program. The concept of an operating system kernel is introduced and it is shown how modules may be loaded into the kernel to provide support for hardware interfaces. In Python, some basic data manipulation and formatting is demonstrated, and the “while” loop and “if…else” statement are introduced.
Step 3 introduces the student to the concept of serial and parallel data interfaces, and the Raspberry Pi is configured to use the SPI protocol. Students will be introduced to the “apt-get” command to download, install and update software packages from the Debian repository and will also download Python code from GitHub. Basic data transfer between the Raspberry Pi and peripheral hardware is demonstrated by sending data to the LED driver chip. This introduces the concept of using hexadecimal notation to represent of binary data.
In Python, the “try and “except” statements are introduced and the concept of reusing and adapting code is demonstrated by asking the student to load and edit the code from the previous step.
Note- These exercises were created using a Raspberry Pi Model B with a 26 Way GPIO Pin header. Newer models have a 40 Way GPIO header, but the first 26 pins ae the same.
Please see attached files for exercises and Raspberry Pi Setup guides