Pop-Up Particle Pavilion Part 1: Rethinking Shared Spaces
Follow article Dave from DesignSpark
How do you feel about this article? Help us to provide better content for you.
Dave from DesignSpark
Thank you! Your feedback has been received.
Dave from DesignSpark
There was a problem submitting your feedback, please try again later.
Dave from DesignSpark
What do you think of this article?
DesignSpark would like to congratulate Avye Couloute from Girls into Coding for being crowned by The Big Bang as UK Young Engineer of the Year for her project on the pop-up particle pavilion. See The Big Bang announcement and watch the TV interview, then read the project below:
Formation of the Project
For quite a while now I’ve been keen to further explore smart buildings, IoT, and air quality, so for me, the DesignSpark air quality project is the perfect opportunity to do just that. Since the pandemic, social distancing along with the need for additional space and appropriate ventilation has become hugely important. Because of this, I want to also explore the concept of a POP-UP Pavilion - A pavilion that could be installed in different locations to provide space & indoor air quality solutions where needed.

Air quality is something that is usually invisible to us so it is easy to ignore but it does have an impact on us from day to day, “carrying respiratory diseases which affect the probability of you getting infections". https://www.bbc.co.uk/news/science-environment-57102372
The carbon dioxide (CO2) level in a closed space is seen as “a good indicator of air quality and can highlight the need for ventilation”. A well-ventilated room is crucial for reducing the spread of airborne viruses. A well-ventilated space should have CO2 levels below 800ppm and CO2 levels above 1500ppm would indicate poor ventilation or overcrowding. Lower CO2 levels are also “linked to improved learning outcomes and better cogitative performance”. So in today’s world, all of this suggests that the way we design, equip & operate our shared spaces is more important than ever. Restaurants & schools are two examples of where air quality & ventilation needs to be addressed. https://www.imperial.ac.uk/news/233154/curbing-covid-19-schools-imperial-scientists-support/

Materials
This list may change as the project develops
- Adafruit ESP32-S2 Feather with BME280 Sensor
- Adafruit Stepper Motor Featherwing
- TFT FeatherWing - 2.4" 320x240 Touchscreen For All Feathers
- Adafruit SCD 40 - True CO2, Temperature and Humidity Sensor
- NeoPixel Ring - 24 x 5050 RGB LED with Integrated Drivers
- Mini Air Purifier
- 5V DC, Axial Fan, 40 x 40 x 10mm, 7CFM
- Relay - 5V
- 4mm Economy Birch Laser Plywood - 600mm x 400mm sheet (quantity to be confirmed)
- Clear Perspex Sheet (Cast) 4mm x 600mm x 400mm (quantity to be confirmed)
- 6mm Poplar Laser Plywood, 600mm x 400mm sheet
- Lipo Battery - 3.7 v; 500mAh
- AA Battery pack; 3x 1.5V
- Jumper wires
- USB C to B Cable
- M3 button head screws (lengths & quantity to be confirmed)
- M3 hex nuts (quantity to be confirmed)
Design Process
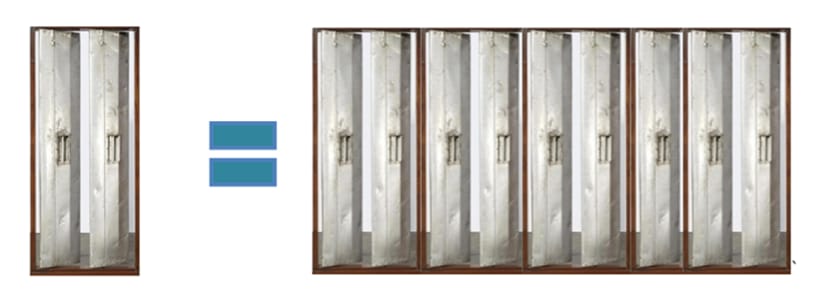
I thought about what we already do to ventilate rooms & how that could be changed or improved. The common method of opening windows stuck out the most. But what if we had the option of opening the walls & the roof as well as the windows? – What if the room could do all of this by itself? To follow up on this I looked around our home for some inspiration and eventually homed in on our wooden horizontal blinds and a set of long vertical fabric blinds that we have in our hallway. THE BLINDS WERE DOING EXACTLY WHAT I NEEDED WALLS TO BE ABLE TO DO. After realising this I searched the internet for different types of blinds & shutters, and after several searches, I landed on an image of some ventilation shutters which had been designed by the architect Le Corbusier – and my vertical shutter wall idea was off.
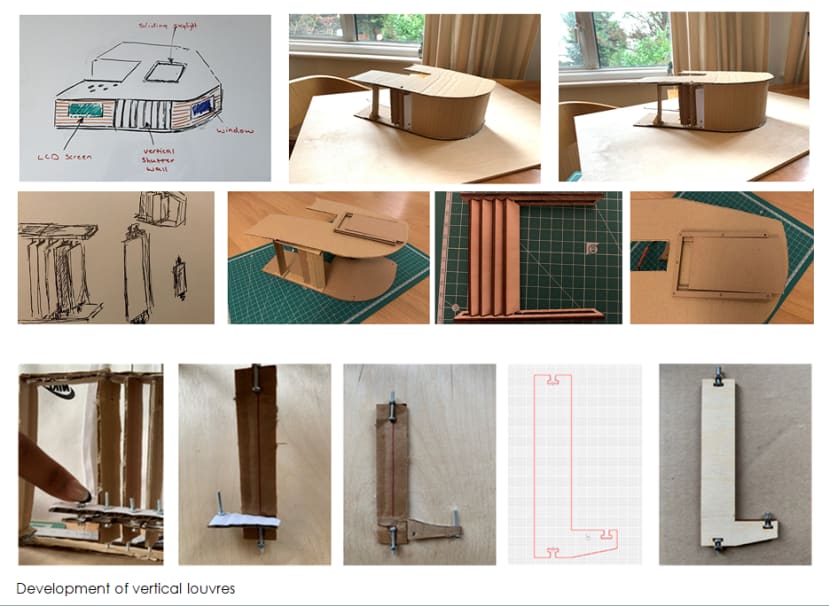
I then made some sketches and some cardboard mock-ups to help visualise my idea and to explore using linkages to make it all move. The cardboard models were a really good way to test how different elements could fit together and also helped me to get a better idea of areas that I needed to investigate, change or drop.
Simplified Pavilion shape
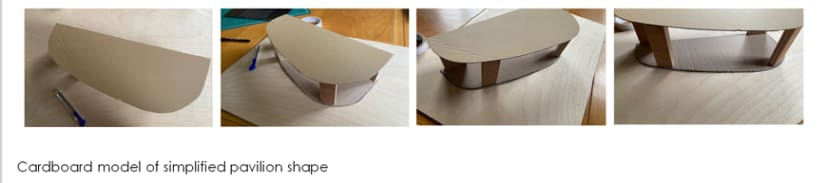
I decided to simplify the design as I thought the components for the build would be easier to make and assemble if the design was more straightforward. Not including the middle recess, meant that the shape of the pavilion was simplified and would open up more internal space. In turn, this would create a more functional and roomy space.
Curved wall & window components
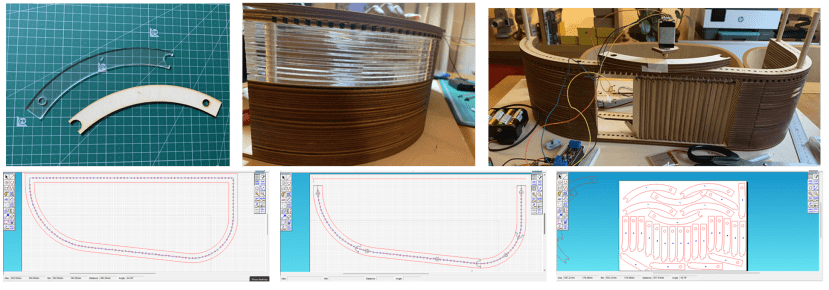
The walls of the pavilion were designed to be built up in several layers of plywood, in fact, 30 layers, each 4mm in thickness. I realised that I could only print two complete layers on a single sheet of plywood, which meant I would need too many sheets and would be left with an awful lot of waste material. To solve this problem, I broke the layer design down into smaller sections that could be cut out separately and put together like a jigsaw. These smaller pieces could now be fitted more efficiently onto a single sheet of plywood, reducing cost and waste. Being able to print each layer in smaller sections also means I or you could use scrap pieces of laser ply to make up the required amount of layers.
Securing & concealing the big stepper motor

I chose to operate the shutter walls with stepper motors, and eventually worked out a way to attach them directly to one of the louvres within the linkage of each of the vertical shutters walls. However, this left me with the problem of how to keep the stepper motor still and secure, without spoiling the aesthetic of the pavilion.
To solve this I created a wooden enclosure for the motor to sit in, which would be attached to the roof of the pavilion. The enclosure was based on a scaled-down version of the pavilion itself. The gaps left between the layers of the enclosure allow air to reach and cool the motor.
Flat (non-curved) wall & small shutters

The flat wall was a lot simpler to create as it wasn’t built up in layers and therefore needed less material. The louvres were smaller & lighter so that a much smaller stepper motor could be used to open and close them. Plus it gave me an opportunity to explore a different way of attaching the louvres to the wall.
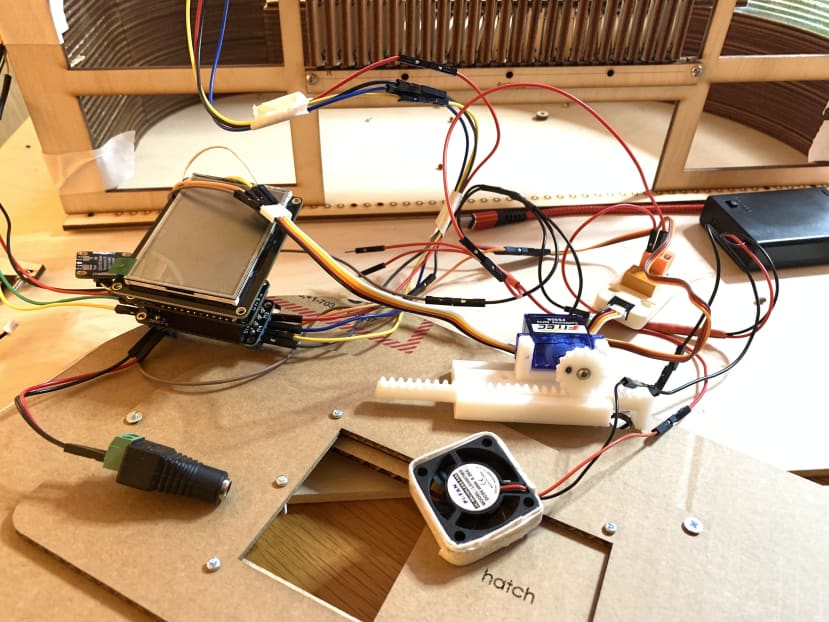
Tests to see if my stepper motors could handle the load.

Things still to do
I still need to attach a fan/air purifier to the pavilion and decide on the best place & method to mount the screen & the Adafruit ESP32-S2 Feather. Both will need to be easy to get at. As well as these bits, the sliding roof/hatch and a neopixel warning light are also on the to-do list.
Next Part
In Part 2 I attempt to explain how I built my particle pavilion.