Pollen Defence System Part 2: Making the Flowers
Follow article
 Dave from DesignSpark
How do you feel about this article? Help us to provide better content for you.
Dave from DesignSpark
Thank you! Your feedback has been received.
Dave from DesignSpark
There was a problem submitting your feedback, please try again later.
Dave from DesignSpark
What do you think of this article?
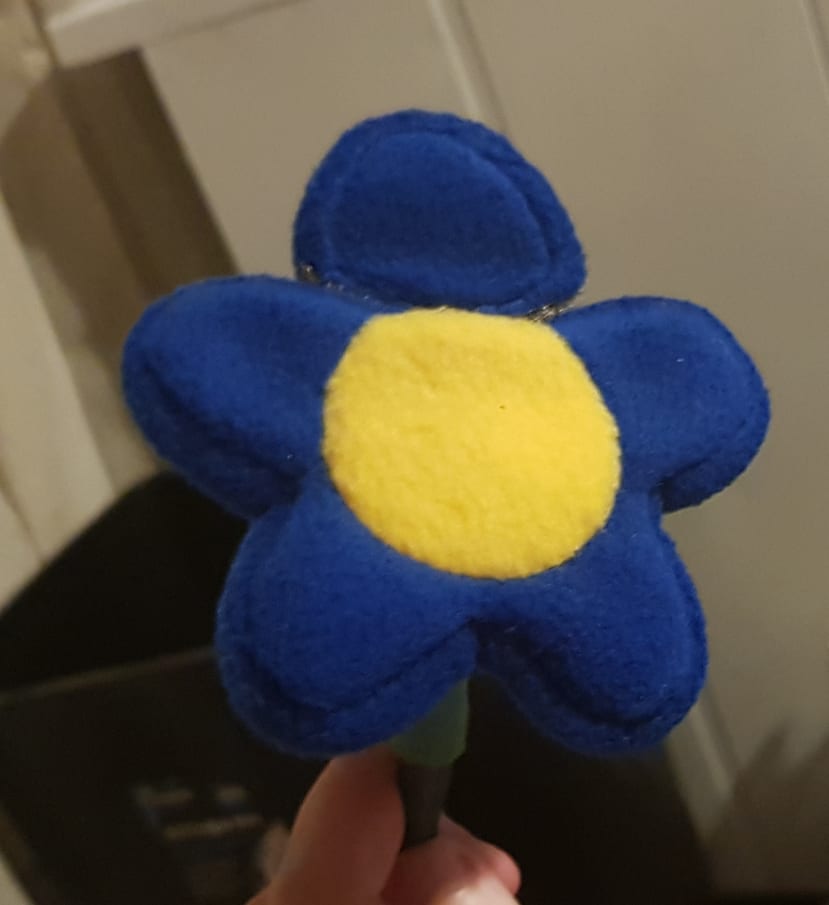
In the first part, I discussed how it all began with the Pollen Defence System, now it's time to make the flowers to use as indicators of your hayfever symptoms.
Ingredients:
- fabric,
- conductive velcro,
- conductive thread,
- regular thread,
- sticks (I used chopsticks for v1, another option is bamboo or sticks from the garden centre),
- heatshrink that is wide enough to contain one stick and two wires, ideally green because it'll be the outside of your stalks,
- wire (coated),
- scissors,
- I used a hairdryer for the heatshrink, you can do whatever works for you,
- pins or clips (I prefer clips) to keep the fabric in place.
Sewing:
There are only two methods you need to be able to sew the flowers, and I have some diagrams to show how they work. The first is a running stitch, where you simply push the needle up and down through the fabric. I recommend keeping your stitches small (say 3 mm each or so) because it looks better finished, but the primary goal is to get the sewing done and I don't want you to worry about getting it all perfect if you haven't sewn before.

As you can see, in the diagram one side of the fabric has bobbly bits. That side is the "right" side of the fabric, which means it's the side you'd like to be on show when your project is finished. The flat side is the "wrong" side of the fabric. To sew something, most of the time we put the right sides together and sew with the wrong side facing out. "Turning" is when you get to the end of sewing, and you turn the fabric inside out so the right side faces out and the stitches are hidden.
This means, when you're almost finished sewing, you usually have to leave a gap, a "turning hole," so you can turn the fabric through that gap. To close it up, we'll use a ladder stitch:
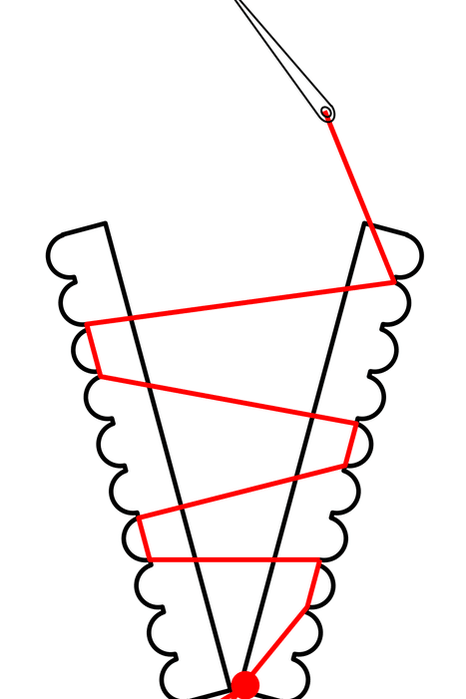
This allows you to mostly or entirely hide your closing stitches.
Method:
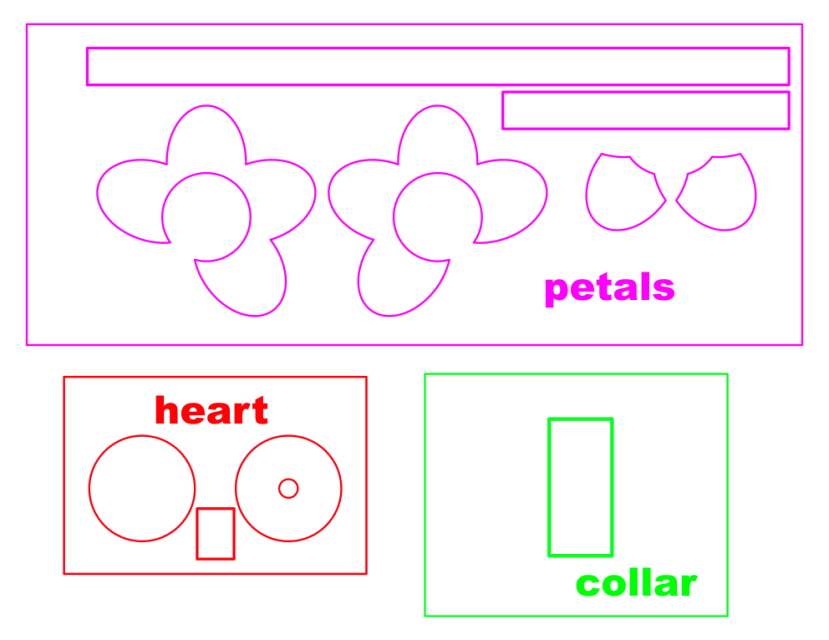
So step one, for me, was sewing and assembling the flowers. Personally, I laser-cut the pattern pieces, but you can print off the pattern and cut them by hand out of whatever fabric you choose. I'm going to refer to the pieces according to this chart:
So step one is folding the collar lengthwise and sewing along the long side. This will turn it into a tube which can be attached to the heart piece with the hole in the centre. The collar will sit over the stalk, and hide the join between the flower and the stalk.

It can be a bit tricky to turn; what I do is leave a tail on the thread, and then use tweezers to pull that tail to the other end. That way I can tug on the thread gently while I poke the end in to turn it inside in.

To attach it to the base of the flower's heart, match the right side of the collar to the right side of the heart piece with the hole in the centre. This is really too fiddly to clip or pin, but shouldn't be too hard to attach with a running stitch. It's okay for the collar to stick up a little bit. To see how it'll look when it's done, check the bottom where the collar is sticking out.
Next, we'll start with the main corona of petals. This needs to be attached to the heart of the flower, twice - once to the piece with the collar and once to the plain circle. This does need to be pinned or clipped, ideally, right sides "together" (the petals will bend away from the centre as you're basically pinning the inner circle of the corona of petals to a circle - that's fine).

Now sew around the circle, bearing in mind that the corona will not fit all the way around the circle. That's fine, that's by design to create a gap for the petal that's attached with conductive velcro.
Do the same with the other corona of petals and the circle forming the heart of the flower with no hole in it.
Next will be the collar that sits between the two halves of the flower. Take the longest rectangle you cut, and match it to the small rectangle that came with the two circles forming the heart of the circle. Place the ends of each together, and sew across. Once you've finished, both ends of the heart piece should be connected to both ends of the longest rectangle. This is sized to fit around the entire flower (minus the separate petal).
Use normal thread to attach two small squares of conductive velcro on either side of the heart rectangle. We'll use conductive thread to attach the wires later. I recommend making these bits of velcro the hook bits (scratchy) because they are small, and sewing the hook part is very frustrating and annoying as it snatches at the thread. Carefully feeding the thread through from the velcro side is a must.

Pin the collar very carefully to one of the halves of the flower, and sew it in stages, making sure you match the edges properly. Due to differences in the way fabric stretches, you may have to make adjustments to ensure it matches up properly - I pin these in stages and then put isolated stitches in some key locations around to make sure any slack is taken up gradually and I don't end up with sudden folds.
Next, pin to the other half of the flower. I place two clips right next to each other on either side of the turning gap I intend to leave. Make the turning gap stretch from just outside one bit of velcro to just outside the other. It's a longish stretch to ladder stitch but means we can assemble the flower, attach the wires, and get everything correctly situated before we close up the flower.

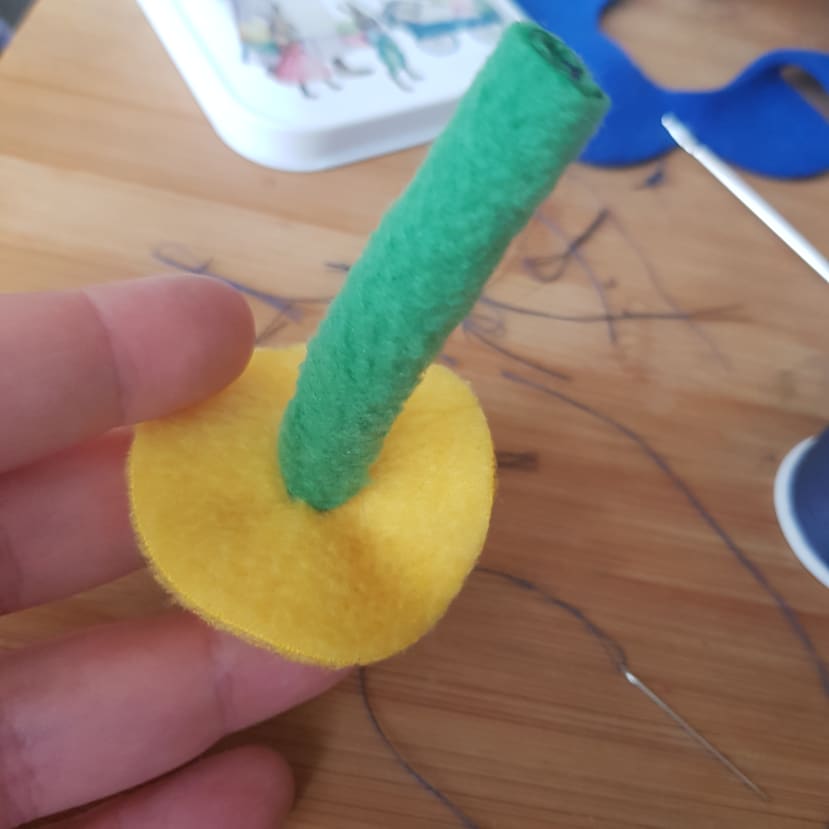
To sort out the wires, insert two lengths of wire next to a stick, in a correctly sized length of heat-shrink. When you heat the heat-shrink, the stick will become a bit lumpy from the cables - lean into that! Nature IS lumpy and that's more than fine! Leave a long length of the wires at the bottom, and about 10cm at the top. Insert the top into the collar of the flower and push through until the wires are sticking out into the centre of your flower. Strip back some of the wire and twist it back on itself to create a loop you can sew onto the inside of the flower using conductive thread.

Next, use the ladder stitch described above to close up the flower. Done! The wires at the bottom will allow you to connect the flower to whichever piece of hardware (for v1 we used an esp) will register the breaking of the circuits.
To make the spare petal, sew the ends of the leftover rectangle together. Sew the fluffy bit of velcro onto this, but make sure this is ONE piece of velcro that is long enough to attach to both of the smaller pieces at once.

Now, just like we did with the rest of the flower, sew the collar onto one side of the petal. Then sew it onto the other part, leaving a turning gap and closing it with a ladder stitch.
Finally, fold some green paper in half and cut on the fold, in a leaf shape. This way, you end up with 2 leaf shapes which are joined together. Write a symptom on the leaf, and use double-sided tape to wrap it around the stalk of your flower and press the two leaves together.

Done!
Repeat 2 more times (or however often you need to track your symptoms).