NVIDIA Jetson Nano应用-安装Deep Stream SDK与执行深度影像串流范例
关注文章
 戴夫来自 DesignSpark
你觉得这篇文章怎么样? 帮助我们为您提供更好的内容。
戴夫来自 DesignSpark
Thank you! Your feedback has been received.
戴夫来自 DesignSpark
There was a problem submitting your feedback, please try again later.
戴夫来自 DesignSpark
你觉得这篇文章怎么样?
|
作者 |
张嘉钧 |
|
难度 |
普通 |
|
材料表 |
Webcam X1 NVIDIA JetsonNano X1 |
DeepStream
现在是一个AI大世代,NVIDIA开发出DeepStream SDK让任何人都能轻松快速地建立以 AI 为基础的 GPU 加速应用程序,以进行影像分析。上述取自于NVIDIA原厂文章,除此之外我有专门写一篇来讲解比较细部的技术与特色:https://www.rs-online.com/designspark/nvidia-deepstream-cn。
Jetson Nano 上安装 DeepStream
首先,我们需要先安装依赖套件:
$ sudo apt install \
libssl1.0.0 \
libgstreamer1.0-0 \
gstreamer1.0-tools \
gstreamer1.0-plugins-good \
gstreamer1.0-plugins-bad \
gstreamer1.0-plugins-ugly \
gstreamer1.0-libav \
libgstrtspserver-1.0-0 \
libjansson4=2.11-1 -y
安装 librdkafka
下载函式库
$ git clone https://github.com/edenhill/librdkafka.git
配置与建构 函式库
$ cd librdkafka
$ git reset --hard 7101c2310341ab3f4675fc565f64f0967e135a6a
$ ./configure
$ make
$ sudo make install
复制 librdkafka 建置完的函式库到DeepStream的文件夹中
$ sudo mkdir -p /opt/nvidia/deepstream/deepstream-5.0/lib
$ sudo cp /usr/local/lib/librdkafka* /opt/nvidia/deepstream/deepstream-5.0/lib
安装完相依套件之后就可以安装DeepStream SDK了,在这之前需要先确认一下自己的 JetPack 版本,因为DeepStream的版本也需要对应才能使用:
$ sudo apt-cache show nvidia-jetpack
或者也可以只用 jetson_stats来查看 ( 需要额外安装 )
$ jetson_release
总之,只要确认自己使用的Jetpack版本之后,就可以找出对应使用的DeepStream版本,从Deep Stream的介绍文件中可以找到下方这张表格,我们的JetPack版本是4.4 对应到的是 DS 5.0, 5.0.1,如果是要使用 DS 5.1的话则需要升级成JetPack 32.5.1。

接着可以从下列的网址找到各版本的封存,如果你直接Google搜寻旧版本,NVIDIA都会导到最新的,所以一定要加上「Archived」,这边我们选择 DeepStream 5.0 的版本,并且下载压缩文件:

下载下来之后就可以将其解压缩到根目录
$ cd ~/Downloads
$ sudo tar -xvf deepstream_sdk_5.0_jetson.tbz2 -C /
进行安装
$ cd /opt/nvidia/deepstream/deepstream-5.0/
$ sudo ./install.sh
$ sudo ldconfig
接着输入下列指令确认是否安装成功
$ deepstream-app --version-all
只要有看到版本信息就代表安装成功了。
卸除DeepStream ( 补充 )
$ cd /opt/nvidia/deepstream/deepstream/
$ sudo vi uninstall.sh
set PREV_DS_VER=5.0
$ sudo chmod +x uninstall.sh
$ sudo ./uninstall.sh

DeepStream App推论用的范例程序 (deepstream-app)
我们可以到下列路径查看所有可以使用范例,基本上DeepStream的运行方式都会跟配置文件一起搭配使用,所以我们要稍微理解并分析一下配置文件的内容才行。
$ cd samples/configs/deepstream-app
$ ls
第一个范例程序 ( source1_usb_dec_infer_resnet_int8 )
运行第一个范例程序,从文件名就可以知道它是只有一个来源,是usb的device,进行的是inference并且执行的模型是resnet,数据型态是int8,不过这边要提醒大家int8只能在Xavier上运作,Nano系列只能跑fp16,所以都需要rebuild 会耗费一些时间;要执行这些配置文件都需要透过deepstream-app这个指令来运行,在输入档名之前还需给予 -c 告诉程序这是配置文件。
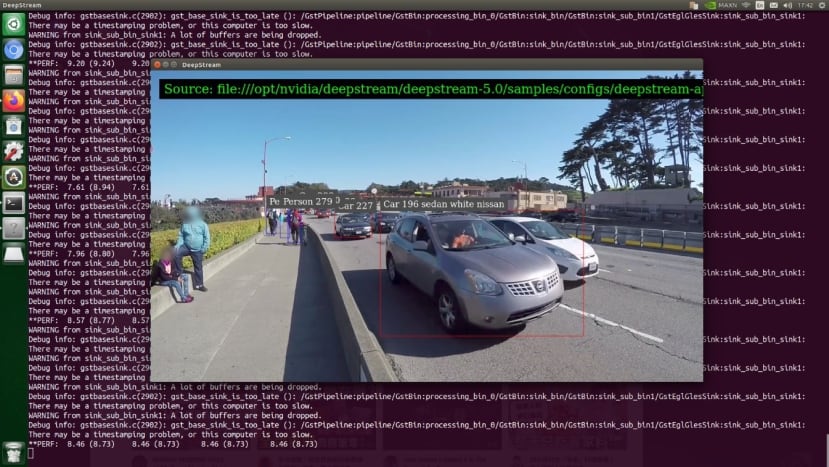
$ deepstream-app -c source1_usb_dec_infer_resnet_int8.txt这系列提供的范例模型仅能辨识「Car」、「Bicycle」、「Person」、「RoadSign」,所以我拿了手机提供台湾街景的画面让它进行分析,执行效果如下。


接着来分析一下它的配置文件吧!一开始会先遇到的是 App的基本设定 ( application ),enable-perf-measurement是评估性能;perf-measurement-interval-sec采样和显示性能评估的时间间隔(以秒为单位);。
[application]
enable-perf-measurement=1
perf-measurement-interval-sec=5
#gie-kitti-output-dir=streamscl
接着是平行显示 ( tiled-display ) 的设定,平行显示这里不确定翻译的正不正确,你们可以想象是监视器画面的概念,可以同时显示多个画面。
首先enable就是要不要开启显示的功能,rows跟columns用来控制显示画面的数量,width跟height则是整个画面的大小。
[tiled-display]
enable=1
rows=1
columns=1
width=1280
height=720
再来是显示画面的来源 ( source ),type用来控制我们的来源:
1: Camera (V4L2)
2: URI
3: MultiURI
4: RTSP
5: Camera (CSI) (Jetson only)
我们这里设定为USB摄影机所以选择1,接下来就是一些基本的设定 fps-n是最大的fps数值d则是最小的,再来使用USB摄影机很重要的点就是dev-node要设定好,可以从输入 ls /dev 去确认,通常名称为 video*,*从0开始。
[source0]
enable=1
#Type - 1=CameraV4L2, 2=URI, 3=MultiURI, 4=RTSP, 5=CSI
type=1
camera-width=640
camera-height=480
camera-fps-n=30
camera-fps-d=1
camera-v4l2-dev-node=0
搞定了输入就要来搞定输出 ( sink ) ,Type有很多种可以选择:
1: Fakesink 不进行输出
2: EGL based windowed sink (nveglglessink) 使用一般的Ubuntu 窗口开起
3: Encode + File Save (encoder + muxer + filesink) 储存成影片
4: Encode + RTSP streaming 使用RTSP串流方式输出
5: Overlay (Jetson only) 强制覆盖在画面上
6: Message converter + Message broker
这边可以看到我们使用的是Overlay,它会直接覆盖在该屏幕最上层,所以如果你只有一个屏幕不建议这样做。
sync则是输出影片的是否要同步( 0:越快越好 1: 同步 )。
display-id跟overlay-id是只有在Overlay的时候才需要特别宣告的,display是显示的屏幕;overlay-id是编号,一定要大于1才行。
source-id则是缓存区域的编号,会包在source的名称当中,如果你有N个source* 跟sink*,你的source-id则要去搭配 * 的编号才行。
[sink0]
enable=1
#Type - 1=FakeSink 2=EglSink 3=File 4=RTSPStreaming 5=Overlay
type=5
sync=0
display-id=0
offset-x=0
offset-y=0
width=0
height=0
overlay-id=1
source-id=0
在介绍一下配置文件提供的另外两种配置,第一个是输出成档案,这边预设是先关闭的(enable=0),这边批注的部分都有告诉使用者格是怎么样去选择。
[sink1]
enable=0
type=3
#1=mp4 2=mkv
container=1
#1=h264 2=h265 3=mpeg4
codec=1
#encoder type 0=Hardware 1=Software
enc-type=0
sync=0
bitrate=2000000
#H264 Profile - 0=Baseline 2=Main 4=High
#H265 Profile - 0=Main 1=Main10
profile=0
output-file=out.mp4
source-id=0
而另一种配置则是输出成网络串流 (RTSP),这是大部分业界会想要做到的功能,最主要需要设定的地方在rtsp-port端口,Windows上撷取rtsp的方法等等会再补充介绍。
[sink2]
enable=0
#Type - 1=FakeSink 2=EglSink 3=File 4=RTSPStreaming 5=Overlay
type=4
#1=h264 2=h265
codec=1
#encoder type 0=Hardware 1=Software
enc-type=0
sync=0
bitrate=4000000
#H264 Profile - 0=Baseline 2=Main 4=High
#H265 Profile - 0=Main 1=Main10
profile=0
# set below properties in case of RTSPStreaming
rtsp-port=8554
udp-port=5400
接着是处理我们在画面中看到对象的边界框以及卷标
[osd]
enable=1
border-width=2
text-size=15
text-color=1;1;1;1;
text-bg-color=0.3;0.3;0.3;1
font=Serif
show-clock=0
clock-x-offset=800
clock-y-offset=820
clock-text-size=12
clock-color=1;0;0;0
接下来是设定串流,live-source是宣告是否为实时影像,最后批注掉的attach-sys-ts-as-ntp则是决定时间的显示是要显示网络串流的时间还是DeepStream分析完的时间。
[streammux]
##Boolean property to inform muxer that sources are live
live-source=1
batch-size=1
##time out in usec, to wait after the first buffer is available
##to push the batch even if the complete batch is not formed
batched-push-timeout=40000
## Set muxer output width and height
width=1280
height=720
## If set to TRUE, system timestamp will be attached as ntp timestamp
## If set to FALSE, ntp timestamp from rtspsrc, if available, will be attached
# attach-sys-ts-as-ntp=1
最后是设定TensorRT引擎,快速讲解TensorRT引擎是由NVIDIA提出的一个AI推论加速引擎,现有的NVIDIA相关工具都是把模型转换成TensorRT以获得更快的体验,而DeepStream又有一个更好玩的功能,就是它会有主要运行的模型(primary-gie)以及多个次级模型(secondary-gie%d),不过在我们这个范例当中它只有运行主要的GIE,首先要先宣告引擎的路径 (model-engine-file);接着是要宣告bbox的颜色;接着是interval这个参数代表的是每一次会有几个批次的资料不被推论,或许是要降低负担才有这个参数,不过这边只有一个引擎所以设定0全部的帧都进行推论;gie-unique-id则是GIE的编号;config-file是模型的配置文件,如果有客制化模型的需求也需要去修改这个档案。
# config-file property is mandatory for any gie section.
# Other properties are optional and if set will override the properties set in
# the infer config file.
[primary-gie]
enable=1
model-engine-file=../../models/Primary_Detector/resnet10.caffemodel_b30_gpu0_int8.engine
#Required to display the PGIE labels, should be added even when using config-file
#property
batch-size=1
#Required by the app for OSD, not a plugin property
bbox-border-color0=1;0;0;1
bbox-border-color1=0;1;1;1
bbox-border-color2=0;0;1;1
bbox-border-color3=0;1;0;1
interval=0

#Required by the app for SGIE, when used along with config-file property
gie-unique-id=1
config-file=config_infer_primary.txt
到这边,第一个范例程序的配置文件终于结束了。
第二个范例程序 (source8_1080p_dec_infer-resnet_tracker_tiled_display_fp16_nano.txt)
这个范例主要在示范8个来源怎么设定平行显示,并且添加了tracker的功能,可以追踪辨识到的对象,那这边我们介绍配置文件的同时也会稍微修改内容。
平行显示最主要要设定的就在 tiled-display,我们需要把rows跟columns设定成4跟2代表着有4列2行,总共可以放8个画面。
[tiled-display]
enable=1
rows=4
columns=2
width=1280
height=720
再来不同的地方就是来源 ( source ),这边选择的是MultiURI,可以让多个显示器都输出同一个影片,这个型态需要宣告的是 num-sources 告诉DS总共要同时输入几个来源,gpu-id如果有多个GPU的话可以额外设定,cudadec-memtype则是分配CUDA内存的储存类型。
[source0]
enable=1
#Type - 1=CameraV4L2 2=URI 3=MultiURI 4=RTSP
type=3
uri=file://../../streams/sample_1080p_h264.mp4
num-sources=8
#drop-frame-interval=2
gpu-id=0
# (0): memtype_device   - Memory type Device
# (1): memtype_pinned   - Memory type Host Pinned
# (2): memtype_unified  - Memory type Unified
cudadec-memtype=0 cudadec-memtype=0
处理好来源接着就是输出了,这边要补充下列这段,并且把原本的sink0的enable改为0。
[sink3]
enable=1
#Type - 1=FakeSink 2=EglSink 3=File
type=2
sync=1
source-id=0
gpu-id=0
nvbuf-memory-type=0
原本是使用Overlay,但是我实测过使用Overlay,就无法做到点击单一来源显示的效果,建议这边先改成EglSink,只要是EglSink就可以侦测你鼠标点击的位置知道你现在要着重观看哪一个source,并且原本平行输出的画面是没有卷标等文字讯息的,点进去那些文字讯息就会跑出来。
接着就要讲到tracker的部分了,这边比较特别的地方是如果要使用tracker需要把宽高设定成32的倍数;ll-lib-file函式库的路径;ll-config-file配置文件的路径;enable-batch-process开启批处理。
[tracker]
enable=1
# For the case of NvDCF tracker, tracker-width and tracker-height must be a multiple of 32, respectively
tracker-width=640
tracker-height=384
#ll-lib-file=/opt/nvidia/deepstream/deepstream-5.0/lib/libnvds_mot_iou.so
#ll-lib-file=/opt/nvidia/deepstream/deepstream-5.0/lib/libnvds_nvdcf.so
ll-lib-file=/opt/nvidia/deepstream/deepstream-5.0/lib/libnvds_mot_klt.so
#ll-config-file required for DCF/IOU only
#ll-config-file=tracker_config.yml
#ll-config-file=iou_config.txt
gpu-id=0
#enable-batch-process and enable-past-frame applicable to DCF only
enable-batch-process=1
enable-past-frame=0
display-tracking-id=1
关于tracker的选择,在原厂网站的文件中可以找到相关信息,图片如下

图片来源: https://docs.nvidia.com/metropolis/deepstream/5.0DP
第三个范例程序 (source4_1080p_dec_infer-resnet_tracker_sgie_tiled_display_int8.txt)

这个范例从文件名来分析的话是具有tracker以及sgie的额外功能,这也是唯一一个有使用到second gie的范例,我们就直接来看看配置文件的部分吧!
其实设置的方法很简单,只需要增加 [secondary-gie%d] 这个项目,这边导入了 VehicleTypes的引擎可以用来辨识车子的种类;gie-unique-id这边则是从3开始,其实不要跟Primary的id冲突到应该就可以了;operate-on-gie-id表示将这个gie应用在哪一个gie上面;operate-on-class-ids可以特别选择应用在第几个类别的项目上,secondary可以自动进行IOU的分割并进行二次的辨识,针对这个部分我们可以设定成辨识到车子再开启secondary辨识。
[secondary-gie0]
enable=1
model-engine-file=../../models/Secondary_VehicleTypes/resnet18.caffemodel_b16_gpu0_int8.engine
gpu-id=0
batch-size=16
gie-unique-id=4
operate-on-gie-id=1
operate-on-class-ids=0;
config-file=config_infer_secondary_vehicletypes.txt
第二个则是辨识车子的颜色
[secondary-gie1]
enable=1
model-engine-file=../../models/Secondary_CarColor/resnet18.caffemodel_b16_gpu0_int8.engine
batch-size=16
gpu-id=0
gie-unique-id=5
operate-on-gie-id=1
operate-on-class-ids=0;
config-file=config_infer_secondary_carcolor.txt
最后试辨识车子的厂牌。
[secondary-gie2]
enable=1
model-engine-file=../../models/Secondary_CarMake/resnet18.caffemodel_b16_gpu0_int8.engine
batch-size=16
gpu-id=0
gie-unique-id=6
operate-on-gie-id=1
operate-on-class-ids=0;
config-file=config_infer_secondary_carmake.txt
结论
看了三个范例之后应该大部分的参数都了解了吧!接着就可以按照自己的需求去更动了,不过目前都只是在使用他提供的模型,如果要使用自己的模型怎么办?在下一篇文章中我会带大家操作使用DeepStream运行YOLOv4的方法,接着再教大家怎么透过YOLOv4进行Transfer Learning训练自己的数据集,最后整合在一起就完成在DeepStream上辨识自己想要辨识的东西了。最后补充怎么在DeepStream输出RTSP并且在Windows计算机上接收画面。
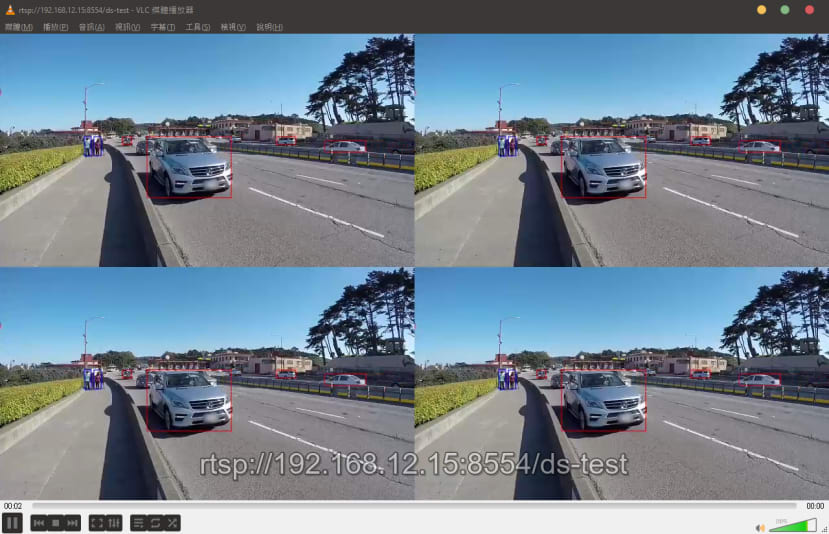
(补充) DS输出RTSP并在Win10上显示
步骤如下:
1.安装VLC : https://www.videolan.org/vlc/index.zh_TW.html

2.开启网络串流,可以输入快捷键 Ctrl+N。

3.输入网址,在DeepStream程序开起来的前几行会提示应该怎么输入,基本上没动到的话,埠号是8554,后面加上数据名称 ds-test,按下播放即可。

4.大功告成