Kickstart Kamper: Building an Off-Grid Battery Storage Frame
Follow article
 Dave from DesignSpark
How do you feel about this article? Help us to provide better content for you.
Dave from DesignSpark
Thank you! Your feedback has been received.
Dave from DesignSpark
There was a problem submitting your feedback, please try again later.
Dave from DesignSpark
What do you think of this article?
There has never been a better time to explore off-grid renewables, with the price of gas and oil being at an all-time high, the end of the feed-in tariff in the UK and the urgent push for energy-efficient heat pumps, suddenly the prospect of generating, storing and consuming electrical energy locally has become vastly more appealing. Although storage technologies are still in their infancy on a macro scale, their applications in remote and mobile power systems have been around for some time and despite its potential economies, not a lot of people appear to be aware of them as a viable option.
Off-grid battery storage systems are most often found in recreational vehicles like campervans, caravans and even boats, where it is not always possible to connect to the electrical grid but instead will be charged by localised renewables such as solar or wind. To this effect, this article aims to document the initial stages of designing an off-grid electrical storage system for our resident sustainable campervan conversion project, Kickstart Kamper, to explore the feasibility of building an independent domestic power system in the interest of making the best use of available renewables.
Parts List
- 100Ah deep-cycle lead acid batteries (727-0427)
- 30mm Aluminium profile (761-3284)
- Three-way cube joints (767-5575)
- Right angle brackets (180-9137)
- M6 T-slot nuts (180-9116)
- PLA filament (832-0214)
- Spray paint (764-3027)
- 5mm plywood
- 30mm steel angle
- Ratchet straps
- Foam tape
To test the initial concept of off-grid electrical storage we need to initially address a few defining factors, including the type of battery best suited for the application and how to best arrange our storage system for optimal operation and space efficiency.
Battery Considerations
There are generally two types of battery chemistries that people consider, both have their respective benefits but both are often dismissed in the context of storage for different reasons. Lithium chemistries are often the obvious first choice because of their long cycle life, high energy density and low-weight but as a newer technology, they are still costly. In comparison, lead-acid chemistries have been around since 1859 and while they suffer the stigma of “ancient technology”, their continuous development over the years has made them surprisingly competitive, extremely cost-effective, and resistant to a lot of electrical abuse, which makes them perfect for homebrew projects.
A lot of emerging battery applications like electric vehicles, make the choice in chemistry very easy due to the obvious requirements for power density and weight, but for renewable storage applications, there is often more than one good choice. Like all engineering challenges, it often comes down to requirements, so firstly, we need to know what we want out of our system before making a decision.
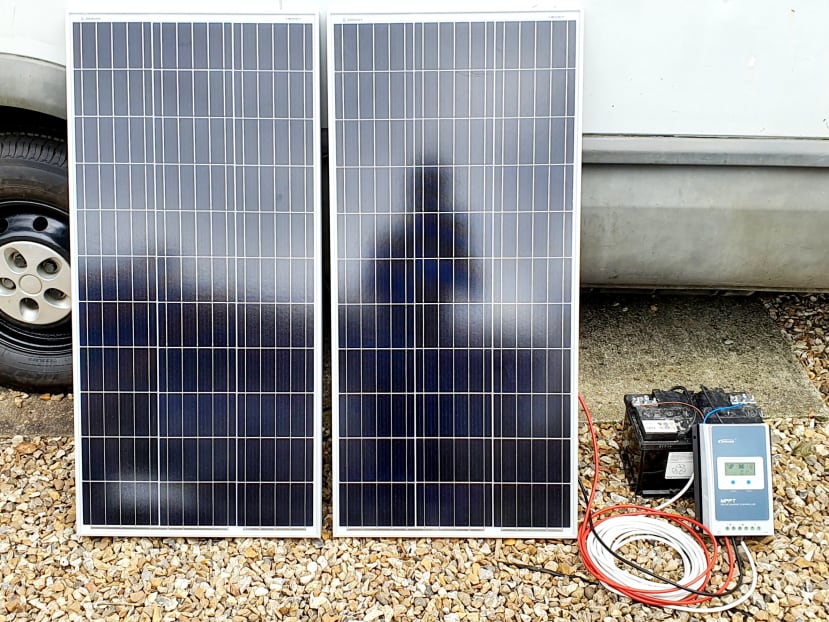
Testing the solar system to mount on the van.
Off-grid storage systems are largely dictated by the limits of any renewables charging the system. For example, my campervan aims to have a 400W solar array and a 100W wind turbine but these numbers are highly dependent on weather and time of day. Equally, I may need to draw 2200W to run an electric kettle for 30 seconds which the renewables on their own could not supply. Therefore, I need to compensate for these fluctuations by calculating the required storage.
The daily renewable power generation on the van is estimated at between 500 to 2000Wh. As I am more likely to use more power on days where I am working, the estimated worst-case power budget is broken down below:
- Laptop (60W) for 8 hours = 480Wh
- TV and other devices (200W) for 3 hours = 600Wh
- Electric kettle (2200W) for 0.1 hours = 220Wh
The sum of all these required loads comes to 1300Wh, therefore the charge deficit allowed over an average five-day working week can be calculated under worst-case conditions:
- 1300Wh – 500Wh = 800Wh charge deficit per day.
- 800W x 5 = 4000Wh charge deficit per five-day week.
- 4000Wh / 12v = 334Ah required battery capacity.
However, discharging to 0% can damage the batteries, therefore I have rounded up to the nearest 100Ah battery which means we need four batteries for our off-grid setup. The max current that can be drawn from the system is taken from the 2200W kettle which distributed between four batteries equates 46A per battery and roughly half the maximum current capacity.
I have decided to use lead-acid batteries for this project in the interest of simplicity and cost more than anything. During my research, I have found that while lithium offers better service life and overall performance on many fronts, contemporary lead-acid chemistries actually offer better value for money and return on investment. I have also found that off-grid electrical equipment favours lead-acid chemistries more readily than lithium and is easier to build multi-battery storage systems with.
Mechanical Considerations
As a general rule, high-capacity batteries are bulky items irrespective of chemistry and do require some consideration to be given to the physical layout of the storage system as well as the mechanical support needed to manage any weight. Off-grid storage systems are often arranged around a metal superstructure that keeps the array of batteries neat and tidy while also limiting the I2R losses by minimising the distance between each battery. This also allows any inverters and charge controllers to be kept in close proximity or built into the frame for maximum efficiency and organisation.
The battery frame is therefore important, especially in a mobile context such as a campervan where the batteries need to be secured while in transit to prevent damage or injury. Therefore, we will be developing a strong, modular superstructure that will allow us to make additions or modifications to our electrical system as it grows during the build. Something that I’ve heard often with campervan conversions is that you never get the layout right first time, so designing the van layout in modular components will also allow us to make drastic changes later if required.
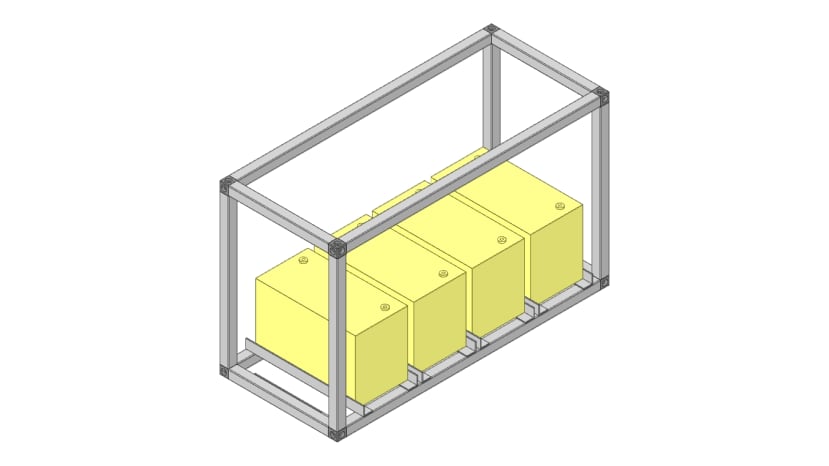
Aluminium superstructure with battery mountings.
We will be using 30mm aluminium profile for the battery frame due to its inherent strength and modularity while being presentable enough to be seen as part of the makerspace aesthetic we are aiming for in the campervan. The batteries will sit in the bottom of the frame to keep the centre of gravity low and will be cradled by sections of mild steel angle and foam tape to soften any bumpiness in the ride as we drive along. Each battery will then be secured with a ratchet strap for easy access.
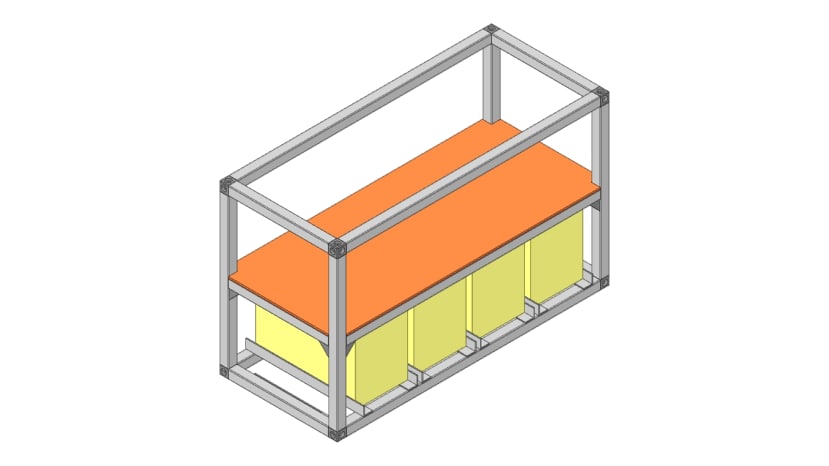
Aluminium superstructure with electronic equipment shelf.
The second level in the frame will feature a plywood shelf to keep accidental debris off the battery terminals while featuring all of the standalone electrical components that will be required in the day to day running of the van. This will likely include, the solar charge controller, wind charge controller, AC inverter, diesel heater, consumer unit and fuse boards as well as the 12v diesel heater all drawing from the batteries that are kept nearby. The top of the frame will then act as the foundation for the bed rafters that will run along the width of the van.
Final assembly and conclusions
Having completed all my calculations and modelled the required frame in DesignSpark Mechanical, I was keen to cut and assemble the components ready to fit into the van. The frame uses 30mm aluminium from RS Pro and while working with aluminium is easy, there was still a fair amount of preparation that was needed before screwing it all together.
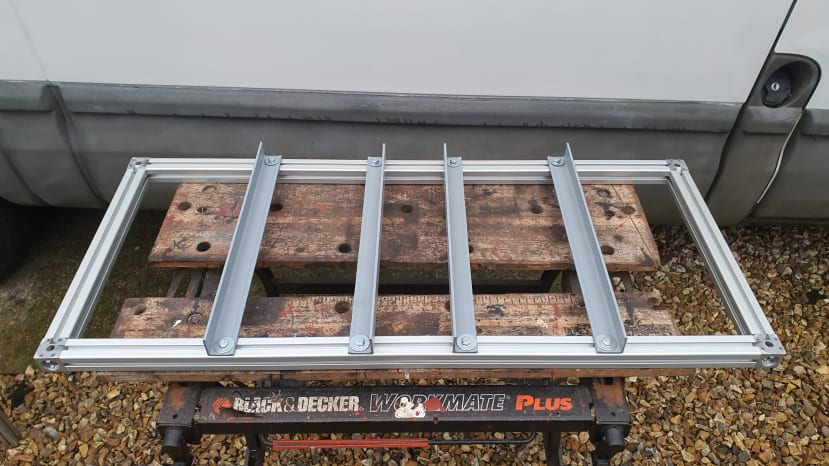
The foundation of the battery frame is designed to be strong and lightweight.
I used a band saw to cut the profile to length and I then tapped the ends with M6 threads that would allow me to connect the frame at right angles using the three-way cube connectors that give it a flush finish. Once this was complete, I cut some 30mm steel angle and attached it to the aluminium profile with some M6 machine screws which would later cradle the batteries and secure them to the frame using some ratchet straps.
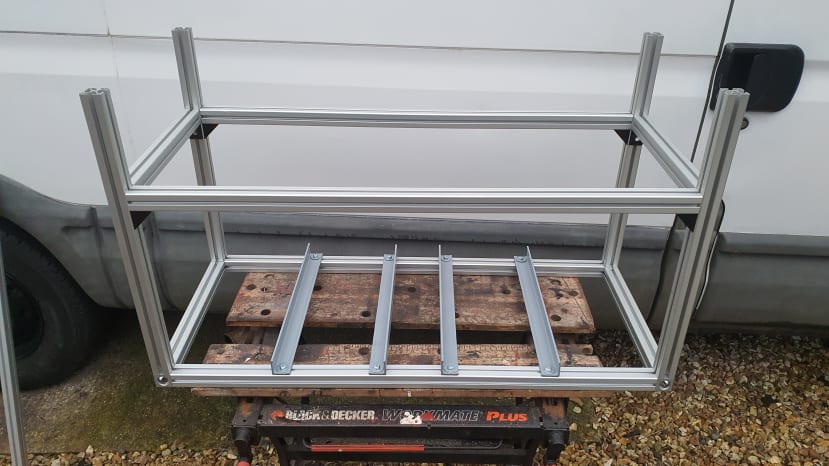
Adding the second layer that will support the shelf with 3D printed brackets.
The second layer of the battery frame is designed as a simple shelf that will eventually hold the electronic equipment that will connect directly to the batteries. The horizontal and vertical pieces were cut to size and connected together with 3D printed right angle brackets that, alongside the cube connectors on the base, make the frame surprisingly sturdy.
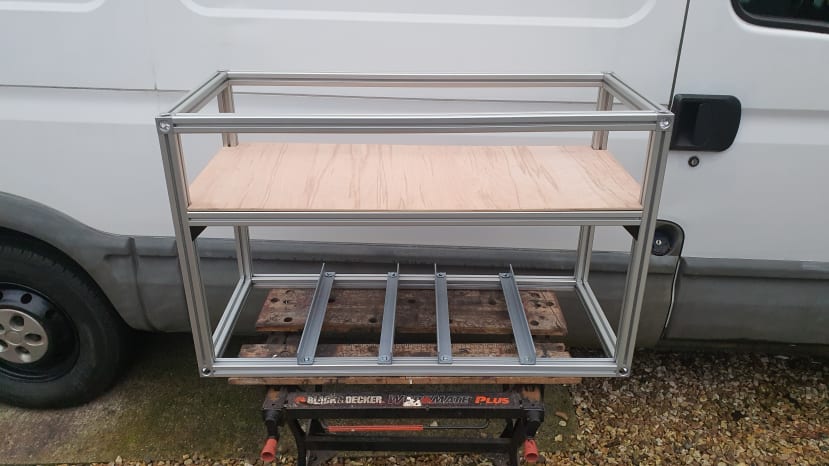
Adding the final top layer and the wooden shelf that will support any electronics.
The last steps in the assembly were to cut a piece of 5mm plywood for the shelf and duplicate what was done on the foundation on top of the frame to complete the structure. Adding the third layer of aluminium helped increase the strength of the frame significantly! This strength will be important for keeping the batteries secure while helping to support the bed rafters that will lay on top of the frame and across the width of the van.
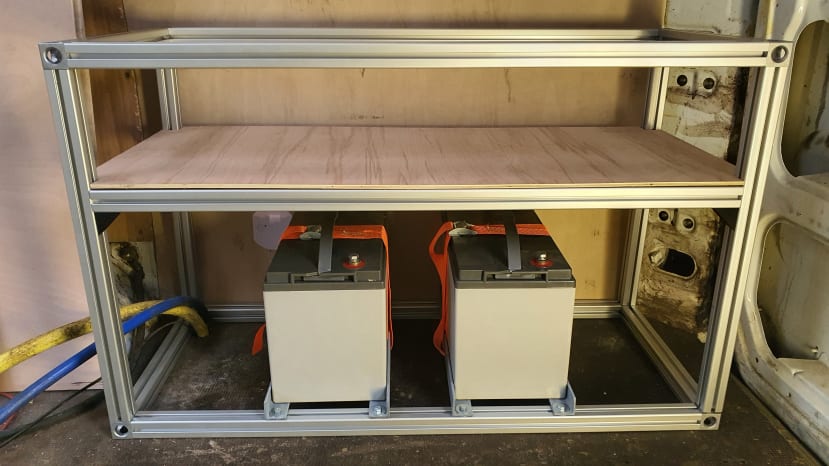
Frame complete and batteries secured with ratchet straps
Finally, we can place the completed frame in the van and test with the batteries in their cradles. As expected, the battery frame looks great and makes for a good starting point for the van interior but there is still a lot to do. The beauty of working with aluminium profile is that it is all modular and can be reconfigured on a whim, this will also make it easier to bolt down once the walls and floors are complete alongside the rest of any furniture.
For a metal frame, this project was surprisingly involved but worth the effort in the interest of using engineering to design functional and comfortable living environments. If you enjoyed this article, you can learn more about the Kickstart Kamper project on DesignSpark or visit the official website below.