FemEng: Experiential Learning with Plants and Arduino
Follow article
 Dave from DesignSpark
How do you feel about this article? Help us to provide better content for you.
Dave from DesignSpark
Thank you! Your feedback has been received.
Dave from DesignSpark
There was a problem submitting your feedback, please try again later.
Dave from DesignSpark
What do you think of this article?

This project was part of the FemEng Technical workshop, where there is a multitude of other wonderful articles that you can read.
Idea Spark
The only thing that kept me company for most of lockdown was my plants - but my plants are silent. Spending hours a day in a flat with other living things that do not make a sound inspired me to put some technical skills to use. I remember watching an amazing TedTalk where an ecologist was talking about how they tracked the electric signals trees sent through their root systems to send information to their neighbours.
Figure 1. Forest shot from Suzanne Simard’s TedTalk: How trees talk to each other
House plants, being another living organism, work in exactly the same way. They have electric pulses travelling through the leaves all the time, sending signals around the plant about what’s going on in the pot, in the air and all around them. These pulses, like other electric signals, can be detected with the right technology. Electromyography uses surface electrodes attached to human skin to detect the electric activity happening in the muscles beneath the surface - taking this idea and revamping it a little will allow for the electric activity within plant leaves to be detected.
The aim of this project is to be able to successfully assemble a circuit that collects electric signals picked up through surface electrodes into data by using Arduino, with the hope that this could then be sonified.
Design Discovery
I was introduced to a website called instructables.com, a wonderful forum full of DIY projects that people have posted for the sake of creativity and an offer to novice designers to follow along. Through it, I was able to discover many projects I'd love to do in the future, and I truly recommend it, if you have not heard of it already.

Figure 2. website banner www.instructables.com
I did manage to find one existing project that was connecting a touché shield up to plants in water and then converting that into sound, it looked great, but the focus for this project was to work with potted plants and my technical skills are not at a point where I am able to adjust and change code. After more internet forum and YouTube searching, I discovered a project that someone had made a few years ago (Biodata Sonification), and it contained a perfect set of instructions on how to turn plants electric signals into sound.
Assembly
Having been lent the SideKick Basic Kit I had access to most of the parts that I needed for this project, and what I did not have was easy enough to find on the RS Components website. The only issue I encountered was trying to not buy resistors in the thousands, as it is mostly for bulk purchases, otherwise, it is a fantastic database with all of the necessary components for fun at-home projects such as these, as well as for your more professional needs.
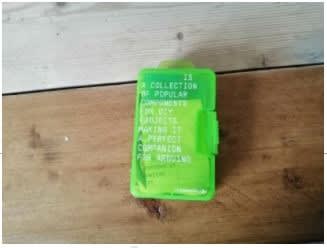
Figure 3. Side Kick Basic Kit
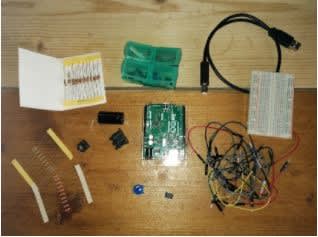
Figure 4. All project components spread on my desk
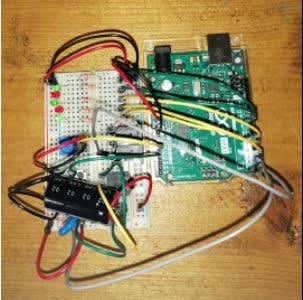
Figure 5. Complete circuit attached to Arduino One
After purchasing the necessary parts from RS Components they arrived the next day and I was quickly able to assemble the breadboard. For the code to work for this design I needed to install MIDI (Musical Instrument Digital Interface) software onto my hard drive, along with a Serial MIDI converter that would be able to convert the Arduino data and sound synthesising program that would hopefully be able to generate some funky plant tunes! I decided to go with software called Ableton Live, a highly rated software that has a three month free trial period. These are all easy to access on the internet, can be downloaded for free, and do not take up a lot of space on your computer. With all of the necessary programs in place, I was able to hook up the Arduino UNO and upload the code that I had outsourced from the archives, it had an initial LED prompt to show me that all of the hard work thus far had not been for nought.
When using Arduino it is important to note that you are aware of which port is being used to transfer data. My code took a few tries to upload because the Arduino IDE thought that the board was connected through COM3 when it was actually connected to COM7. This is easy enough to check for, just go to Start > Device Manager > Ports and look for Arduino UNO.
Endings
Up until this point the project had been a success, but the stopping point had seemingly been reached. The goal of this project was to be able to convert the plant's electric signals into sound, and issues were encountered when all of the physical jobs were done. The previously installed software did not seem to register any data transference from the MIDI port on the breadboard, and after lots of research and further installations of different programs has so far proved fruitless. There are often things that go wrong when trying something for the first time, and in this situation, I had no experience using sound synthesising software and should take this as a lesson to teach myself. Perhaps with more time, I will be able to see where mistakes have been made and what still needs to be done.
Completing this project is something that will continue on into the future but having gotten this far is still a boon. Although no closer to understanding the nature and of my ficus elastica, this project has allowed me to gain familiarity with wiring a breadboard, understanding, and then purchasing components, and the limitations of having only one USB input in your laptop can be. I encourage anyone who is interested to have a look at websites such as Instructables for inspiration and get building!
To complete this yourself check out the links below:
https://github.com/electricityforprogress/BiodataSonificationBreadboardKit