Building a Remote SDR with the Pi 3 Model B+ and SDRplay RSP2
Follow article
 Dave from DesignSpark
How do you feel about this article? Help us to provide better content for you.
Dave from DesignSpark
Thank you! Your feedback has been received.
Dave from DesignSpark
There was a problem submitting your feedback, please try again later.
Dave from DesignSpark
What do you think of this article?

Putting the radio where the antenna is with a PoE capable Pi and low cost SDR receiver.
To get the best possible performance and avoid having unwieldy obstacles in the way, antennas tend to be installed in more remote and less convenient locations, such as attics, gardens and rooftops. This is particularly true when you’re interested in receiving HF, LF and VLF signals, since aerials soon start to become rather large and can often be a very long piece of wire.
So the solution is usually to run a length of coaxial cable from the antenna to the radio hardware, but this introduces loss and quite possibly a noticeable amount of noise also, depending on the environment. One neat solution to this is to install the radio alongside the antenna, but traditionally this would mean running dedicated power out and developing some sort of remote control system.
However, a software-defined radio (SDR) far more easily lends itself to remote operation and paired with a Power-over-Ethernet (PoE) powered Raspberry Pi, provides a particularly neat solution. Since there are many ways we can set up the software side, with Ethernet offering a robust interface over which to control the radio hardware, while PoE is happy powering equipment over fairly long network cable runs and does this in a safe manner.
SDRPlay RSP2
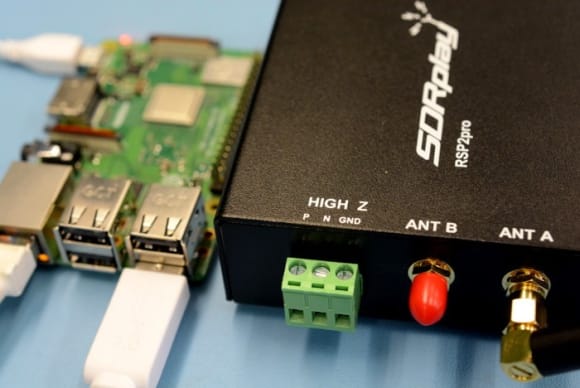
The SDRplay Radio Spectrum Processor (RSP) is a low cost SDR receiver with a USB interface and that covers a frequency range of 1kHz to 2GHz. It is currently available in three versions:
- RSP1A (150-395). An improved version of the original RSP1.
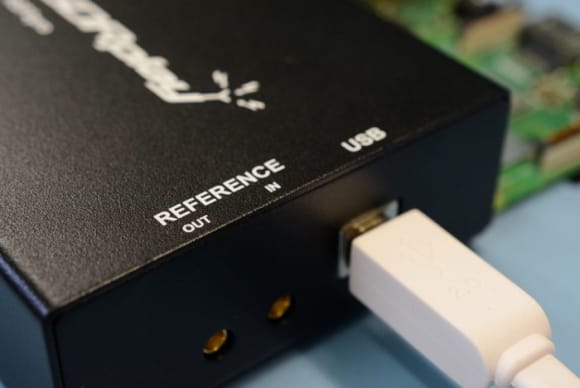
- RSP2 (124-9619) . Builds on the above and, for example, adds two more RF inputs (1x additional coaxial + 1x Hi-Z connection), plus reference clock I/O and improved noise figure.
- RSP2pro (125-7958) . Metal case packaged version of the RSP2.
The RSP1A is the lowest cost version, but for not much more the RSP2 offers an improved noise figure (in effect greater sensitivity), has a 2nd coax input (handy if you have more than 1x antenna, e.g. tuned for different bands) and can be used directly with a third high impedance antenna also. The reference clock I/O capability of the RSP2 proving useful if you had, say, a GPS locked reference clock, or you wanted to chain together multiple units and have them all synchronised.
The RSP is powered via USB and so no additional power source is required. As a reasonably compact device it would also be well suited to being mounted together with a Pi 3 Model B+ at the site of an antenna. Of course, an appropriate enclosure will be required, e.g. one that is suitably ingress protection (IP) rated for the environment.
Driver software
Installing the RSP hardware driver/API is straightforward enough and once you have downloaded this simply:
pi@3bplus:~ $ chmod +x SDRplay_RSP_API-RPi-2.11.1.run

pi@3bplus:~ $ ./SDRplay_RSP_API-RPi-2.11.1.run
Note that the file name is subject to change as new release are made.
Applications

Now at this point we could look to run applications locally on the Pi and SDRplay do provide a download for the dump1090 software, which can be used to receive aircraft Mode-S transponder signals that report the identity, position and speed of aircraft.
GNU Radio support
A lot of excellent applications are built on top of the GNU Radio SDR toolkit, such as Gqrx, a popular general purpose SDR receiver application. There are many others also — some of which that are much more research/engineer focused — and there is a visual editor called GNU Radio Companion that allows you to quickly assemble new signal processing flowgraphs.
To get signals into GNU Radio requires an SDR “source” block. If we had transmit capability also we’d have a “sink” block too. GrOsmoSDR provides these for a variety of SDR hardware, and includes a highly useful FFT display application also. At the time of writing it appears that a fork (special version) of this code may need to be used and details are provided on the SDRplay forums.
Note that building all of GNU Radio itself from source code on a Raspberry Pi is discouraged, since it is a large codebase, would take a long time to build and may sometimes prove problematic. Instead, it is recommended to install GNU Radio and its development files from packages. E.g.:
pi@3bplus:~ $ sudo apt-get install gnuradio gnuradio-devThen proceed to build gr-osmosdr. In addition it may then be necessary to subsequently build any applications which use this from source also, since if you were to install, for example, Gqrx from the Raspbian package repository, this will pull in the repository package of gr-osmosdr — which obviously won’t be built with SDRplay support.
SoapySDR support
SoapySDR is a vendor and platform neutral SDR support library with a modular architecture. The SoapySDRPlay module adds support to it for SDRplay hardware. With these installed it’s possible to then make use of applications which support the SoapySDR API, such as CubicSDR.
To install SoapySDR:
pi@3bplus:~ $ sudo apt-get install cmake swig libavahi-client-dev

pi@3bplus:~ $ mkdir src

pi@3bplus:~ $ cd src

pi@3bplus:~ $ git clone https://github.com/pothosware/SoapySDR.git

pi@3bplus:~ $ cd SoapySDR

pi@3bplus:~ $ mkdir build

pi@3bplus:~ $ cd build

pi@3bplus:~ $ cmake ../

pi@3bplus:~ $ make

pi@3bplus:~ $ sudo make install
And then to install the SoapySDRPlay module:
pi@3bplus:~ $ cd ../..

pi@3bplus:~ $ git clone https://github.com/pothosware/SoapySDRPlay.git

pi@3bplus:~ $ cd SoapySDRPlay

pi@3bplus:~ $ mkdir build

pi@3bplus:~ $ cd build

pi@3bplus:~ $ cmake ..

pi@3bplus:~ $ make

pi@3bplus:~ $ sudo make install
At this point if the SDRPlay was connected at the time of installing the driver, it will be necessary to unplug it and plug it back in.
pi@3bplus:~ $ SoapySDRUtil --findFollowing which to see if SoapySDR can detect our hardware.

So now that we’ve confirmed that SoapySDR can see our hardware we could proceed to build CubicSDR or some other application that supports the API. However, one particularly nice feature of SoapySDR is that it can be used to make SDR hardware available as a remote network resource.
Remote streaming
SoapySDR remote support enables SDR hardware attached to one computer to be used by an application running on another computer, with tuning and configuration commands — e.g. to select the antenna and set gain etc. — being sent from the client to the server, and raw samples being streamed back to the client where the actual digital signal processing is carried out.
This is quite different to running a software-defined radio application on the Raspberry Pi and then sending the demodulated audio, video or data etc. back over the network. With SoapySDR remote operation, the Pi and SDRplay RSP become a relatively “dumb” network resource — it’s like sharing a printer or a scanner over the network, only much cooler.
First we need to install the optional SoapyRemote component on our Pi:
pi@3bplus:~ $ cd ../..
pi@3bplus:~ $ git clone https://github.com/pothosware/SoapyRemote.git
pi@3bplus:~ $ cd SoapyRemote
pi@3bplus:~ $ mkdir build
pi@3bplus:~ $ cd build
pi@3bplus:~ $ cmake ..
pi@3bplus:~ $ make
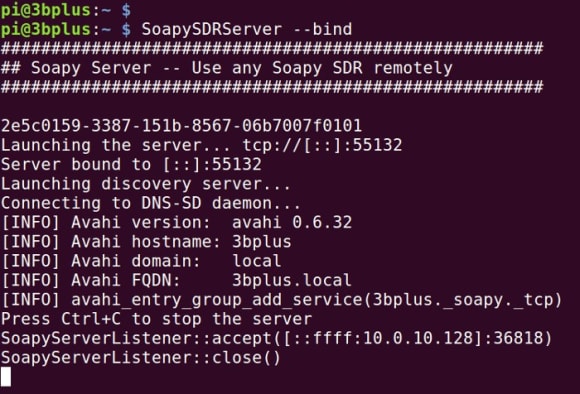
pi@3bplus:~ $ sudo make installAt this point we can start the server process manually with:
pi@3bplus:~ $ SoapySDRServer --bindThis will allow us to confirm that it starts without any problems and we will also see debug messages printed out to the terminal as remote client machines connect.
Next we’ll need to install SoapySDR and the SoapyRemote components on our client machine, which could actually be another Raspberry Pi, or more commonly it might be a laptop. Note that this machine doesn’t need the SoapySDRPlay software, since it won’t be talking directly to the hardware and we have this installed on our (first) Pi. So, just repeat 2 of the 3 above install steps.
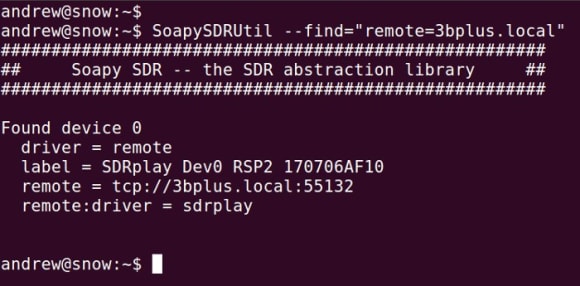
Once SoapySDR + SoapyRemote has been installed on the second Pi we can confirm that this can indeed access the hardware attached to the first by once again use SoapySDRUtil:
andrew@snow:~$ SoapySDRUtil --find="remote=3bplus.local"Note that you could specify a name or IP address for the remote parameter.
At this point if everything goes according to plan, the remote hardware should be detected and the SoapySDRServer process should show an inbound connection.
Streaming RF samples over the network is pretty resource intensive and so for this to be reliable we’ll need to configure larger O/S buffers by adding two lines to the end of /etc/sysctl.conf:
net.core.rmem_max=104857600
net.core.wmem_max=104857600
This should be done on both the server and client computers. Then to enable SoapySDRServer at boot time enter:
pi@3bplus:~ $ sudo systemctl enable SoapySDRServerUpon rebooting the new kernel parameters will be applied and the server process will start.
Testing
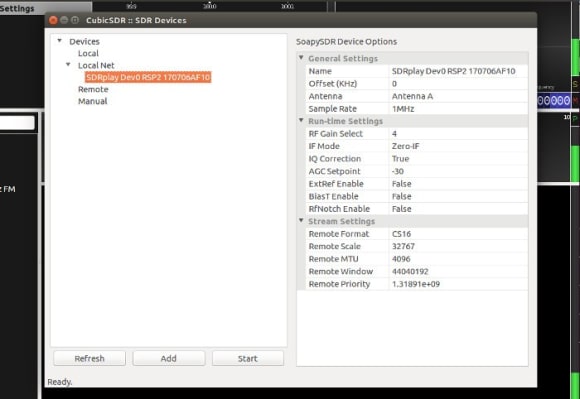
To test we installed CubicSDR. Since we had the mDNS development library (libavahi-client-dev) installed on both Linux machines when SoapySDR was built, it meant that CubicSDR was able to automatically find the remote SDR on the network. You may note also that here we have the network maximum transmission unit (MTU) set to 4096, which we were able to do because the upgraded Ethernet on the new Pi 3 Model B+ supports “jumbo frames”. This will help to further improve network performance. To set this on the network interface at the command line:
pi@3bplus:~ $ sudo ifconfig eth0 mtu 4096Repeat this on the client computer also, but remember to substitute “eth0” for the appropriate network interface if it is not this.

Finally, upon starting processing we were greeted with a spectrum display, able to (remotely!) tune the radio, select FM demodulation (carried out on the client computer) and listen to signals.
Wrapping up
The hardware and SoapySDR configuration detailed gives us plenty of flexibility. With some applications it may make sense to run the digital signal processing on the Pi with the RSP attached, and then forward demodulated audio, video and/or data over the network. For example, if receiving aircraft Mode-S transmissions you might send the data across to another system, e.g. a database or display, via MQTT or a web API. Whereas audio and video could be streamed over the network.
However, the ability to run the Pi + RSP as a “dumb” server and remotely control this and stream raw samples over the network can prove incredibly useful. For example, if frequently switching from one application to another, or developing a new application in GNU Radio Companion.