Assembling the Updated UNTZtrument 8x8 LED Button Grid Controller
Follow article
 Dave from DesignSpark
How do you feel about this article? Help us to provide better content for you.
Dave from DesignSpark
Thank you! Your feedback has been received.
Dave from DesignSpark
There was a problem submitting your feedback, please try again later.
Dave from DesignSpark
What do you think of this article?
Arduino compatible Monome-style controller with musical potential.
The modular synthesiser I have been building has proved very successful at producing ambient, drone style music, as I had hoped it would. However, it does not have a keyboard (and I have no keyboard skills), which is fine for this style of music, but I have begun to feel that it would benefit from some other means of human input.
After a quick search around for something that might fit the bill, I discovered the UNTZtrument (124-5473) from our old friends at Adafruit. I had already used a number of their products including in the Sound Effects Module and the Neopixel Lighting Effects box.
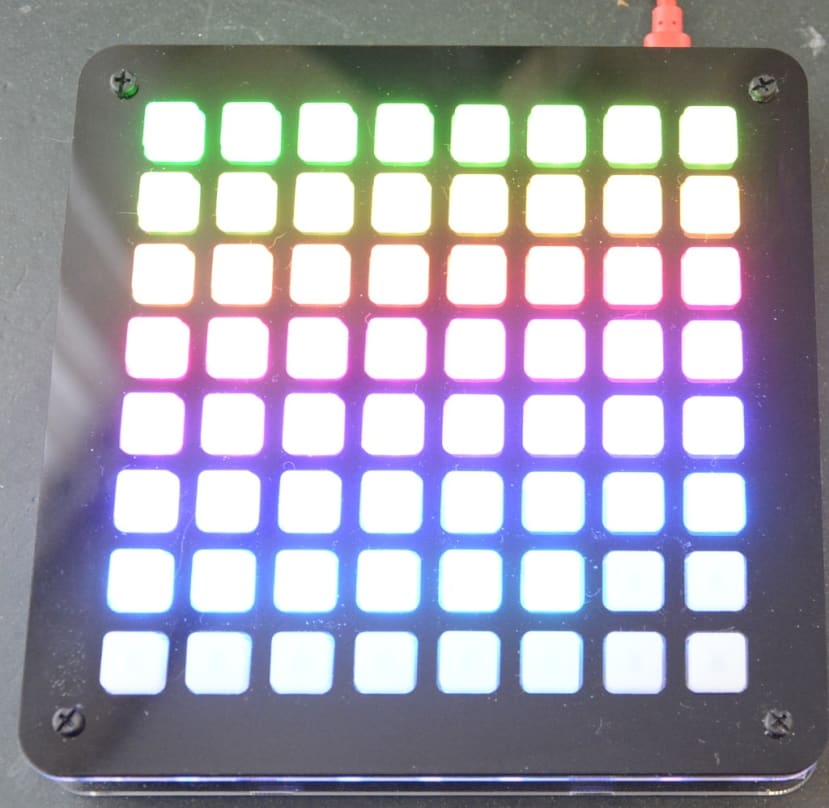
The UNTZtrument is a MIDI controller that features a grid of buttons that looks at first glance very similar to the classic Monome - a minimalist controller designed for performing electronic music. Where the UNTZtrument differs from the Monome, is that this is a serial USB device that requires a software bridge based on the Max visual programming language, whereas the UNTZtrument uses USB MIDI. The original version of the UNTZtrument was powered by an Arduino Leonardo (761-7324) — similar to the midi controller I built for the Red Tin — and used four of Adafruit’s Trellis 4x4 backlit keypads to give an 8x8 matrix of 64 buttons. As I would find out, the latest version differs from this.
Some changes
Once the kit arrived I checked out the assembly instructions on the Adafruit web site and immediately noticed that the instructions had not been updated to take account of the new hardware. The first thing I noticed was the pre-soldered SMD LEDs as opposed to having to solder the LEDs yourself, as per the instructions. On closer inspection, I realised that this updated version of the kit used NeoTrellis boards as opposed to the Trellis ones. These use Adafruit’s “Seesaw I2C-to-anything chip”, which means that the button management and LED driving is completely handled over I2C.
The kit also comes with an Adafruit Feather board and so the Leonardo I had lined up was redundant – although Adafruit says that the NeoTrellis supports both Arduino and CircuitPython libraries, so can be used with any microcontroller or computer board. Hence I could switch to the Leonardo or even a Raspberry Pi (182-2096) in the future if I wish.
Assembling the UNTZtrument

As I had the new version I needed to follow the guide for the NeoTrellis here but also refer back to the old UNTZtrument one to check a few details. I would also need to refer to the guide for the Feather M4 Express when I came running sketches.
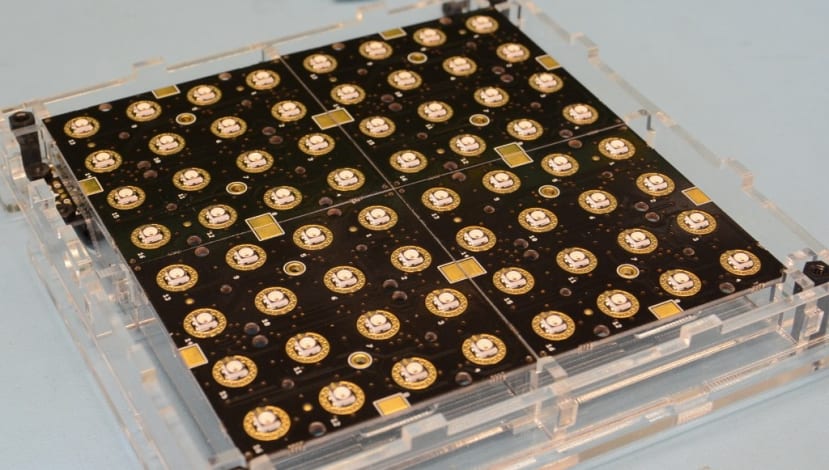
I started by tiling my 4 boards together. I removed the little breakaway tabs from the sides of the PCBs with a small file, so that they would fit snugly together. I then soldered the five solder pads together using a short bit of wire at each join, to give it extra strength and a durable connection.
I then needed to solder jumpers on three of the boards so they all have a different address. The jumpers are labelled A0, A1, A2, A3 and A4 on the boards. I followed the guide for setting the jumpers in the instructions for building the original UNTZtrument, soldering jumper A0 on one board, A0 and A1 on another, and A1 on the final one, giving me addresses of 0x2E, 0x2F, 0x30, 0x31 on the NeoTrellis boards (as opposed to 0x70, 0x71, 0x72, 0x73 on the original). As we will see later, this is important when it comes to controlling the boards.
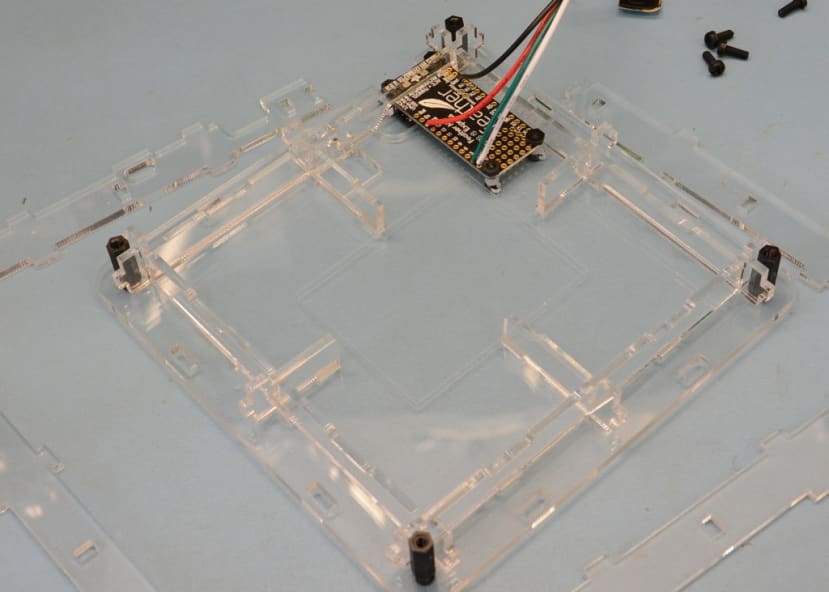
Once the NeoTrellis boards were connected together it was time to build the case, which was fairly straightforward — the most difficult thing was removing the protective paper coating from the acrylic parts! I started by fixing the Feather Express M4 in place and adding the inner supports.
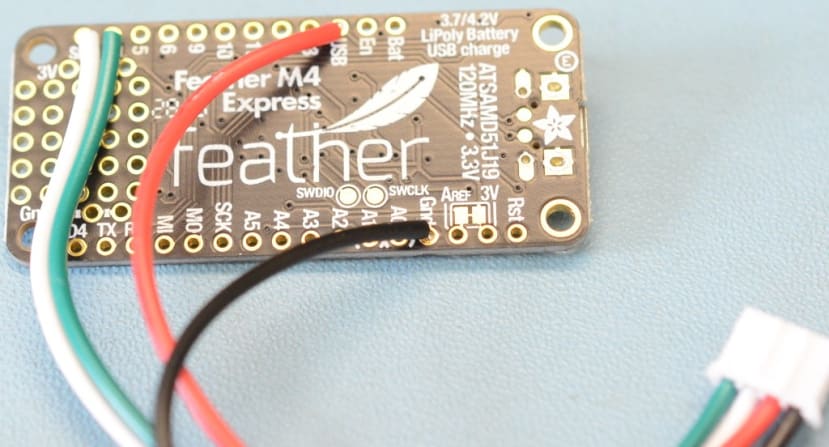
The supplied cable needs cutting down to about half of its length and the wires soldering to the appropriate connectors of the Feather.
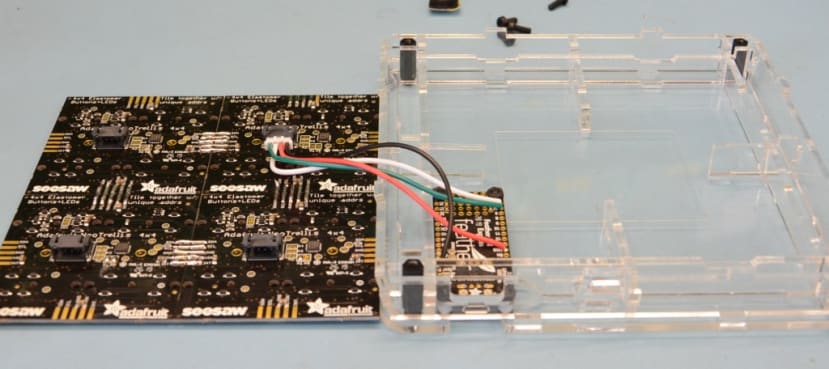
I next added a stand-off to each corner and slotted the case sides in place, before connecting the Feather to the top right-hand side NeoTrellis board.
The NeoTrellis matrix could then be flipped over and put in place, taking care not to trap any of the wires between it and the case walls.

The 4 grids of elastomer buttons then fit over the NeoTrellis – small lugs on the underside fitting into holes on the boards. Then it just needs the top grid and its black cover fitting over the buttons and holding in place with a screw into the top of each of the corner stand-offs.
Software
To get my project running with the Arduino IDE I needed to add the Adafruit Feather board support and the SeeSaw library.

To add the board I needed to open the File menu in the IDE, go to Preferences and add the following URL to the Additional Boards Manager URLs option:
https://adafruit.github.io/arduino-board-index/package_adafruit_index.json
I could then go to the Tools menu, expand the Boards sub-menu and click on “Boards Manager ...”. This brings up the Boards window where I needed to find and install the Arduino SAMD Boards and the Adafruit SAMD Boards. Once this was done I could go back to the Board menu and select the Adafruit Feather M4 Express.

I discovered that the Adafruit UNTZtrument library is for the old version and so
what I needed instead was the Adafruit Seesaw library. I found and installed that by opening Manage Libraries … in the Tools Menu and searching for Seesaw. Once that was done I could try out the example sketch, which is found in Files/ Examples/Adafruit seesaw Library/NeoTrellis/Multitrellis/basic.
This is a sketch to run 2 NeoTrellis boards, but the comments detail how to add more boards by editing one line and adding another at the top of the sketch, so:
#include
"Adafruit_NeoTrellis.h"

#define
Y_DIM 4 //number of rows of key

#define
X_DIM 8 //number of columns of keys

//create
a matrix of trellis panels

Adafruit_NeoTrellis
t_array[Y_DIM/4][X_DIM/4] = {

{
Adafruit_NeoTrellis(0x2E), Adafruit_NeoTrellis(0x2F) }
};
becomes:
#include
"Adafruit_NeoTrellis.h"

#define
Y_DIM 8 //number of rows of key

#define
X_DIM 8 //number of columns of keys

//create
a matrix of trellis panels

Adafruit_NeoTrellis
t_array[Y_DIM/4][X_DIM/4] = {

{
Adafruit_NeoTrellis(0x2E), Adafruit_NeoTrellis(0x2F) },

{
Adafruit_NeoTrellis(0x30), Adafruit_NeoTrellis(0x31) }
};
Once that is done and the sketch uploaded, each button LED lights up in
turn and then the buttons will light up when pressed. You
can see the I2C addresses I set by soldering the jumpers in the code.
CircuitPython
What the above sketch does not do is send MIDI signals and it would appear that I need to get to grips with CircuitPython to achieve that. The problem I found trying to follow the example on the Adafruit site, was that my Feather Express M4 soon ran out of storage space, so unless it is updated, it looks like to use this I am going to need to use the Leonardo or a different board, and re-designing the case slightly to accommodate that. However, there may also be alternative solutions and this is something that I will be looking into next.
Note that it appears that together with the hardware design updates this product is being rebranded as the Adafruit 8x8 NeoTrellis Feather M4 Kit.