The world in your hands with this POV Globe!
Follow article Dave from DesignSpark
How do you feel about this article? Help us to provide better content for you.
Dave from DesignSpark
Thank you! Your feedback has been received.
Dave from DesignSpark
There was a problem submitting your feedback, please try again later.
Dave from DesignSpark
What do you think of this article?
This project was carried out as a requirement for the subject "Development of Electronic Equipment" in the Master in Industrial Engineering of the Public University of Navarra (UPNA). The project consists of the planning, design, and creation of an electronic product in a certain period of time.

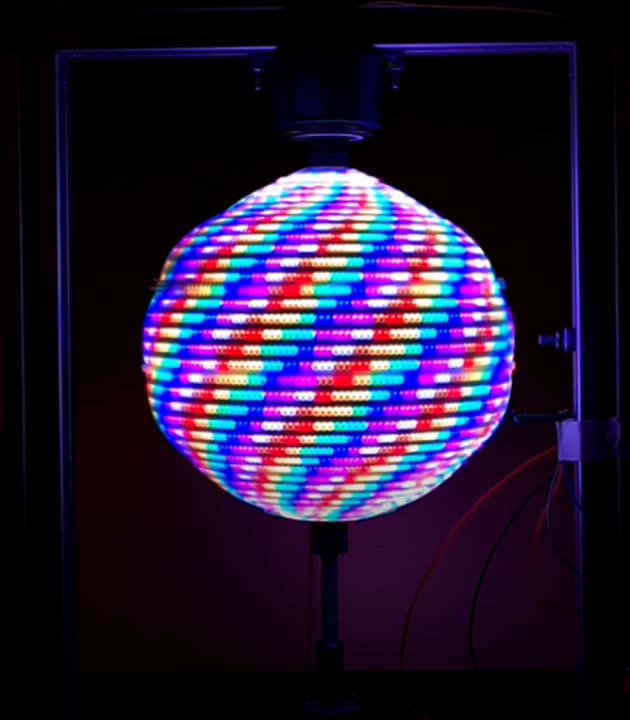
This eye-catching display is based on the POV (Persistence Of Vision) effect, obtained by rotating an LED strip on a circular stand at a relatively high speed of around 25 turns per second. To the human eye, it looks like a glowing floating ball with cool images, but let’s see what's behind it!

Hardware
The system consists of a 32 LED strip mounted on a 3D printed circular support, rotating jointly to a DC motor shaft. Slip rings are used for signal and energy to pass from the fixed part of the structure to the moving part. The sequence of the LEDs is controlled by an Arduino Mega 2560 (715-4084) board programmed in the Arduino IDE, using timers and a sync signal from a Hall effect sensor. The working modes are controlled from an App on your phone connected via Bluetooth to a BT-06 module, although it can also be controlled via a button on the box. A dual power supply is used to provide two voltage levels of 5V for the electronic components and 12V for the DC motor controlled with a PWM module.

To avoid vibrations, a solid structure made with Bosch profiles was built. Also, a box was designed in AutoCAD and made with a laser cutter to hold all the electrical elements within it.

From image to effect!
If you are wondering how we made these effects, we used an Excel file in which we can enter the colour of each pixel to create a matrix automatically converted to code. In this way, we can create any 32x74 image in a few minutes.

App and working modes
All functions are controlled by an Android App created with the MIT App Inventor website. The Globe can be controlled by the App download from a QR code pasted on the box (codes and plans can be found in the download at the bottom of this article). In the App you can see all the modes on the main page, where you can also connect to the system via Bluetooth and configure general parameters such as Brightness and Speed of the effect. You can also turn the entire system on and off.

- Writing mode: In this mode, you can write whatever you want, and it will be displayed on the globe!

- Lamp mode: In this mode, you can set the colour you want using the RGB and brightness scroll bars.

- Rainbow – Lollipop mode: In this mode, you can select whether you want the ball to look like a Lollipop or like a party ball with changing colours.
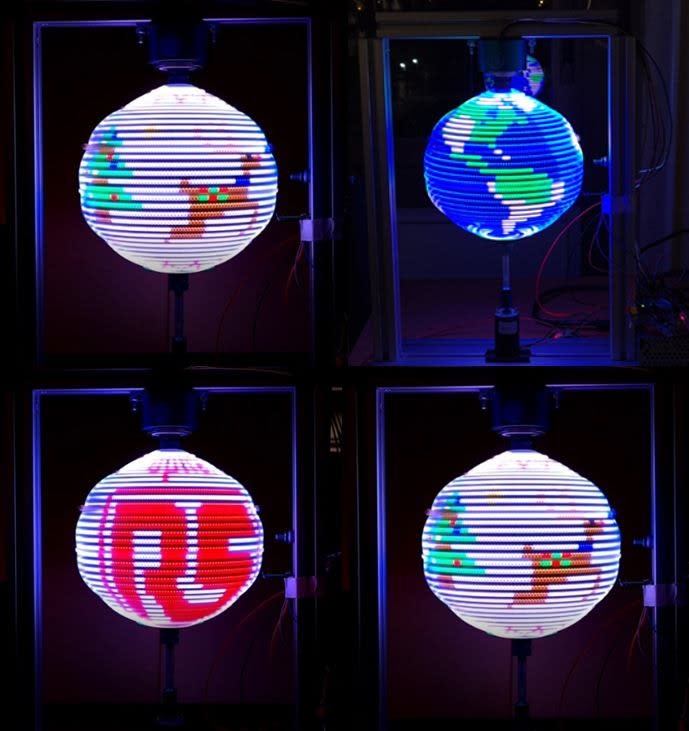
- Image modes: There are also some modes to display an image such as the Earth, a Christmas ball, the RS Logo or a funny gif of Mario and Luigi jumping. All these images can turn around the ball in both directions and at different speeds.
- I mode: In this mode, we use an Artificial Intelligence algorithm created in the Personal Image Classifier web of App Inventor to predict which card the camera is focusing on.

Video:

Project done by Pablo Zorrilla Echeverría and Mikel Pildain Leria.