Smart Parking System using NodeMCU (Part1)
Follow article
 Dave from DesignSpark
How do you feel about this article? Help us to provide better content for you.
Dave from DesignSpark
Thank you! Your feedback has been received.
Dave from DesignSpark
There was a problem submitting your feedback, please try again later.
Dave from DesignSpark
What do you think of this article?
In this tutorial, we will look at the project SMART PARKING SYSTEM USING NODEMCU and discuss how to implement it through IoT. There are many types of domains in the smart city and Smart Parking is one of the most popular.
In this project, we will get the parking availability data and the user can access this data either by using Blynk App or Google Firebase. Here we will use firebase as an IoT database to get the parking availability data. So, when I say the topic Smart Parking System using Node MCU with the help of firebase many questions come into your mind immediately:
- What is Smart Parking System?
- How to get with Node MCU?
- What are the components required for the project?
- How to set up the firebase with the Node MCU?
Now, I am here to discuss all the above questions clearly in this tutorial.
What is Smart Parking System?
Simply, the smart parking system is a modern way of the parking system without the need of security men and can be controlled and notifies us when the parking is filled.
Nowaday’s everyone needs everything to be automated and simple to do work. This will help in having safe and proper parking in the malls, cinema theatres, shopping centres, and at many more public places, etc.
This will help to detect the vehicle presence and can trigger the gate to open or close the gate automatically as per the availability.
How to get with Node MCU ESP8266?
Node MCU is an open-source LUA based firmware developed for the ESP8266 Wi-Fi module and it is also an open-source IoT technology. ESP8266 is the most popular controller which is used to built IOT based applications as it has inbuilt support for Wi-Fi to connect to the internet
The ESP8266 Node MCU is used as the main controller in this project to control all the peripherals attached to it
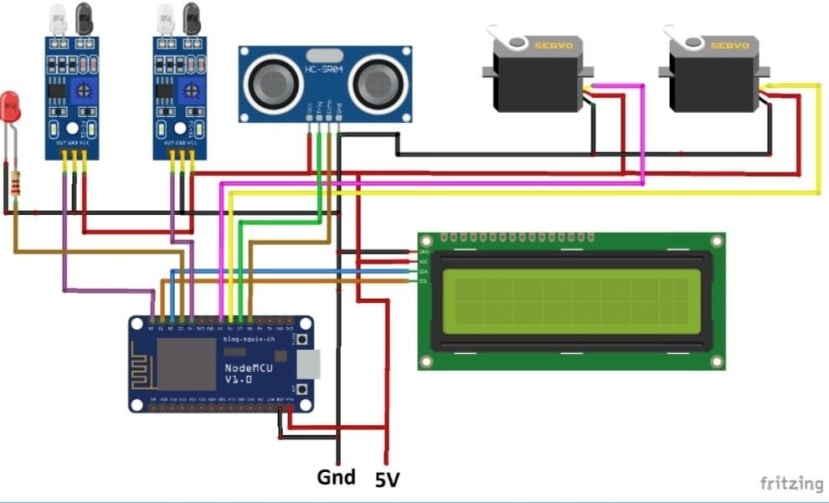
Design of Node MCU ESP266:
Components Required:
- ESP8266 Node MCU
- Ultrasonic Sensor
- IR Sensors
- 16x2 LCD Display & I2C
- Connecting Wires (Jumpers)
Circuit Design of the project:
Setting up the Firebase:
Firebase is Google's database platform that is used to manage, create and modify data generated from any of the android applications, web services and many more.
Here, I will be discussing the setting up of the Google Firebase for our project.
By following the below steps shown, you can complete the setup
- By using your G-mail you need to sign up in the Firebase Console.
- Next, open your chrome and go to “firebase.google.com”.
- On that page at the right top corner, go to "Go to Console" as shown in the below diagram.
- Next, click on the Add project.
- After clicking on the add project, type your project name as Smart Parking System
- Click on the continue button.
- Next, click on "create project" and in the next step click on continue.
- By this time, you will have successfully created a new project with the name "Smart Parking System.
- Now to have a Hostname and Authorization key (secret key) follow the below steps:
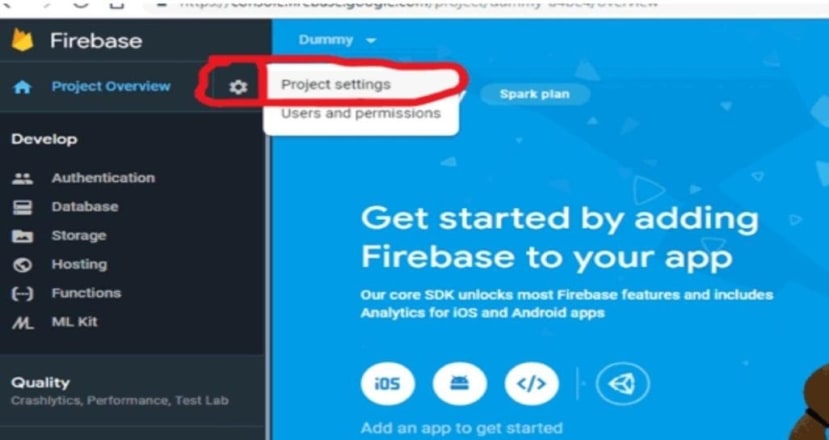
- Go to the Settings icon and select “Project Settings” from the options given.
- Now go to the Service accounts and there you can see two options “Firebase admin SDK” and “Database Secrets”.
- Click on Database secrets and scroll on your project name then you will find a "show" option appears on the right side
- Click on the "show" option and then you can see the secret key created for your project.
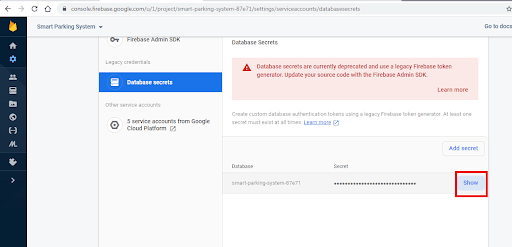
- Copy that secret key and save it to the notepad. This is your “FIREBASE_AUTH” string which is to be written in the Arduino Programming code.
- Now go to the "Database" on the left control bar and click on it

- Scroll down and click on “Create Database”
- Now choose “Start in test mode” and then click on “Enable”
- Now, the database is created and we need to come to this section again to see the display of the parking mode
- Just above the database, you can see: "https://smart-parking-system-87e71.firebaseio.com/"
- Now just copy “your_project_name.firebaseio.com” without any slash and https and you need to save it again to the notepad for the secret key.
- This will be your “FIREBASE_HOST” string which is to be written in the Arduino Programming code.
- The last step is to put the "FIREBASE_HOST" and "FIREBASE_AUTH" in the Arduino programming and upload the sketch
- By this, the availability of parking can be tracked online with a database on Firebase

- With this set up the firebase is completed.
So, we have successfully set up our firebase online account. You should also have a look at this Security Control System, which is also real time but it's using RF technology-based XBee modules, instead of NodeMCU(WiFi-based), which we are using. In the next part, we will program the NodeMCU and will have a look at how to upload sensors' data over to this Firebase account. Thanks for reading.