Restoring a Tadpole SPARCbook 3 Part 1: Introduction
Follow article
 Dave from DesignSpark
How do you feel about this article? Help us to provide better content for you.
Dave from DesignSpark
Thank you! Your feedback has been received.
Dave from DesignSpark
There was a problem submitting your feedback, please try again later.
Dave from DesignSpark
What do you think of this article?
Refurbishing a rare 1990s RISC processor-powered UNIX laptop.
Tadpole Technology was a small British computer company formed in 1983 and originally based out of Cambridge, who amongst other things manufactured VMEbus boards for industrial applications, along with military spec, small server and laptop computers. During the 1990s and perhaps most famously, Tadpole produced a range of high-end laptops that were based on the SPARC, PowerPC and Alpha RISC architectures, running Solaris, AIX and OpenVMS respectively.
A previous series of articles followed the restoration of a SPARCstation IPX, noting how Sun UNIX workstations were a much-coveted object of geek desire in the early 1990s. However, Tadpole laptops which boasted a RISC processor were a great deal rarer than such workstations, with an almost legendary status and you were lucky if you even got to see one in the flesh.
In this series of posts, we’ll take a look at restoring a third-generation Tadpole SPARCbook, which was introduced in 1994 at a starting cost of $10,950 — which with inflation would make the price tag equivalent to almost $20,000 or £15,000 in today’s money!
Specifications

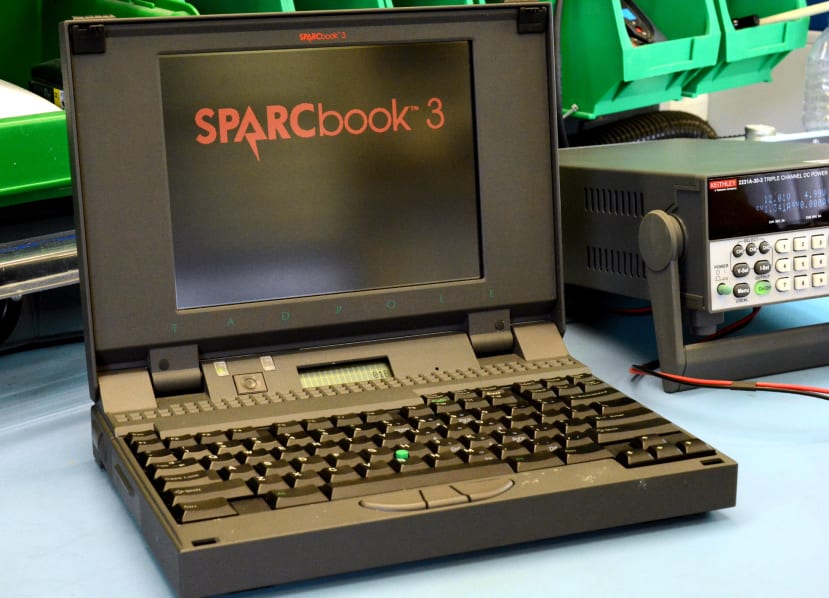
Two things you immediately notice about the SPARCbook are its robust magnesium enclosure and a very satisfying keyboard complete with an integrated pointing stick. The latter being reminiscent of a classic IBM Thinkpad keyboard and it turns out that this is precisely what it is, with IBM also having invested in Tadpole during the early 90s.
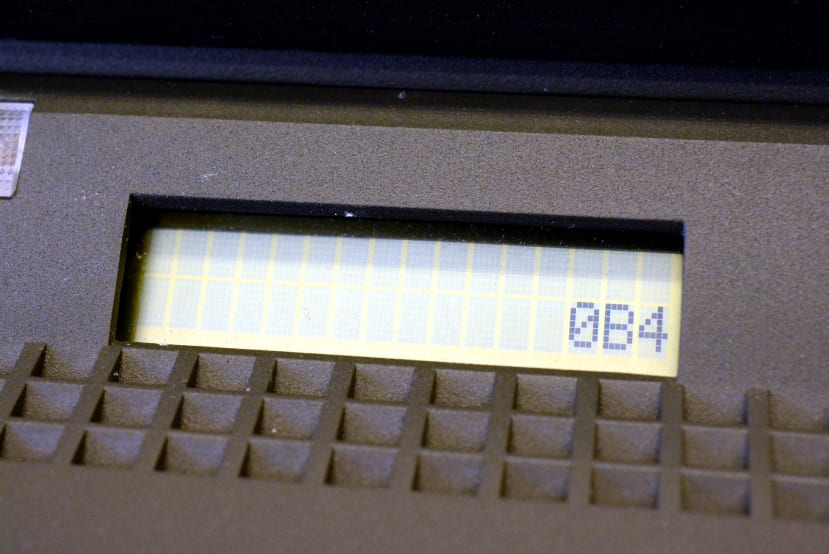
To the rear of the keyboard is a small LCD display for system status information, along with LED indicators and a power button.
The specifications of this particular SPARCbook 3 are as follows:
- 50MHz microSPARC processor (TI TMS390S10)
- 64MB RAM
- Weitek P9000 framebuffer with 1MB RAM
- 9.5” TFT display
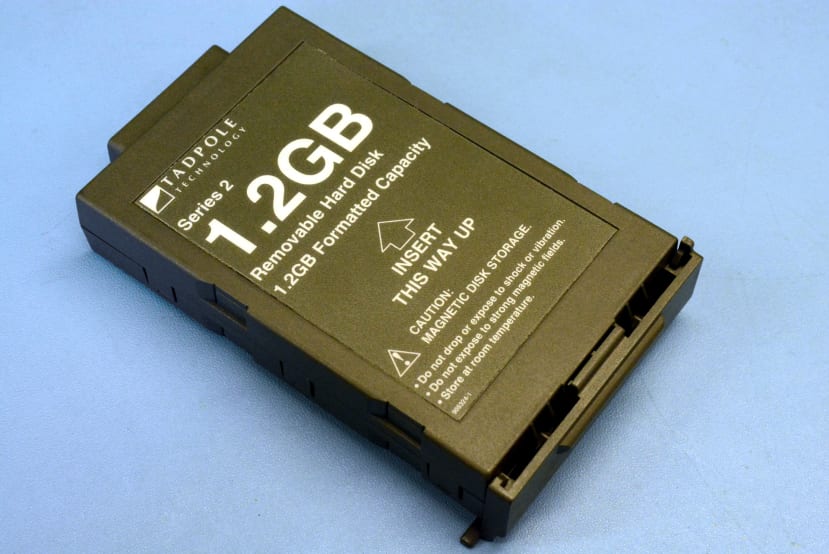
- Removable 2.5” 1.2GB SCSI drive
- Two PCMCIA slots
- 14.4K fax/modem
- ISDN
- 10M Ethernet (AUI)
The processor is actually fitted to a separate module and the SPARCbook 3 was also available as a later upgrade with a 170MHz TurboSPARC CPU.
Internal
It was decided to not dismantle the SPARCbook until deemed necessary, as there is always the possibility of getting the (dis)assembly procedure wrong and breaking a tab or damaging a fragile cable — particularly with vintage and more esoteric portable computers, which can be densely packed with multiple modules and fiddly interconnections. Hence better to put the SPARCbook through its paces as-is, to begin with, then tackle dismantling as and when this is required. This way if it develops a new problem, we know it was likely of our own doing and can try to fix this.
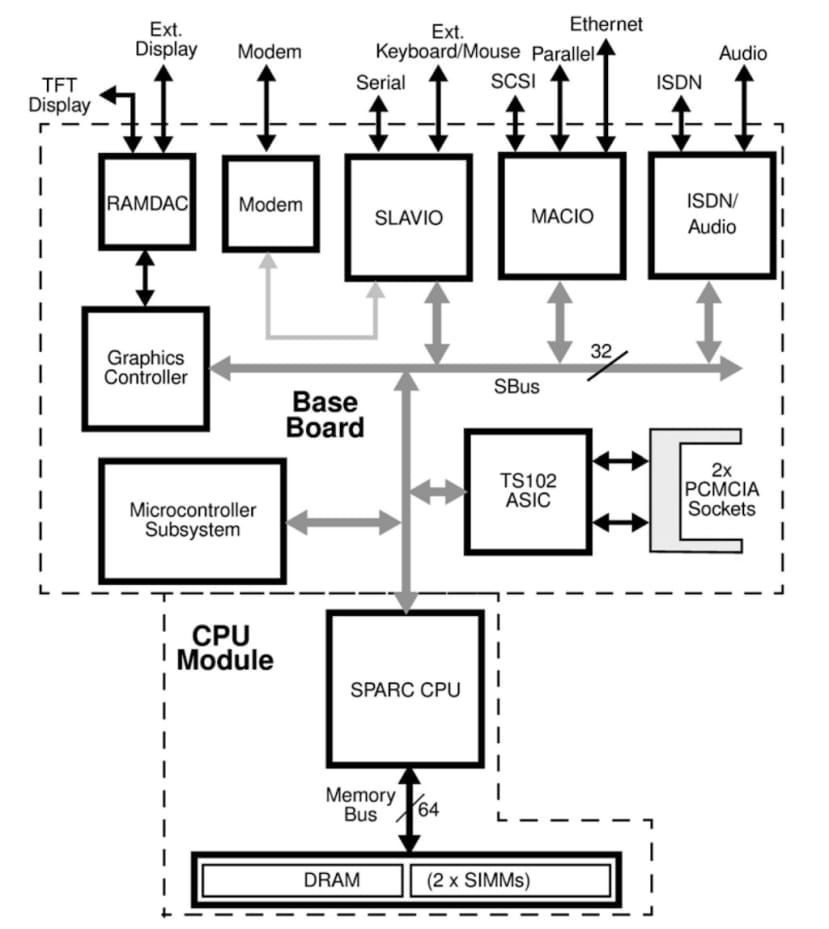
However, we can get an idea of the SPARCbook internals from its user manual and this states that there is a base board, CPU module and microcontroller module. These can be seen pictured in the diagram above, albeit with the microcontroller shown as part of the baseboard. The microcontroller module is based around a Hitachi H8 MCU and provides control for the keyboard, pointing stick and LCD display, along with system control and status monitoring.
Like most SPARC systems, the SPARCbook features SBus for peripheral interfacing — albeit unlike a Sun workstation and more inline with a typical laptop, this does not support pluggable peripherals and is used to integrate onboard peripherals, such as the graphics controller and ISDN. It also features a slower Ebus, which is used for things such as NVRAM, RTC and boot EPROM.

Unfortunately, we don’t have a battery and locating even a dead pack is likely to be a challenge.
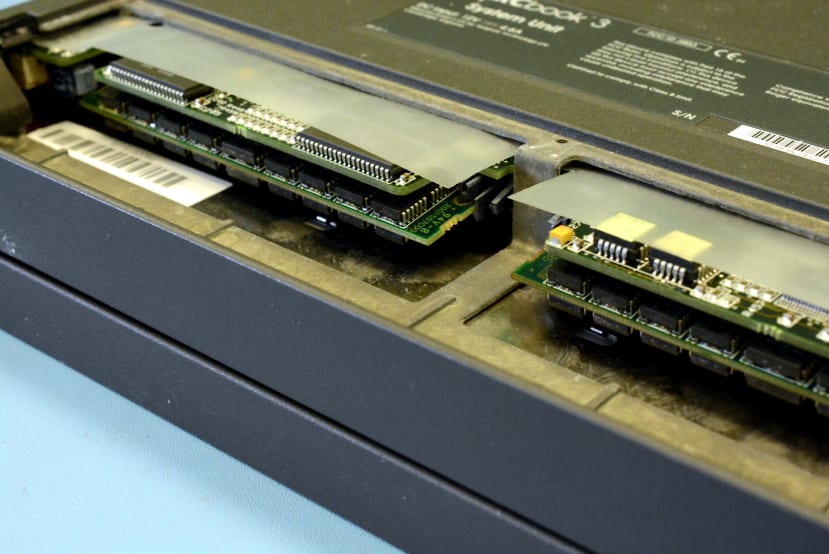
Above we can see that when a metal screening part is removed from the battery compartment, the two SIMMs are visible, located under what is presumably the base board.
Expansion
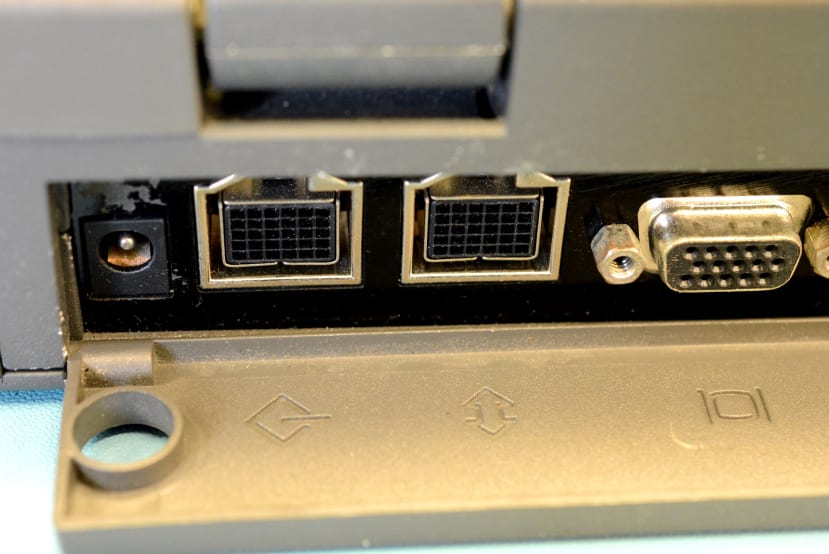
On the rear panel, there is a barrel jack power connector for 12VDC input, along with two HD-50 connectors, as also used by vintage Apple Powerbooks. The first of which is SCSI expansion and the second a parallel port. To the right of which is a 15-pin connector for an external monitor.
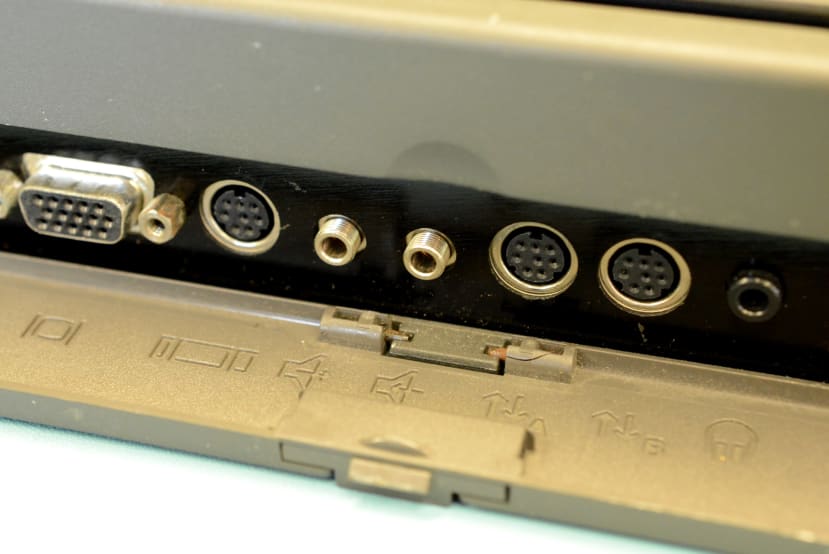
Next, there are connections for an external keyboard/mouse, audio in and out, plus two serial ports and a 3.5mm headphone jack.
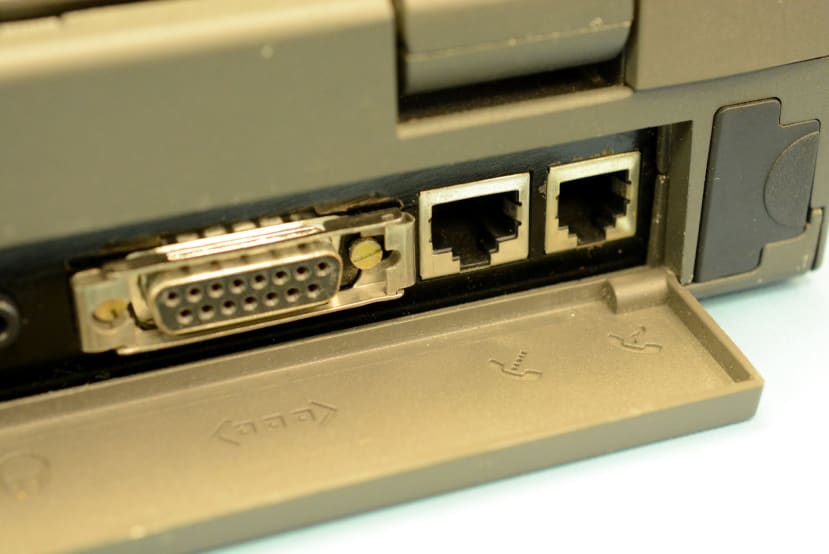
Finally, we have Ethernet — AUI connection for an external transceiver, no integrated twisted pair here! — followed by the ISDN and modem ports.
First power
Since we don’t have the original power supply/charger, a bench PSU (826-4741) was used instead and in fact, it is probably better to use one at first with such vintage equipment, since you can monitor current and if need be, limit the current and/or gradually increase the supply voltage.
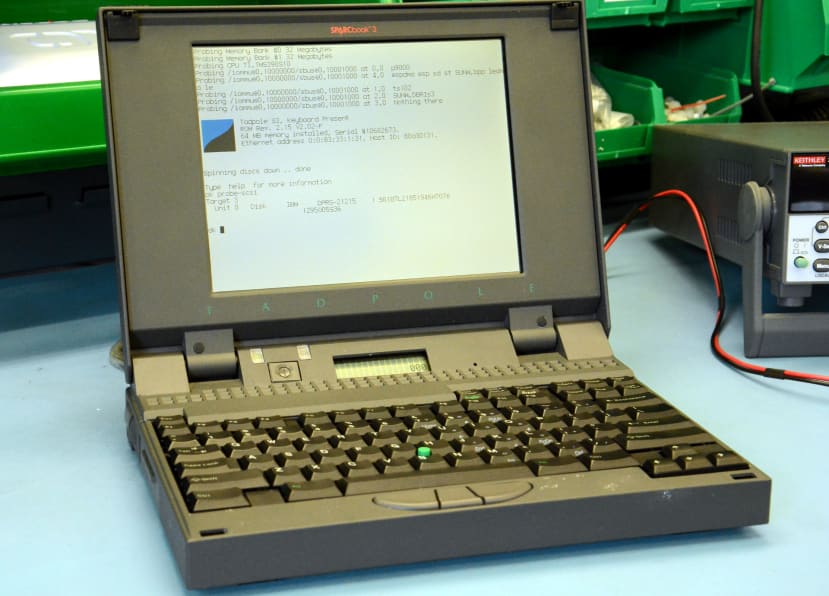
On applying power and turning it on, the TFT display did not come to life. However, after cycling the power supply and pressing the power button once again, it did and we were able to access the OpenBoot PROM (OBP) and enter the probe-scsi command to probe the SCSI bus.
Fortunately — and unlike when restoring the SPARCstation IPX — we were not greeted with errors regarding the NVRAM battery having failed, losing the MAC address and Sun Host ID as a result. Since the SPARCbook does apparently use a similar Timekeeper NVRAM with integrated lithium battery, the MAC address and Host ID must be managed elsewhere, e.g. by the microcontroller.
Next steps
As with the SPARCstation IPX restoration, it would be preferable to switch to using solid-state storage, so as to make it easier to experiment with different O/S versions and configurations etc., while also preserving the original spinning rust SCSI HDD. Ideally, this solution would also fit into the 2.5” HDD caddy, so that it could be used without needing to have an external drive cabled.
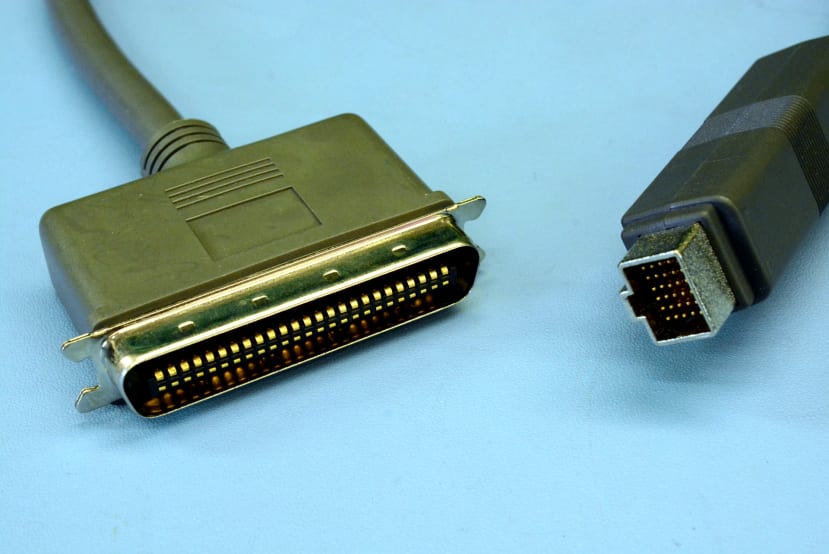
Speaking of cables, an adapter has been sourced to transition from the now quite rare HD-50 connector, to a 50-pin Centronics SCSI connector — which has also not been common for some time but will at least be easier to interface with an external CDROM drive for O/S installation.
Operating system options include Linux, NetBSD and, of course, Sun Solaris. The latter being the obvious choice for such a vintage machine and likely the only one which will be supported by the Tadpole software if we can track this down! Seemingly this provided drivers and functionality useful for laptop computing, which the Solaris O/S would not provide out-of-the-box.
We may also have to dismantle the SPARCbook to swap out the NVRAM/battery, should this indeed prove problematic. Finally, it would be great to track down a battery pack, even if the cells are far beyond being useful, as this could be rebuilt and a laptop should really be, well, mobile.
In the next post, we now cover the assembly and configuration of a SCSI bus to SD card adapter, before proceeding to install a similarly vintage copy of the Solaris operating system.