Raspberry Pi人手检测开关
关注文章
 戴夫来自 DesignSpark
你觉得这篇文章怎么样? 帮助我们为您提供更好的内容。
戴夫来自 DesignSpark
Thank you! Your feedback has been received.
戴夫来自 DesignSpark
There was a problem submitting your feedback, please try again later.
戴夫来自 DesignSpark
你觉得这篇文章怎么样?
| 难度 | 中等 |
| 所需时间 | 1.5小时 |
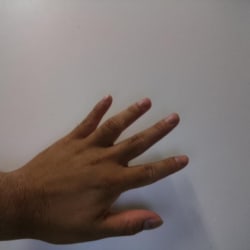
最近几年以来,Raspberry Pi迅速发展不同应用。 现在人们开始研究更成熟的主题,例如将Raspberry Pi用于深度学习应用程序。 在本文中,我们想知道如何将Raspberry Pi用于基本的深度学习应用程序,例如图像分类。本文提供 一个非常简单的示例,我们使用卷积神经网络(CNN)预训练了一个简单的手部识别模型。 以下是样本训练图像:
 |
 |
| 手 | 其他 |
本文的目的是演示使用Raspberry Pi处理图像的示例深度学习应用程序。 我们想要识别Raspberry Pi相机看到的图像,并将其分类为手或其他。 在这种情况下,其他对象是位于白色背景前面的任何其他对象。 一旦检测到手,就可以打开/关闭继电器以打开/关闭电气设备。
以下是我们将用于此项目的组件:
材料和组件
- Raspberry Pi 3B+
- Raspberry Pi Camera v2
- 16GB (或32GB) 空白SD卡
- USB 电源
- 7-inch Raspberry Pi 显示屏
- 5V 继电器板
自选:
- SD卡读卡器

说明:
步骤1:克隆我们的Raspbian OS img
为了避免花太多时间安装库、软件包等,我们准备了一个备份.img文件,可以将其直接复制到SD卡中。这是推荐的方式,因为在Raspberry Pi中安装Python库非常繁琐且耗时。
1.1 首先,下载我们的.img文件:
https://drive.google.com/drive/folders/1BHYqwTJtz7ipFddYJ2rRp8wxOiB0yinK?usp=sharing
1.2 这样做之后,请下载Win32 Disk Imager。
https://sourceforge.net/projects/win32diskimager/
1.3 安装Win32 Disk Imager后,将其打开并将SD卡读取器插入计算机。使用其GUI,找到并选择我们的.img文件。对于设备选项,请使用刚插入的SD卡的驱动器号。
警告:确保驱动器号与您的SD卡相对应,否则您可能会擦除硬盘数据。
然后,单击“写入”按钮并等待其完成。此过程可能需要20到25分钟,具体取决于SD卡和SD卡读取器的读/写速度。

步骤2:准备和连接硬件
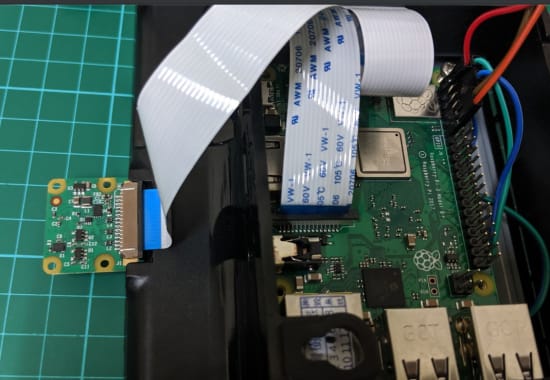
2.1 这次,将新复制的SD卡插入Raspberry Pi。 最好在组装屏幕之前执行此操作,否则必须再次打开屏幕外壳。 同样,通过Raspberry Pi相机的相机插槽将Raspberry Pi相机连接到Raspberry Pi,如下所示:
2.2 重新组装并合上屏幕保护套(有关此部分,您可以参考我们的先前文章),然后将摄像头放在屏幕保护套的顶部摄像头支架上。 这非常方便,因此您不必为Raspberry Pi相机单独购买相机套。
2.3 接下来,按照此图所示的针脚输出,将中继板连接到Raspberry Pi
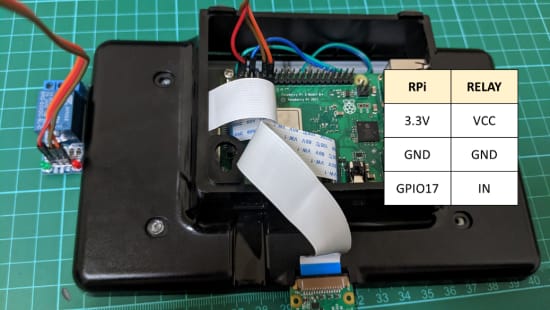
根据您的继电器板,VCC、GND和IN应该几乎相同。 而Raspberry Pi GPIO,如果您已经连接了其他东西并可以在程序代码中进行更改,则始终可以将其切换到GPIO17以外的其他引脚。
步骤3:演示时间
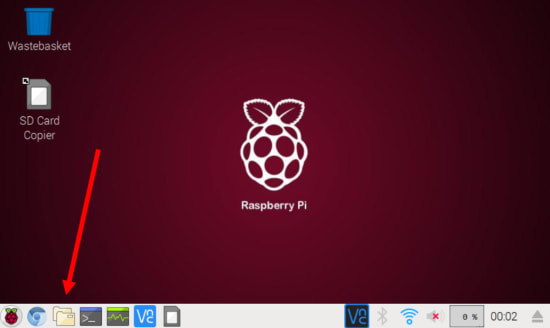
3.1 由于我们跳过了在Raspberry Pi中安装库的耗时步骤,因此我们直接测试程序。 打开Raspberry Pi,然后等到桌面出现后,再看到以下内容:
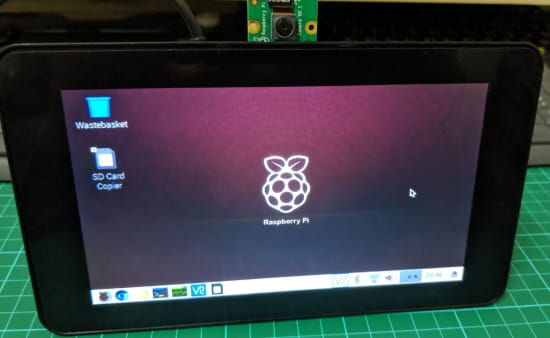
从这里开始,打开文件管理器。
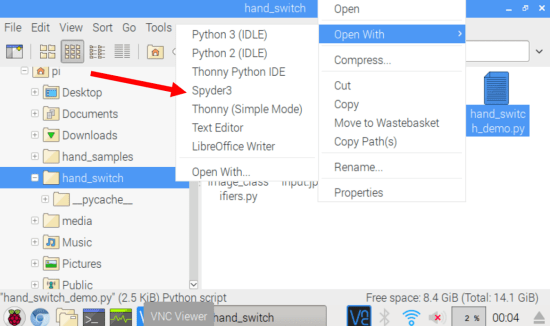
3.2 前往/ home / pi / hand_switch /并使用Spyder3或您喜欢的任何其他IDE打开hand_switch_demo.py。
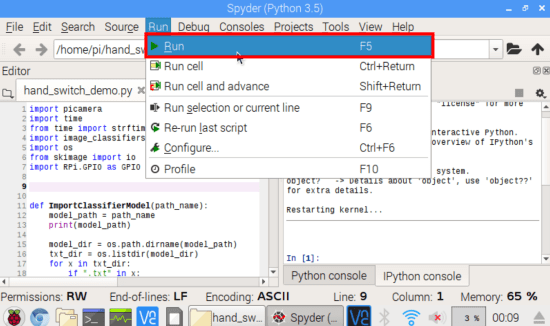
3.3 打开IDE后,请单击运行->运行
3.4 检查控制台的输出,然后尝试将手放在相机前面。 本演示中使用的当前模型是在白色背景前的手部图像进行训练的。 因此,不要期望此模型在其他类型的图像中非常准确。 本文还提供了一个示例视频。

步骤4:理论和代码说明
为了开发这个项目,我们必须准备一个卷积神经网络模型(CNN model)来识别手。 以下是分步骤过程:
- 使用Raspberry Pi v2相机收集图像
-我们收集了150张手形图像和150张其他图像
- 使用排序后的图像训练了CNN模型
-在Python 3.5中Keras和Tensorflow的支持下,我们使用带GPU的台式机对模型进行了训练
- 将经过训练的模型复制到Raspberry Pi
这些步骤非常复杂,可能需要花费一些时间来学习。 在以后的文章中将详细介绍这些部分。
总结一下,这是我们制作的程序的工作方式:
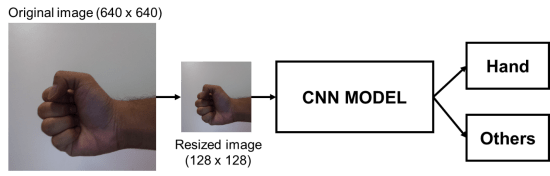
原始图像是Raspberry Pi每秒获得的图像。 然后将图像调整大小为128 x 128的图像,使用CNN模型进行处理及识别图像是否是手。
以下是代码以及一些注释:
# Calls necessary Python libraries
import picamera
import time
from time import strftime,localtime
import image_classifiers as IC
import os
from skimage import io
import RPi.GPIO as GPIO


# Function to load the CNN model and its label .txt file
def ImportClassifierModel(path_name):
    model_path = path_name
    print(model_path)

    model_dir = os.path.dirname(model_path)
    txt_dir = os.listdir(model_dir)
    for x in txt_dir:
        if ".txt" in x:
            txt_fname, extension = os.path.splitext(x)
            if txt_fname in model_path:
                label_path = model_dir + "/" + txt_fname + ".txt"
    print(label_path)

    model = ""
    try:
        model = IC.ImportGraph(model_path)
        class_names = IC.load_labels(label_path)
    except Exception as e:
        print(e)
    return model, class_names


# Load classifier model and class names
PATH_TO_CLASSIFIER = "/home/pi/hand_switch/hand_cnn_22.h5"
target_model, class_names = ImportClassifierModel(PATH_TO_CLASSIFIER)

# Initializes camera
try:
    camera.close()
except:
    pass
camera = picamera.PiCamera()
camera.resolution = (640, 640)

# Set up gpio
RELAY = 17
GPIO.setmode(GPIO.BCM)
GPIO.setup(RELAY, GPIO.OUT)


# Other variables
# required_votes is a variable you can set to set the sensitivity of the switch.
# This means that after 3 hand consecutive classifications, the switch is turned on.
# This prevents the program to keep on switching on and off such as breaking your connected device.
second_prev = 0
hand_votes = 0
required_votes = 3

while 1:
    time_now = strftime("%Y/%m/%d %H:%M:%S", localtime())
    img_filename = strftime("%Y_%m_%d %H_%M_%S", localtime())
    second_now = strftime("%S", localtime())


    # Runs the classification every second
    if (second_now != second_prev) and (int(second_now) % 1) == 0:
        time.sleep(0.01)
        FILENAME = "/home/pi/hand_switch/input.jpg"
        camera.capture(FILENAME, resize=(640, 640))

        input_image = io.imread(FILENAME)
        input_image = (input_image[:,:,::-1])
        image_tensor = IC.load_classify_image(input_image, 128)

        image_class, score = target_model.predict_by_cnn(image_tensor, 0.5, class_names[0:(len(class_names))])

        if image_class == "hand":
            hand_votes = hand_votes + 1
        else:
            hand_votes = hand_votes - 1
        hand_votes = max(hand_votes, 0)
        hand_votes = min(hand_votes, required_votes)

        if hand_votes >= required_votes:
            GPIO.output(RELAY, 1)
        if hand_votes <= 0:
            GPIO.output(RELAY, 0)
        RELAY_STAT = GPIO.input(RELAY)

        print("Result: " + image_class, " Votes: " + str(hand_votes), " Relay: " + str(RELAY_STAT))


    second_prev = second_now