FemEng – Interfacing Arduino with Max/MSP
Follow article Dave from DesignSpark
How do you feel about this article? Help us to provide better content for you.
Dave from DesignSpark
Thank you! Your feedback has been received.
Dave from DesignSpark
There was a problem submitting your feedback, please try again later.
Dave from DesignSpark
What do you think of this article?
This article is part of the FemEng Technical Workshop series.
The project’s aim is to use an Arduino board (769-7409) to control sounds generated in Max/MSP.
Digital control of musical instruments provides more flexibility than traditional instruments when generating and processing sounds. Digital sound generation, however, often lacks physical controls needed for immediate musical expression. Some devices address this issue by using the same design as traditional instruments. MIDI controllers and digital keyboards, for example, provide many physical inputs for the musician to interact with, such as weighted/unweighted or touch-sensitive keys, while adding functionality with various buttons, ribbon controllers etc. Much like the Stylophone, for which the act of moving a stylus across a metal keyboard closes an analogue circuit, physically turning knobs of synthesizers and controllers allows us to interact with, and shape, the sound generated by an electronic device.
By combining ease of processing with the necessary interaction with the outside world, physical computing enables us to build instruments that respond to real-world input. This project aims to interface an Arduino board with the Max/MSP software. While the board is used for sensing input from the user, Max/MSP adds musicality to data by generating sound. A potentiometer connected to the Arduino is thus used to control the frequency of a virtual oscillator in Max/MSP. The Arduino reads the values of the potentiometer and sends them serially to Max. Max then processes the data stream and produces sound.
A three-pin potentiometer is connected to the Arduino in the usual way. The code reads the value from the resistor and stores it.
To send data from the Arduino to Max, we use a serial connection. The Arduino waits for Max to initialise the connection. A flag is raised when it has received data from Max. It then sends the value of the potentiometer, followed by a space. This will be used in Max to determine the beginning and end of each string corresponding to individual values. After each space is sent, the flag is lowered, and the Arduino again waits for Max to send data. This will allow Max to control the rate at which it receives data from the Arduino.
Max uses the serial object to send and receive data serially. The Baud rate specified must match that of the Arduino connection. To receive data, the object must be polled at a certain time interval. The metro object sends a bang message to the serial object, which outputs the received data at the interval specified in metro (in ms). See the final patch below.
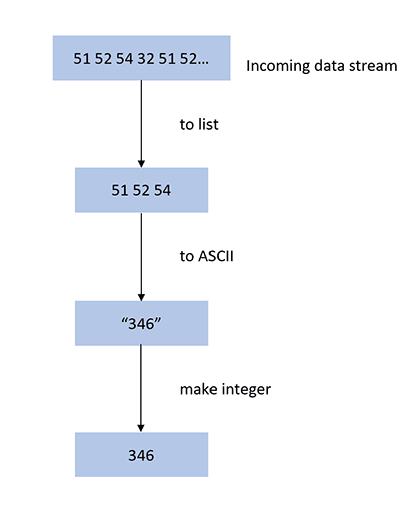
The data received in Max is ASCII-encoded. To transmit meaningful data to an MSP object (an object that uses signals, that will be used here to generate sound), the data must first be formatted. The potentiometer values are separated by a space, ASCII code 32. Thus, by selecting 32 in the incoming data stream, we can send groups of ASCII-encoded digits, corresponding to individual potentiometer values, to the next object. These are grouped in a list, which is translated into an ASCII symbol and converted to an integer.
The values received from the potentiometer vary from 0 to 659 (experimentally). To expand the range of frequencies that the Max oscillator will be able to use, we scale the values received from the potentiometer. Here, 1047 Hz corresponds to a C6. This note is high enough to attain a wide range, without making the device oversensitive to slight changes in the position of the knob. The cycle~ object generates a sine wave at the frequency received in its inlet. Combining this signal with the line~ object makes smooth on/off transitions.
The Max patch below shows the processing flow and sound generation.

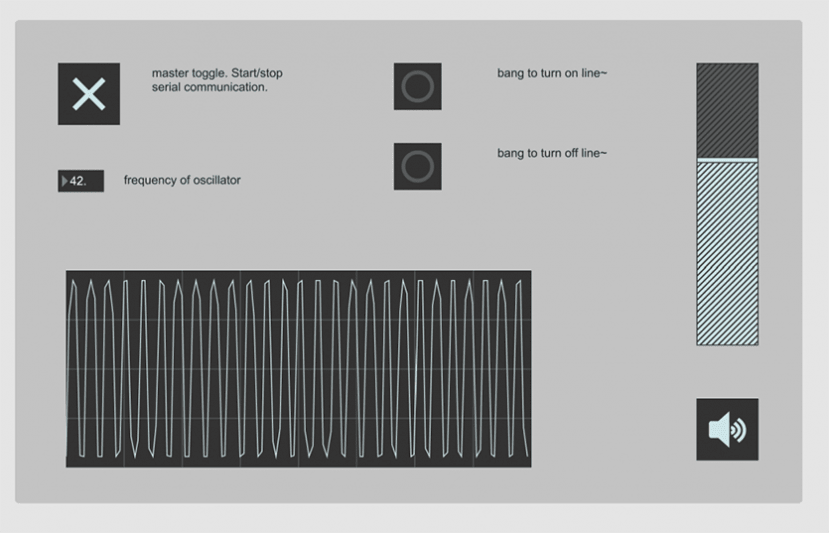
Finally, the patch can be “played” with a basic user interface.
Many thanks to the RS Grassroots team for providing us with the components and technical support for this project.