An Introduction to the OKdo IoT Air Quality Starter Kit
Follow article
 Dave from DesignSpark
How do you feel about this article? Help us to provide better content for you.
Dave from DesignSpark
Thank you! Your feedback has been received.
Dave from DesignSpark
There was a problem submitting your feedback, please try again later.
Dave from DesignSpark
What do you think of this article?
Setting up the kit to connect to the Okdo IoT Cloud and share air quality data with the world.
The Okdo Air Quality IoT Starter Kit (181-8207) is a really simple way to monitor and share air quality data via the Cloud. The provided sensors use a Wio Link board to connect to OKdo’s IoT Cloud, which is powered by AllThingsTalk, who I had already come across in a previous blog.
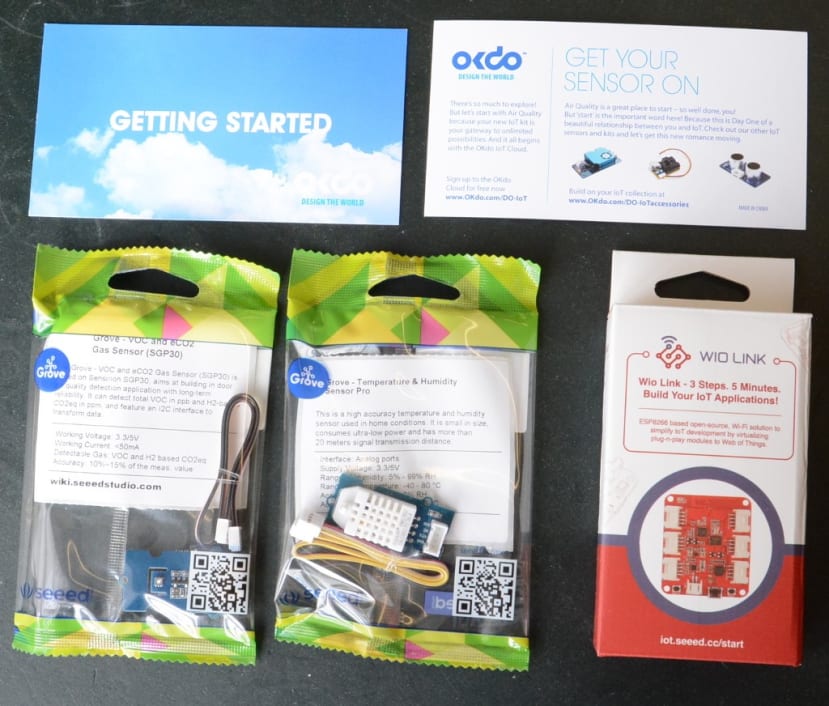
What is in the kit
The Air Quality Kit contains of a Wio Link board (179-3745) , which is an ESP8266 based open-source Wi-Fi board developed by Seeed after a successful Kickstarter campaign about 5 years ago. It also includes 2 of Seeed’s Grove modules that I was familiar with from looking at their Starter Kit, Moisture Sensor, and Voice Recognition kit. This Air Quality Kit has a gas sensor and a temperature/humidity sensor. The TVOC/eCO2 Gas Sensor is based on Sensiron SGP30, which is a digital multi-pixel gas sensor that can detect harmful gases through TVOC (Total Volatile Organic Compounds) and CO2eq. The DHT22 temperature & humidity sensor is a high accuracy sensor used in indoor applications, the measurement range of which is 5% RH –99% RH for humidity, with a temperature a range of -40°C to 80°C.
Getting Started

According to the instructions on the card enclosed with the kit, the first thing I needed to do is to sign-up for an OKdo IoT Cloud Account at www.okdo.com/do-iot. In my case, I discovered that the AllThingsTalk account I had set up previously let me sign in, so I didn’t need to set up a new one.

The OKdo IoT Cloud organises members and devices into “Grounds”. When you create your account it automatically creates a Ground for you and names it Playground. If you click on the Playground link and then the +CONNECT A DEVICE button, you will see the OKdo Air Quality IoT Starter Kit listed.

Simply click on the image of the kit to add the kit to your Playground.
Getting the board and sensors up and running
The next thing I needed to do is to load a sketch onto my Wio Link board using the Arduino IDE.
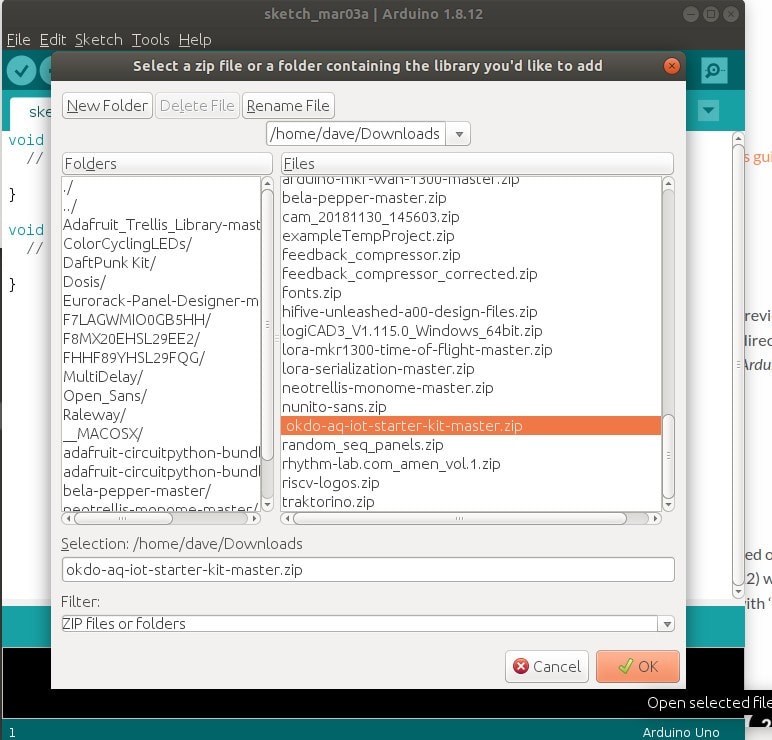
I downloaded the Air Quality IoT Start Kit library files and installed the library by opening the Sketch menu in IDE, going to Include Library and selecting Add ZIP Library, navigating to my Downloads folder and then selecting the newly downloaded library .zip file.
You will also need to add the Wio Link Board. Still in the Arduino IDE, go to File/Preferences and add the following URL to Additional Board Manager URLs:
http://arduino.esp8266.com/stable/package_esp8266com_index.json"

Next, open the Tools menu and select Board and the Board Manager in the pop-out menu. You can then search for and install the Wio Link board. Select and install the Esp8266 package by the ESP8266 Community.
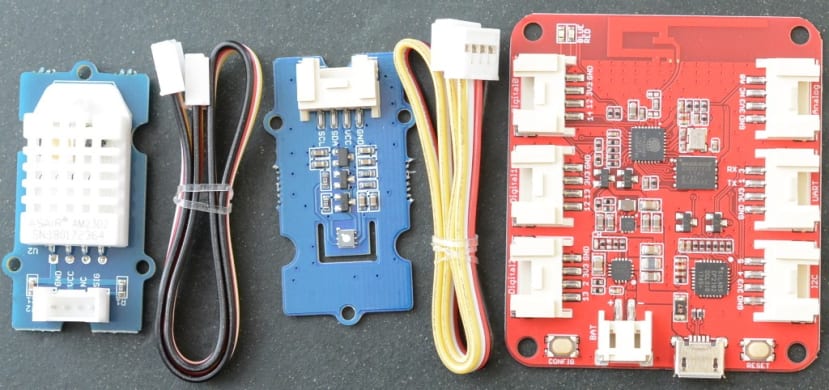
Once this was done I connected the two sensors to the WIO Link board using the supplied cables. The Temperature & Humidity sensor plugs into the socket marked “Digital2” and the Gas Sensor to the socket marked “I2C”. I then connected the board into a USB socket on my PC.

Back in the Arduino IDE, I selected the newly added Seeed Wio Link board in the Tools menu and the port for the USB my board was connected to. Then in the File menu under examples, scrolled down to Okdo AQ IoT Starter Kit in the Custom Libraries section and selected “Okdo_Air_Quality_IoT_Starter_Kit_V1”. I then needed to authenticate the device.
/*

* Enter your AllThingsTalk device credentials below

*/

#ifndef KEYS_h

#define KEYS_h

const char* DEVICE_ID = "5BroM9c13gfgjijfFHkWyr8B";

const char* DEVICE_TOKEN = "maker:4G8leAuDguYIW1VeVxnpDx9BZXwuSSNb7NaAOyS";

const char* WIFI_SSID= "myWiFi";

const char* WIFI_PASSWORD = "MyWiFiPassword";

#endif
Clicking on the keys.h tab will show the sketch that handles authentication. I needed to add the Device ID and the Device Token.
Back in the OKdo Cloud application and in Playground I could see the Air Quality device I had created. Clicking on that brought up the asset overview where I could click on the Settings button in the top-right of the device screen and from there clicking on the Authentication section, this displayed the Device ID and Device Token that I could simply copy and paste into the relevant sections of the Keys.h sketch. I then next added my Wireless SSID and Password to the code.

I could now compile, upload and run the example sketch.
Following which on the device page of the OKdo IoT Cloud I could see the data from the sensors being displayed and updated each minute. Just to check that it really was working, I plugged the kit into a Power Bank Portable Charger (136-6473) and took the sensors out into the workshop.

Looking under the “Live” tab in my Playground I could soon see the temperature dropping and the humidity rising.
I could display the data in a more appealing and accessible way by creating a Pinboard. Clicking on the Pinboard link on the left-hand column of the Playground page allowed me to easily create a new Pinboard and add graphs and a location map linked to my devices.


The Pinboard can easily be shared by clicking the Share icon which generates a page with a URL to your Pinboard that is accessible to everyone. The one I created is called Air Quality.
I sent the link to my phone and created a shortcut on my Home Screen so I could check the conditions in the Workshop before I set off to work. There is an AllThingsTalk Android app that could, in theory, also give me access to the data on my ‘phone but I have not had any luck getting to work on my handset.
Further Possibilities
Having powered the kit with the portable charger it occurred to me I could make it properly portable by connecting it to the Cloud by using my mobile phone as a hot spot. There is also a battery connector on the Wio Link board and so it could also be powered that way with a suitable battery, or I could power it from the USB socket in my car, which could be interesting on longer journeys with the addition of a damp dog in the back!