Remote Flying Fish Project Part 14: Flutter UI Design
Follow article Dave from DesignSpark
How do you feel about this article? Help us to provide better content for you.
Dave from DesignSpark
Thank you! Your feedback has been received.
Dave from DesignSpark
There was a problem submitting your feedback, please try again later.
Dave from DesignSpark
What do you think of this article?
In this chapter, we will create a simple interface of our mobile application by Flutter.
First, click "Start a new Flutter project".

Select "Flutter Application".

Type in the project name and select the folder of Flutter for Flutter SDK path.

Remain in the default settings and click "Finish".

You may have a similar interface shown up as below.

Now, you may see "No devices" on the upper bar, which means you have not connected any device either physical or virtual.

Select "Tools" → "AVD Manager".

Click the "Run button" in "Actions".

A virtual device shows up.

Now you can see your virtual device on the upper bar.

Let's move on to the coding. Insert the following codes to import the resources for Flutter. Note that some of the rows are int grey, which means it has not yet be used.

First, we fixed the orientation of mobile horizontally (default vertical) in the void main function.
Remark: we will move this part into initState() later

Then we need to separate the screen into two parts, left for controlling the horizontal direction and right for controlling the vertical direction. Follow the steps below.
1. Modify the MyApp() function into Setup()
2. Change the title name to "Flying Fish Controller".
3. In the MaterialApp() function, adding a Scaffold() in "home:" to create an App Bar and Row() in "body:" with multiple "children".
4. Inside the "children", you can use Expanded() to specify the percentage of the width. Let's say 70% for the left side and 30% for the right side.
5. Adding a container in "child:" with the colour you want. (i.e. light blue for left and yellow for right)

Delete the class "MyHomePage" and class "_MyHomePageState". Run the program (press shift + F10). You may see the result like this.

The next part is to create two joysticks in the left and the right region. We can use GestureDetector() to draw any shape. However, we need to first create it then create a container. Therefore, we have to delete the container first. Let's add a new class name HorizontalTouchControl() to replace the left container.


In this class, we defined some variables and constants for future use, it can let us detect whether we drag a joystick. So we create another class, HorizontalTouchControlState(), that to create GestureDetector.

We extend "State<HorizontalTouchControl>" and return a new GestureDetector in Widget build() function. You can see there are three void methods which represent "Start", "End" and "Update". When the user touches down the screen, it will display "start". Display "end" if touches up. We will discuss what to put inside later.

Next, we create a new Container under the GestureDetector. You can see there is a new command called alignment, it can fix the origin coordinate (0,0) at a specific corner by different input, (-1.0, 1.0) for the left bottom, (1.0, 1.0) for the right bottom. We will use it in the implementation as we want to make sure it is suitable for all screen sizes of mobile.
Before drawing the joystick, we need several values, the radius of the joystick and the original coordinates (x,y) of the joysticks. As we mentioned, the origin for the left region is in the left bottom and the origin for the right region is in the right bottom. Also, the y-axis of the screen is negative if it is above the origin. Therefore, we can define the following variables at the top of the program.

Also, we need the screen size of the mobile. So we create two more variables below those coordinates. (size_height and size_width)

However, we need to use "context" to get the height and width of the screen. Therefore, we have to separate the "MaterialApp()" by using a new class. We can get the height and width by "MediaQuery.of(context).size.height[width]".

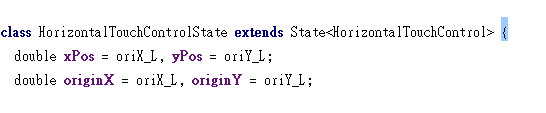
Create four variables in the class HorizontalTouchState to store the value of the original coordinates for future uses.
Create a new CustomPaint under the Container, create another class called HorizontalTouchControlPainter inside of it. (i.e. painter:) Remarks: for clear understanding, let's change the colour of the Container to default white colour by delete the "colour:" command.

Override the paint() function, we need to create 3 different shapes, two lines, a big circle and a small circle. Therefore, we need to create three new Paints, "paint_dot", "paint_circle" and "paint_line". Remarks: the big circle should empty inside and the small circle should be filled.
Then draw the circles and the lines, be careful the start and the end coordinates of the lines.

You may see the last line we override a boolean "shouldRepaint()", it will draw the dot again if the position is changed. Then the dot will follow your finger when you are dragging it.
The next step is to set the new coordinates to the variables when you are dragging the dot. You can use"setState() inside the _handlePanUpdate().

Now you can test your program on your virtual device. You can drag the dot in whatever place within the left region. The dot will follow your finger. However, you can see there are two mistakes, the big circle and the lines only fix in the original position. We want it to appear where we touch down the screen. The second mistake is the dot will stop at the position that we stop dragging. We want everything back to the original position including all circles and lines.

Therefore, we can add the commands inside the "_handlePanStart" and "_handlePanEnd". It can set the coordinates that you press on the screen and the original coordinates when you touch off the screen.

Here is the result, it looks much better.

The next step is to calculate the distance and the angle. Let create three variables at the top of the program, "distance", "angle" and "height". It is also the three variables that we send to the Arduino in the future part.

Create two methods to calculate the distance and the angle.

Remarks: Be careful of the y coordinate. Also, the output of using "atan()" is in radian. Change it to a degree by multiply 180 and divide pi.

Once we have the value of the distance and the angle, we can limit the dot inside the big circle. Also, adding a print command to see the results of distance and angle.


Congrats, you already finished the left region. We still have the right region. It is mostly the same as the left region but has some minor changes.
Replace the Container with a new class VerticalTouchControl.

Change the name from Horizontal to Vertical inside the class TouchControl.
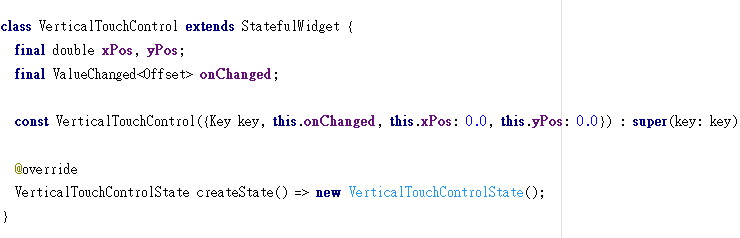
The four variables using the coordinate of the right region.

The alignment is set to (1.0, 1.0). The origin coordinate is set to (0, 0) at the bottom right corner.

The following class have some changes. We would like to use two new variables to store the distance(distance_R) and the angle(angle_R) of the joystick as we do not want to interrupt the variable "distance" and "angle". They are used to limit the dot move within the big circle.

Also, we will need to calculate the height. It is simple, move upward (output 1), move downward (output-1) and no move (output 0). You can simply compare the y-axis of the moving dot.
The calculation of distance and angle is more or less the same, but be careful the x-axis is in -ve sign.


After all, there is only one more step to control the airship, sending messages to Arduino through Bluetooth. We will discuss it in the next chapter.

Parts in this series
- Remote Flying Fish Project Part 1: Introduction
- Remote Flying Fish Project Part 2: DIY Series - Arduino Testing
- Remote Flying Fish Project Part 3: Motor Testing
- Remote Flying Fish Project Part 4: Bluetooth Testing
- Remote Flying Fish Project Part 5: Motor Testing with Remote XY
- Remote Flying Fish Project Part 6: PCB Design (preparatory)
- Remote Flying Fish Project Part 7: PCB Design (Schematic)
- Remote Flying Fish Project Part 8: PCB Design (PCB Layout)
- Remote Flying Fish Project Part 9: Soldering and Arduino Programming
- Remote Flying Fish Project Part 10: Flutter Introduction
- Remote Flying Fish Project Part 11: Flutter Installation on MacOS
- Remote Flying Fish Project Part 12: Flutter Installation on Windows
- Remote Flying Fish Project Part 13: Get yourself a Git
- Remote Flying Fish Project Part 14: Flutter UI Design
- Remote Flying Fish Project Part 15: Bluetooth in Flutter
- Remote Flying Fish Project Part 16: 3D printing for propeller protector
- Remote Flying Fish Project Part 17: Flight Test and Fine-tuning