Building a LoRaWAN Water Detector using an Arduino MKR WAN 1300 and a Grove Moisture Sensor
Follow article
 Dave from DesignSpark
How do you feel about this article? Help us to provide better content for you.
Dave from DesignSpark
Thank you! Your feedback has been received.
Dave from DesignSpark
There was a problem submitting your feedback, please try again later.
Dave from DesignSpark
What do you think of this article?

Using a moisture sensor connected to an Arduino MKR WAN 1300 board to measure moisture levels and send the data up to The Things Network.
Having used the Grove Starter Kit for Arduino and the Grove Voice Recognizer I now have quite a collection of Grove Modules. Also, after recently looking at the Arduino MKR WAN 1300 I am eager to explore its possibilities further. So I was pleased to discover that a MKR Connector Carrier (176-3646) would allow me to easily use the Grove sensors with the MKR Wan 1300.
Connecting the Grove Sensors to the MKR WAN 133

I started off by plugging the MKR Arduino MKR WAN 1300 into the Connector Carrier and then connected a Grove proximity sensor. I uploaded the example sketch to the Arduino and waved my hand over the sensor and could see the result in the Serial Monitor of Arduino IDE.
I then tried a variety of other sensors and decided to explore the uses of the moisture sensor (174-3236) . This seemed appropriate as we get a lot of moisture here in Yorkshire, and I thought it could be used to detect water getting into places it shouldn’t.
Connecting to The Things Network

I had already connected my MKR WAN 1300 to the Things Network (TTN) and outlined this in a previous blog post. Getting the sensor to send data to TTN was fairly straight forward – getting it in a useful format was a different matter. I based an initial sketch on the MKR WAN 1300 basic “hello world” sketch from Gonzalo Casas GitHub, and the Grove Moisture Sensor example that sends values to the Serial monitor.
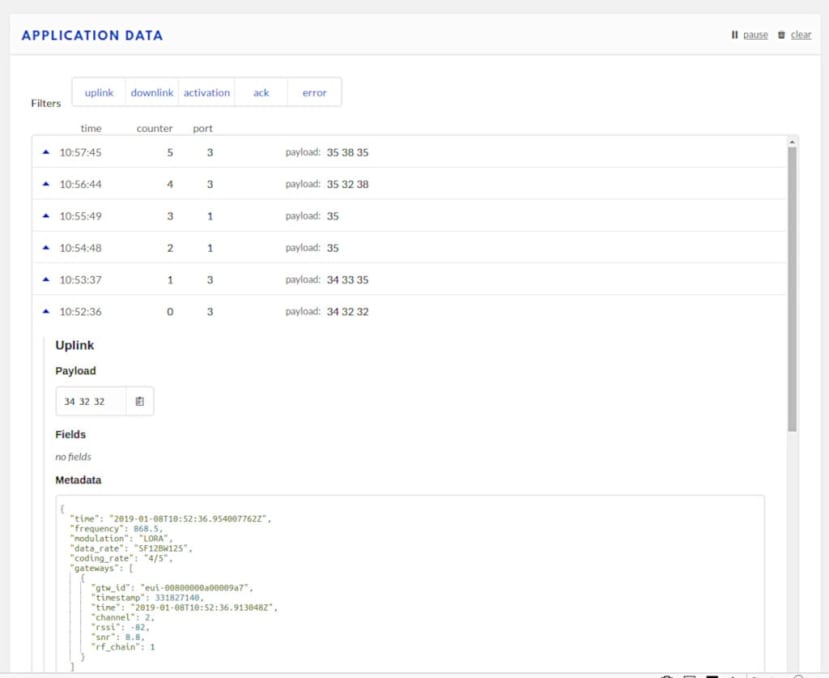
I could see the data being sent up to TTN but it did not make much sense, so I set about trying to fix this.
Sending Data As Bytes
The Things Network uses LoRaWAN, a wireless communication standard like WiFi or Bluetooth, which is a type of Low Power Wide Area Network (LPWAN). It depends on data being sent and received as efficiently as possible to conserve bandwidth and airtime. This has the added benefit of also conserving power, which is especially useful in the case of battery powered devices. This means that data should be encoded to use as little air time as possible. So it should be converted to bytes, rather than sent as ASCII characters, before being transmitted – and it should use as few bytes as possible. So I needed to convert the data my sensor was generating to bytes before transmitting it.
To this end, the first thing I needed to do was to change the modem.print line in my sketch to modem.write. On reading the MKR Wan reference material it became clear that modem.write sends data as a byte or series of bytes, while the print function that I had mistakenly used, sends characters representing the digits of a number.
Once modem.print was changed to modem.write I could see it was sending bytes OK, but I could improve things further by squeezing the data into a single byte. The maximum value of a byte is 255, but according to its datasheet, the Grove sensor generates Output Values as follows:

I tested how this looked in real life by dipping the sensor into a glass of water. The reading I got was just over 600. Shorting the contacts out with a key or screwdriver generated a value of around 800. This means if I divided the value by 3 it would give a value less than 255 in the wettest circumstances. In this instance, I did not need precision – i.e. 950 degrees of wetness, since 300 is fine for what I wanted. It could easily be edited in the future to divide by 3.5 or 4 just to be absolutely sure we stay within the maximum value of 255 limit for a single byte.
The Final Sketch
My sketch now looks like this:
#include <MKRWAN.h>

LoRaModem modem;

#include "arduino_secrets.h"

// Please enter your sensitive data in the arduino_secrets.h tab

String appEui = SECRET_APP_EUI;
String appKey = SECRET_APP_KEY;
int sensorPin = A0;
int sensorValue = 0;
void setup() {

// put your setup code here, to run once:

Serial.begin(115200);
while (!Serial);

// change this to your regional band (eg. US915, AS923, ...)

if (!modem.begin(EU868)) {
Serial.println("Failed to start module");
while (1) {}

};

Serial.print("Your module version is: ");
Serial.println(modem.version());
Serial.print("Your device EUI is: ");
Serial.println(modem.deviceEUI());
int connected = modem.joinOTAA(appEui, appKey);

if (!connected) {

Serial.println("Something went wrong; are you indoors? Move near a window and retry");

while (1) {}

}

// Set poll interval to 60 secs.

modem.minPollInterval(60);

// NOTE: independently of this setting the modem will
// not send more than one message every 2 minutes,
// this is enforced by firmware and can not be changed.

}

void loop() {

// read the value from the sensor:

sensorValue = analogRead(sensorPin);

// scale the reading and fit into 1 byte

int scaledValue = sensorValue / 3;
byte payload = scaledValue;
Serial.print("Sensor reading = " );
Serial.println(sensorValue);
Serial.print("Scaled value = " );
Serial.println(scaledValue);

delay(1000);

modem.beginPacket();
modem.write(payload);
int err = modem.endPacket(false);
if (err > 0) {
Serial.println("Data Sent");
} else {
Serial.println("Error");
}
delay(100000 * 60);
}
You will need to install the MKR WAN library to run the sketch, I have already outlined how to do this in my blog about the MKR WAN 1300.
The grove moisture detector is an analogue sensor so doesn’t need a library to operate.
You will also need to create a file called arduino_secrets.h in the same folder as the above sketch that contains the following:
// Replace with keys obtained from TheThingsNetwork console

#define SECRET_APP_EUI "xxxxxxxxxxxxxxxx"

#define SECRET_APP_KEY "xxxxxxxxxxxxxxxxxxxxxxxxxxxxxxxx"
You can then edit this to replace the x’s with the App EUI and the App Key that you can find on the Device page of TTN Console.
Adding a Decoder in The Things Network Console
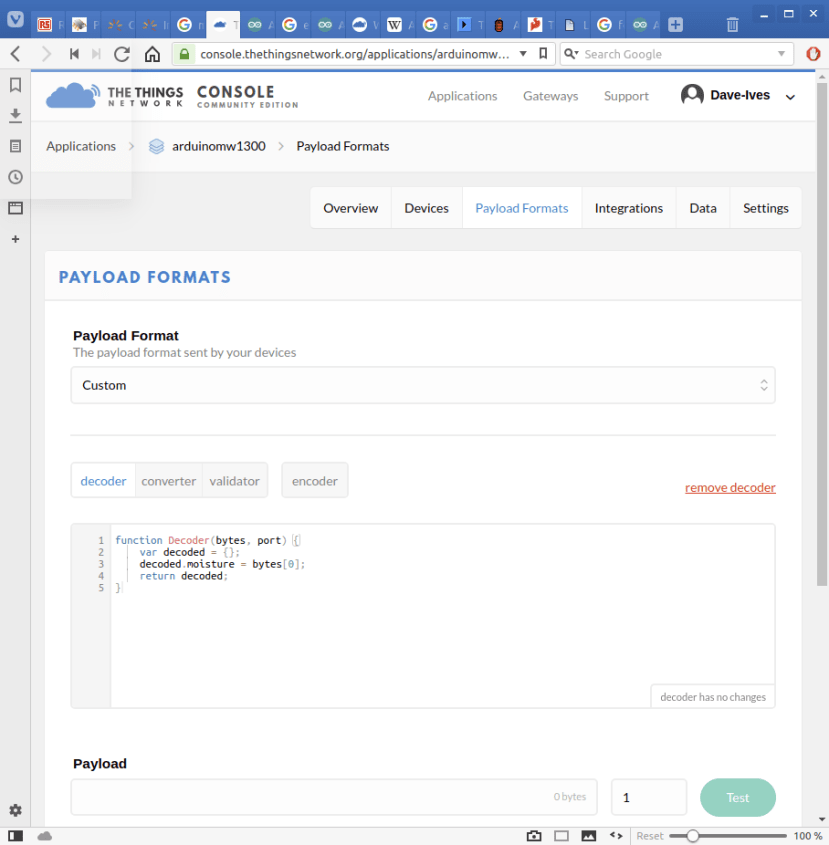
Once the data arrives at The Things Network, the byte value needs to be turned back into a meaningful number. This is done using the decoder on the TTN side, which is in the “Payload Formats” page of the Application section of TTN Console. It uses Javascript and the following decoder reads the byte sent by the sensor and turns it back into an integer:
function Decoder(bytes, port) {
var decoded = {};
decoded.moisture = bytes[0];
return decoded;
}
Debugging

The sketch includes the lines that write to the serial monitor so as to help with debugging. This displays the integer output from the sensor, then that value is divided by 3 to give an easy comparison with what we see in the TTN data window. This will make it easy to monitor any unusual values being generated if, for example, they go over 255.
Conclusion
If I had just wanted a flood detector I could have used the Grove Water Sensor (174-3242) for this project, but the moisture detector offers more flexibility. Apart from an actual flood, I could use it to see how wet the field behind the house is before taking the dog out for a walk, or it could be used in summer to see when plants need watering.
I am also going to investigate ways of setting it up to send an SMS or tweet alert when things get too wet (or dry).