Building a 3D Print Queue Automation System - Part 1
Follow article
 Dave from DesignSpark
How do you feel about this article? Help us to provide better content for you.
Dave from DesignSpark
Thank you! Your feedback has been received.
Dave from DesignSpark
There was a problem submitting your feedback, please try again later.
Dave from DesignSpark
What do you think of this article?
The first stages in how I built a 3D print queue automation system for the iForge, the University of Sheffield’s student-run Makerspace.
This series of articles will go over my process and key stages when developing my 3D print queue automation solution for the iForge, the University of Sheffield’s student-led engineering Makerspace.
If you’d like to find out more about what the iForge is and how we operate, please take a look at my article on it!
If you have any questions or want to know more, please leave a comment! I’ll do my best to help you out.
Background
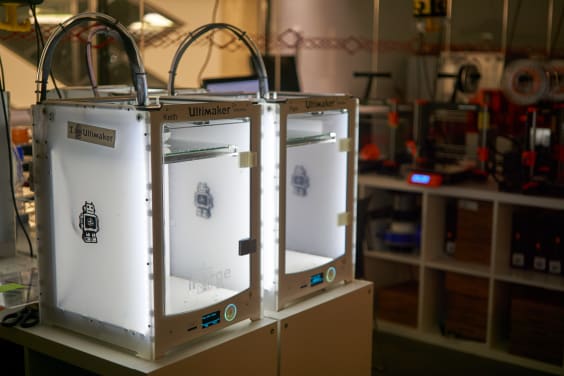
Among the most popular tools available in the iForge are our 9 3D printers - over 400 different students printed a total of over 1400 print jobs over the last year, taking 290 full days of printer time and using over 87kg of PLA filament.
The biggest issue for us at the iForge is that this volume of printing requires a lot of time and attention from the student volunteers to organise. Additionally, over the whole year, we had a 7% print failure rate, mostly due to badly prepared models that weren’t checked thoroughly enough before printing. A number of these failures caused damage to the printers requiring a considerable amount of repair work to fix, and the majority of these would have been avoidable if the print job was stopped as they started to fail.
The main iForge workshop is completely separate from the 3D printing lab, which is two floors up and on the other side of the building. This is because of space constraints in our main workshop and helps with keeping the 3D printers clean, but being so far away makes it difficult for the iForge Reps, our student volunteers who run the space, to monitor and manage them.
Our current 3D printing process is as follows:
- First, the user slices their 3D model to make gcode - the machine code that all of our 3D printers use. The most appropriate settings for a print can vary from model to model, so all our volunteer student Reps are trained to handle the basics so they can help.
- An iForge Rep checks that the settings used were suitable and uses a piece of custom software to upload the print job to the queue, which is based on Google Sheets and a Google Drive folder.
- When available, a Rep will go to the print lab to check that the ongoing prints are working properly and aren’t going to fail. If prints are complete and ready to remove from the 3D printer’s buildplate they will be taken off and put aside to take back down to the iForge. The Rep then opens up the queue spreadsheet, finds the appropriate print and marks it as ‘complete’, which automatically sends an email notifying the user.
- As soon as a printer is clear and ready to start another print, the Rep will find the next print on the queue spreadsheet. This gives them a gcode filename to search for in the Drive folder, which they then download. They then have to get the SD card from the 3D printer, put the gcode file on the SD card then return the card to the printer. At this point they can use the printer’s interface to start the print from the SD card, then mark the print job as ‘running’ on the queue spreadsheet.
- We usually ask that Reps keep an eye on the 3D printers until at least the first couple of layers are complete, as this is the most likely period where print failure could cause serious damage to the print or the 3D printer.
This cycle repeats throughout the day, with Reps regularly going up to the print lab to check the status of the printers and sort out finished and new print jobs. While this system works fairly well overall, it takes quite a bit of time where the Rep could be in the iForge helping run the space.

The Problem
The most time-consuming parts of this process are moving between the main workshop and the print lab, managing the queue spreadsheet and finding and transferring files.
This project aims to target both of those key areas as a complete programmed solution with minimal human interaction necessary. As part of that, I’d also like to address a couple of other issues such as the problems with how slow Google Sheets can be when working with such a large spreadsheet.
Solution Overview
I started with a list of the key features for my solution:
- Overhauled print database
- Automatic queue management
- Automatic transfer from queue to printers
- Remote printer monitoring
- Remote printer control
- Basic access control/security
- Simple and easy setup and maintenance
Based on this list I split the project into a number of key sections.
- Queue Database - First is the print queue database and an interface for that, handling storage and some processing of print data. Most of the other components will use this in some capacity.
- Supervisor - Second is a ‘supervisor’ program, which primarily handles moving files between the print queue and the printers, checking when prints are finished and updating the queue database as necessary.
- User interface - Then there’s the user / Rep interface, featuring camera streams from each printer and basic controls to allow them to pause and resume prints that need manual intervention, and to stop prints that are failing - which will, in turn, mark them as ‘failed’ in the queue database.
- Deployment - Finally we need a way of easily getting this all to run, ideally in a way that doesn’t require directly editing code on the live devices.
Architecture
Most of this will be written in Python, running on a Raspberry Pi single-board computer on the university network. Each 3D printer will have its own Pi attached running an instance of Octoprint, an open-source 3D printer management solution.
Aside from OctoPrint, I’ve identified a couple of other open-source projects I’m likely to draw from when building my system.
- Guysoft’s OctoPi project builds an OS image with OctoPrint completely set up for a Raspberry Pi, which I will likely modify to include a few key plugins for management of the queue system so you don’t have to manually set up all the printers from scratch.
- Quillford’s PrinterView is a web browser-based UI for monitoring multiple OctoPrint instances simultaneously, which I will modify to show a set array of printers and their webcam streams.
balenaCloud will make managing and deploying code to the controlling Pi easier, and its remote monitoring and updating tools will make checking how the system is working much easier.
In the interest of making this project useful to anyone who might want to use parts of it for themselves, most of what I do will be available on GitHub.
After the articles going through my development process, I will publish a project guide here on DesignSpark, going through every step needed to run your own system.
Next Steps
In the next articles in this series, I will go over how I built each component of the project, what I learnt and how I overcame any issues I encountered. Click for part 2.