Build your electronics workbench for prototyping (as a student or hobbyist)
Follow article
 Dave from DesignSpark
How do you feel about this article? Help us to provide better content for you.
Dave from DesignSpark
Thank you! Your feedback has been received.
Dave from DesignSpark
There was a problem submitting your feedback, please try again later.
Dave from DesignSpark
What do you think of this article?
With the new academic year commencing, we see a lot of students are starting their exciting journeys into the world of electronics. And nothing can beat getting your hands dirty by working on electronics projects and seeing your ideas turn into a fully functioning prototype. If you are in a position, where you feel overwhelmed about building your first electronics workbench, this article is for you.
You will get a sneak peek into my electronics workbench that I started building at the beginning of 2021. This is not, by all means, a professional setup, but more suitable for students or hobbyists, who do not want to spend a lot of money on the equipment and working with a very limited space.
Where to start?
Well, you will need some sort of desk or table first. Since we are focusing on budget-friendly options, I am not going recommended anything above £100. Personally, I found a metal workbench from Toolstrade that does the work for me. Unfortunately, by the time this article is being written, the exact model that I got seems to be sold out. Instead, I am going to leave you with the link with similar options from Amazon. I have also seen other people using IKEA items, but that just seemed like a lot of job for me (plus IKEA during the pandemic is a nightmare).
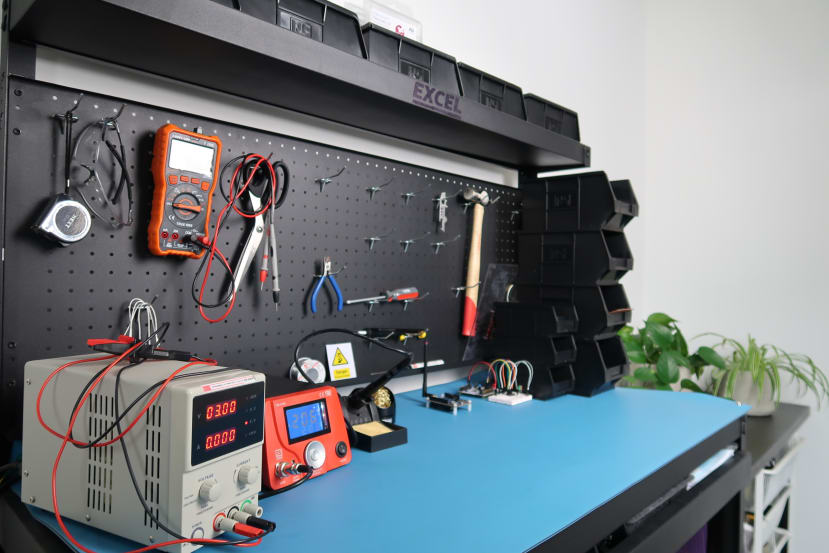
What I liked about the workbench is that it has a decently large drawer and space at the top for storage. I can also use the pegboard with hooks to organise smaller items or the tools I use most often. Although this is not something you have to get, having plastic containers (909-6906) (909-6915) helps immensely with keeping the area tidy.
ESD proofing your area
Safety first! And that’s true when comes to working with ESD-sensitive components, which will need special attention and a couple of adjustments to your workbench. What is ESD and why you should worry about it? The term stands for electrostatic discharge and it signifies a release of static electricity between two oppositely charged objects that come into contact. The build-up of electrostatic charge can happen when two materials are rubbed together, for example, when walking on the carpet or brushing hair.
Some values of electrostatic voltage generated by common activities in either high humidity (65 to 95% humidity) or low humidity (10 to 20% humidity) environment are shown in the table below.
|
Means of Static Generation www.interfacebus.com |
Electrostatic Voltage | |
|---|---|---|
| 10 to 20% relative humidity | 65 to 90% relative humidity | |
| Walking across carpet | 35,000 | 1,500 |
| Walking over vinyl floor | 12,000 | 250 |
| Worker at bench | 6,000 | 300 |
| Vinyl envelopes for work instructions | 7,000 | 600 |
| Common poly bag picked up from bench | 20,000 | 1,200 |
| Work chair padded with polyurethane foam | 18,000 | 1,500 |
Some examples of ESD-sensitive components that you might encounter are:
- Integrated circuits, e.g. microcontroller, op-amps, voltage regulators.
- Laser diodes
- High precision resistors
- CCD sensors
- And more…
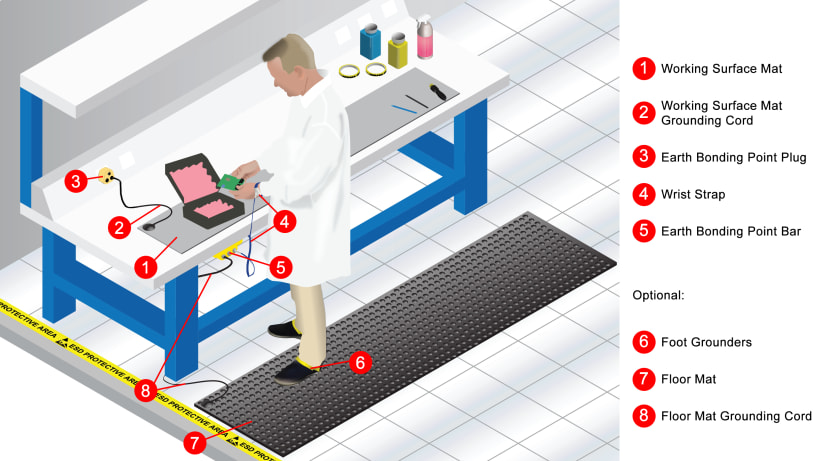
To protect these devices from ESD, it is necessary to keep them at the same electrical potential as any used surfaces, objects and people in the room by grounding everything to Earth. This can be achieved using the items shown in the diagram below. Let’s go through each of them individually:
- ESD-safe mats (466-1643) are used to cover the working surface. They are designed to drain static charge and protect any surfaces from any wear and tear.
- Grounding cords (287-7486) are then needed to connect the ESD mat to the Earth bonding plug. They would typically have metal studs on each side.
- Earth Bonding Point (298-3890) plug fits straight to the mains supply outlet and provides a connection with the earth conductor only.
- ESD wrist wrap (798-9275) with either banana plug or metal stud connects to the Earth bonding point and prevents a build-up of static on a person’s body from being damaged when handling ESD sensitive devices.
How to power your projects?
There are multiple ways you could do that and what option to go with will depend on the specific requirements of your project. For example, if you are designing any kind of portable device, you can use rechargeable or non-rechargeable alkaline batteries. Alternatively, coin button batteries are ideal for compact designs. Working with most development boards and evaluation kits out there, you can get away with USB power coming straight from your PC.
Power supplies, on the other hand, are very handy in any electronics workbench, not only for powering your projects but also for things like testing and debugging. The type of power supply that is commonly used in educational and laboratory environments is a variable DC bench power supply. It draws AC power from the mains electricity and converts it to the specific DC voltage level that is required for your project.
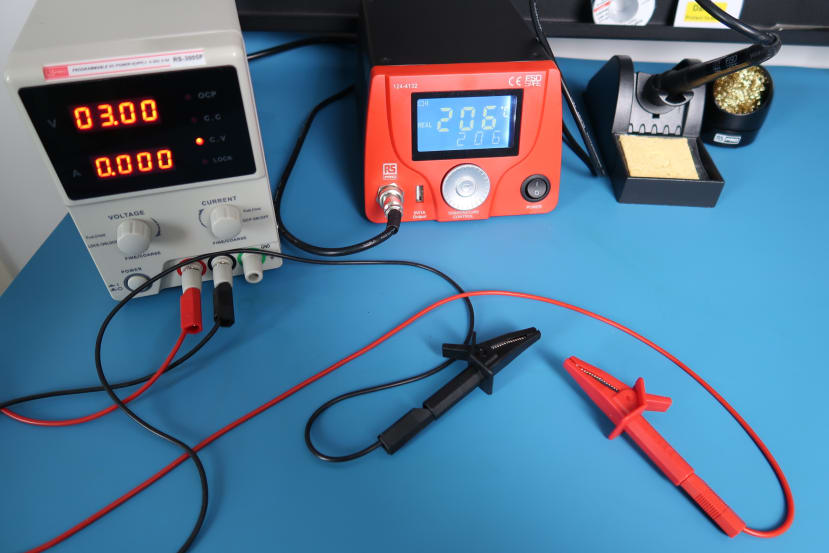
Let’s review some of the aspects of a bench power supply with variable DC output by using the one I own as an example. The RS Pro RS3005P digital control DC power supply (175-7367) supports an output voltage range of 0-30V and an output current range of 0-5A. It has a 4-digit display and two knobs for adjusting for current and voltage values, a set of banana jack terminals and a power button for turning the supply on and off.
RS PRO RS3005P digital control DC power supply
This model specifically supports two modes of operation: constant voltage and constant current. In the constant voltage mode, you can specify the exact voltage value you want to provide across the load. For example, if you are supplying 3V across a 10kOhm resistor, you would get 0.3 mA, according to Ohm’s law. Conversely, the constant current mode allows supplying a constant current value regardless of any changes in the load’s resistance value.
To complete the setup, I have added the RS Pro test leads (273-9429) and crocodile clips (044-6967) , which are plugged into the positive and negative terminals. You can also make a connection between one of the terminals and ground using a cable or a metal shorting bar if you want either of them to be referenced to the ground.
A Multimeter to the rescue
Multimeters are extremely useful to have around the house even if you are not working on any electronics projects. You can do things like checking whether the batteries on your remote controller are dead or why the light fixture has been flickering. I suggest we get to know this handy little tool a bit closer.
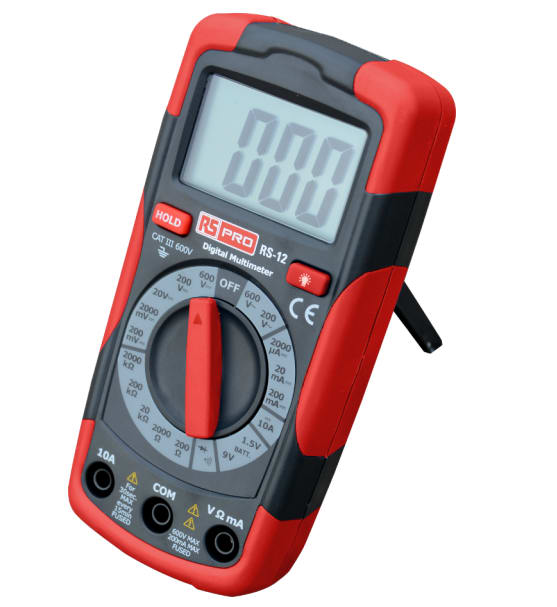
RS Pro RS12 Handheld Digital Multimeter
Most digital multimeters will have three main areas: display, selector knob and ports. The display shows the reading that is being taken, whereas the selector knob can be used to select various parameters to read, such as DC/AC voltage, DC current and resistance.
Looking at the datasheet for the RS Pro RS12 Handheld Digital Multimeter (123-2004) as an example, you can see that there are five different functions this device can read. Before taking any measurements, you need to turn the knob to the right section and adjusting the range for your readings.
Specifications
| Function | Range | Resolution | Accuracy |
|---|---|---|---|
| DC Voltage (Vdc) | 200mV | 0.1mV | ± (0.5% reading + 2 digits) |
| 2000mV | 1mV | ||
| 20V | 0.01V | ||
| 200V | 0.1V | ± (0.8% reading + 2 digits) | |
| 600V | 1V | ||
|
AC Voltage (Vac) |
200V | 0.1V | ± (1.2% reading + 10 digits 50/60Hz) |
| 600V | 1V | ||
| DC Current (Adc) | 2000μA | 1μA | ± (1.0% reading + 2 digits) |
| 20mA | 10μA | ||
| 200mA | 100μA | ± (1.2% reading + 2 digits) | |
| 10A | 1mA | ± (2.0% reading + 2 digits) | |
| Resistance | 200Ω | 0.1Ω | ± (0.8% reading + 2 digits) |
| 2000Ω | 1Ω | ||
| 20kΩ | 0.01kΩ | ||
| 200kΩ | 0.1kΩ | ||
| 2000kΩ | 1kΩ | ± (1.0% reading + 2 digits) | |
| Battery Test | 9V | 10mV | ± (1.0% reading + 2 digits) |
| 1.5V | 1mV |
Specifications for RS Pro RS12 Handheld Digital Multimeter
The three ports at the bottom part of the multimeter correspond to the 10A, COM and VΩmA. The 10A prob is used to measure current values that are larger than 200mA, while current measurements above that value as well voltage and resistance values can be taken through the VΩmA port. The COM port refers to the ground.
Soldering basics
Soldering is probably one of the most fun skills that you can develop when working on electronics projects. In a nutshell, soldering involves joining two or more metal parts together by using a filler metal, also called a solder, to make an electrical connection.
The solder has a lower melting temperature than the adjoining parts and most commonly you will find lead-based (tin and lead alloy) and lead-free options. The former needs to be handled properly because of its lead content, with precautions like washing your hands after soldering, using fume extractors (151-3014) and working in a properly ventilated room. The lead-free solder is an environmentally friendly and less hazardous option, but it can be a bit trickier to work with, especially if you are just getting started.
Another little helper for projects that involves soldering is a flux (251-3637) . It is applied prior to the soldering process and helps to remove oxidation and improve electrical contact between electronic components.

When it comes to the soldering equipment, there is plenty to choose from depending on your budget and what sort of features you want to have. Soldering irons can be plugged directly to mains electricity and are generally an affordable, easy-to-use option. However, they can be limiting in terms of being able to set up the temperature or change the tip of the iron. Previously I had one of those, but recently I upgraded to the RS Pro soldering station (124-4132) with an LCD display, temperature control dial and a soldering gun with a high-end alumina ceramic heating element. I also paired it with an iron solder tip cleaner set (136-8299) and solder sucker (771-9543) .
Prototyping essentials
What are the basic components you might need to get started with prototyping? Below I am listing some of my must-haves, but why not check out RS’ student prototyping essentials page for more inspiration?
- Solderable breadboard (043-4217)
- Wire cutters (053-6420) and pliers (847-3765)
- LEDs (228-5562) , (247-1482)
- Resistors (707-7587) , (707-8221) , (707-7745)
- Jumper wires (204-8241) , (204-8243)
And if you want to get hands-on hardware experience with microcontrollers, our partners at STMicroelectronics and Arm are currently running a self-paced course on EdX platform.