Advanced Audio Effects with a BeagleBone Black and Bela Part 2: Building a Multi-Effects Module for The Red Tin
Follow article
 Dave from DesignSpark
How do you feel about this article? Help us to provide better content for you.
Dave from DesignSpark
Thank you! Your feedback has been received.
Dave from DesignSpark
There was a problem submitting your feedback, please try again later.
Dave from DesignSpark
What do you think of this article?
Enclosure design and build, wiring the knobs and buttons, and adapting a Bela project.
In the first part of this post, I explored the potential of the Bela cape for the BeagleBone Black (125-2412) , trying out some different sketches (code projects) and getting a feel for what it was capable of. Now it was time to put it to use in the Red Tin.
I found an example of a guitar effects pedal based on the BeagleBone Black and Bela, that I thought would be a good place to start with my DJ effects unit. It featured a number of sound effects that could be selected with push buttons and then their parameters adjusted.
Being designed for use with a guitar, some of the effects were not exactly what I wanted, but I was hoping I could edit the Bela sketch to substitute others.
I contacted the maker of the pedal on the Bela user forum and he was very helpful. Throughout my recent adventures in electronics, I have almost invariably found people to be very generous with their time, expertise and experience, for which I am very grateful.
Enclosure


I made a prototype using MDF for the base and a scrap piece of clear acrylic for the top. Both were laser cut and the sides of the top were then formed by heating and bending them using an acrylic bender.

The final version will, of course, be in red acrylic.
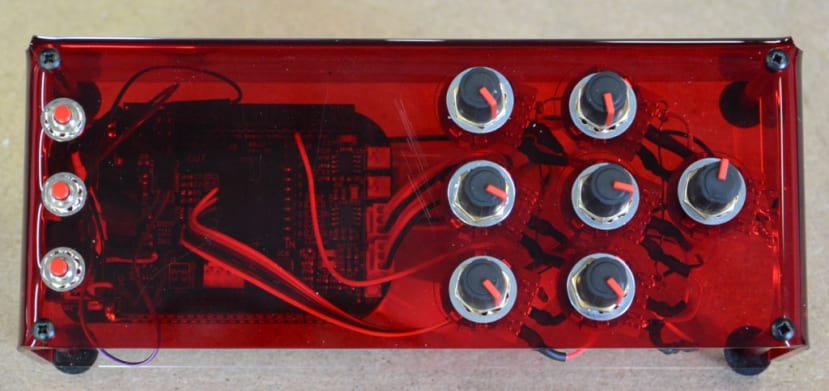
Wiring

I assembled the parts:
- 6 x 10k potentiometers (168-140)
- 3 x Momentary Miniature push button switch (133-6473)
- 6 x Knobs (467-6689)
- 6 x 470 Ω resistors (707-7647) (not pictured)
- 3 x 3.3 kΩ resistors (125-1162) (not pictured)
- 1 x 2.54mm Pitch, 36 Way, 1 Row, Right Angle Pin Header
Pictured is also a 10 segment Light Bar LED display (246-5689) and some 470 Ohm bussed resistors, that I intend to incorporate in the future to indicate which effects are active.

I followed the wiring guidance for the guitar effects kindly given by “ryjobil” on the Bela Forum; connecting the six 10k pots between ADC ref pin and gnd with wipers going to Analogue input channels 0-5 on the Bela. I wired a 470-ohm resistor between 5V and the analogue ref pin to make up the extra current drawn by the 10k pots.
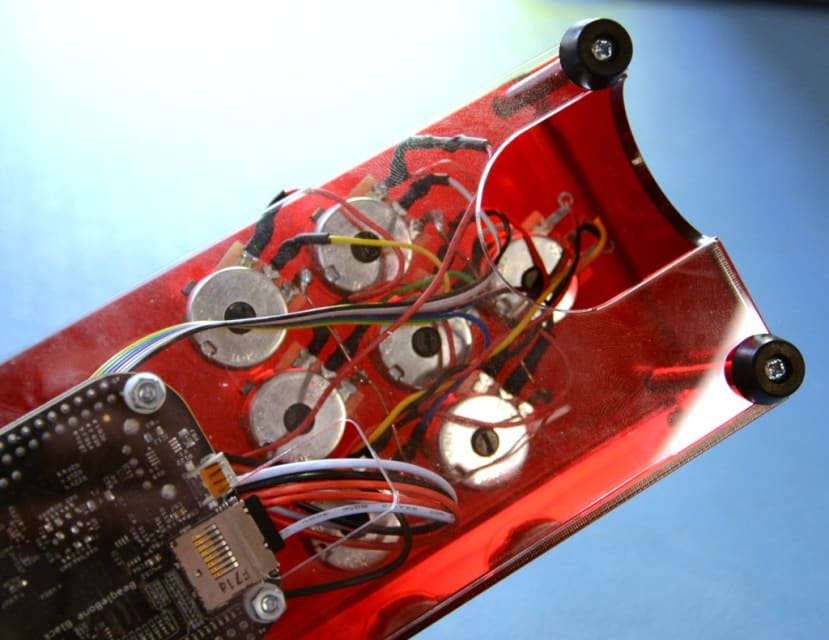
I soldered this on a jig and then transferred it to the case.
Next, the momentary pushbutton switches were wired across a digital input pin and then to 3.3V and 3.3k pull-down resistor to ground. These could then be fitted into the latest version of the case.

I used the right angle pin headers (251-8654) cut to the appropriate length to connect everything to the Bela Analogue and Digital inputs — the right angles saving some space in the enclosure.
I added a 7th potentiometer before realising that it was for the bypass volume for the WahWah effect that I was not going to use, so although it can be seen on some of the pictures, it is not wired up, but may come in useful in future with updated code/projects that could make use of it.
I then ran a quick test to see how it worked and I could see the switches and pots were acting as expected from the readout in the Bela IDE console.
Modifying the Script
I should point out at this stage that the extent of my coding expertise is a smattering of HTML 5 and Arduino, so what follows is a real beginners attempt at re-fashioning the original sketch.

Being a Bela Project for a guitar pedal there are some effects that I am not going to use. The different effects are scrolled through by multiple presses of the buttons so I wanted to take out the ones I was not interested in and re-order the remaining ones.
As I was not going to use the Wahwah effect I started by “commenting” out:
#include "inductorwah.h"The Bela IDE very helpfully updates in the console section indicating all the places where the sketch is now broken as a result of my tinkering. This meant I could then systematically go through the sketch, commenting out the irrelevant lines. As the main “render.cpp” is over 2,000 lines long and calls on loads of other sketches, the live syntax error updating was a godsend.
I then also took out the sustainer which left me with a nice selection of 10 effects.
This process also had the added advantage that it started to give me a picture of how the project was working – which bits were inter-dependent and how it fitted together.
The Finished Thing

Once the wiring was finished and the parts fitted into the enclosure and I modified the main sketch somewhat, I tested it out with some actual sound. I found a loop of ambient guitar music and used that as the source and started scrolling through the effects which works as follows:
- Digital input 0: Scrolls through the list of FX, makes them active for control. (CONTROL_EFFECT_SWITCH)
- Digital input 1: Toggles on/bypass state of active effect. (EFFECT_BYPASS_SWITCH)
- Digital input 2: Scrolls through control pages on the effect, which assigns the pots to different sets of parameters. (CONTROL_CONTEXT_SWITCH)
I have not quite decided yet which buttons I want for which input, but it is very easy to switch them around by moving the pins on the Bela header.
With a range of 10 effects at my disposal and the ability to layer them the permutations start to get a little confusing but the video gives a taste of what is possible.
Future developments
I may make a version of the enclosure without the redundant 7th dial (and with the Input and Output labelled the right way round!) As mentioned above, I also intend to build in some kind of LED indicators to help see which of the effects is running. On the coding side, now that I have a better idea of how it works, I should hopefully be able to try integrating some different effects.