戴夫来自 DesignSpark
你觉得这篇文章怎么样? 帮助我们为您提供更好的内容。
戴夫来自 DesignSpark
Thank you! Your feedback has been received.
戴夫来自 DesignSpark
There was a problem submitting your feedback, please try again later.
戴夫来自 DesignSpark
你觉得这篇文章怎么样?
 Zerynth,XinaBox和ubidots Cloud是物联网原型设计的实用工具。本文旨在帮助您编程Xinabox以收集SW03传感器天气数据,并与ubidots云端连接,在自行设计的ubidots仪表板上显示数据。
零件清单
| 数量 | 产品 | 库存编号 | |
|---|---|---|---|
| 1 | XinaBox SW03, Weather Sensor Module for MPL3115A2 | 174-3746 | |
| 1 | XinaBox xCHIP Wi-Fi & Bluetooth Core Module CW02 | 174-3702 | |
| 1 | XinaBox, USB Programming Interface Module for FT232R - IP01 | 174-3703 | |
| 1 | Zerynth Studio | ||
| 1 | ubidots | ||
什么是XinaBox?

XinaBox是一个模块化电子模组,有不同的核心模块和传感器模块,并自行设计及使用一种连接标准,无需电线,焊接,面包板或硬件知识,即可帮助您在短时间内进行原型设计。本项目使用CW02核心模块和SW03传感器模块。 CW02是配备ESP8266 / ESP-12F Wi-Fi芯片的核心模块。 SW03是用于从周围环境收集数据的天气传感器模块。
有关XinaBox的信息,请访问https://xinabox.cc/pages/overview。
什么是Zerynth?
根据Zerynth,“Zerynth是一个软件工具包,允许用Python或混合C / Python编程最流行的32位微控制器”。因此,您可以使用Zerynth来编写32位微控制器,如XinaBox,而无需触及C代码,从而降低了复杂性。您可以在Zerynth支援的设备上查看Zerynth支援哪些设备。
有关Zerynth的信息,请访问https://www.zerynth.com/。
什么是ubidots?
ubidots是物联网的云平台,主要功能包括数据捕获、分析可视化和规则管理。 ubidots的GUI简单易用。您可以构建自己的仪表板(称为“Dashboard”)以显示已接收的数据。借助ubidots中的API,只需通过几个步骤便能连接您的设备、捕获传感器数据并可视化您的数据。最重要的是,它是免费的。
有关ubidots的信息,请访问https://ubidots.com/。
第一步:硬件组装
如下图所示,连接XinaBox的模块:
- 将CW02连接到USB编程接口模块IP01。
- 将SW03天气传感器连接到CW02。
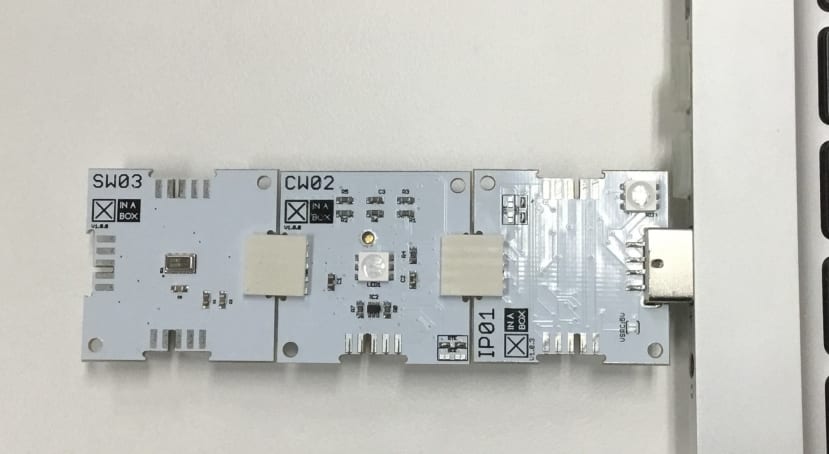
如对硬件有兴趣,请访问XinaBox CW02的技术规范或Zerynth文档以了解更多。
第二步:设置Zerynth Studio
Zerynth Studio是支援以Python语言编写嵌入式硬件的IDE,它是免费和跨平台,支持Windows 64位,Linux 64位和Mac OS X。单击下面的链接下载适用于您PC OS的安装档。
下载Zerynth Studio:https://www.zerynth.com/zerynth-studio/
只需几个步骤即可轻松安装。点击下面的链接检查安装指南。
Zerynth Studio安装指南:
https://docs.zerynth.com/latest/official/core.zerynth.docs/installationguide/docs/index.html
第三步:简易编程XinaBox CW02
设置Zerynth Studio中的设备
安装完成后,启动Zerynth Studio并按照Zerynth Docs中的步骤。
Zerynth Docs链接:https://docs.zerynth.com/latest/official/core.zerynth.docs/gettingstarted/docs/index.html
- 创建用户帐户。
- 将XinaBox连接到PC。
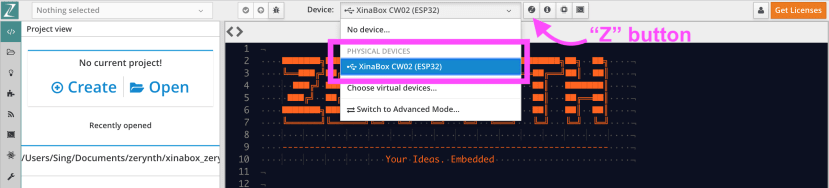
- 在Zerynth Studio的设备管理工具栏上选择XinaBox CW02(ESP32)(如果未显示XinaBox CW02,请再次重新连接XinaBox,同时确保PC已安装驱动程序)。
- 点击Zerynth Studio中的“Z”按钮注册设备。
- 再次点击“Z”按钮为设备创建虚拟机。
- 第三次点击“Z”按钮虚拟化设备。
视频(步骤与CW02相同)
之后,您就可以编写XinaBox了。
编写XinaBox以读取SW03传感器的数据
如果您在此部分遇到任何困难,可以参考入门指南。
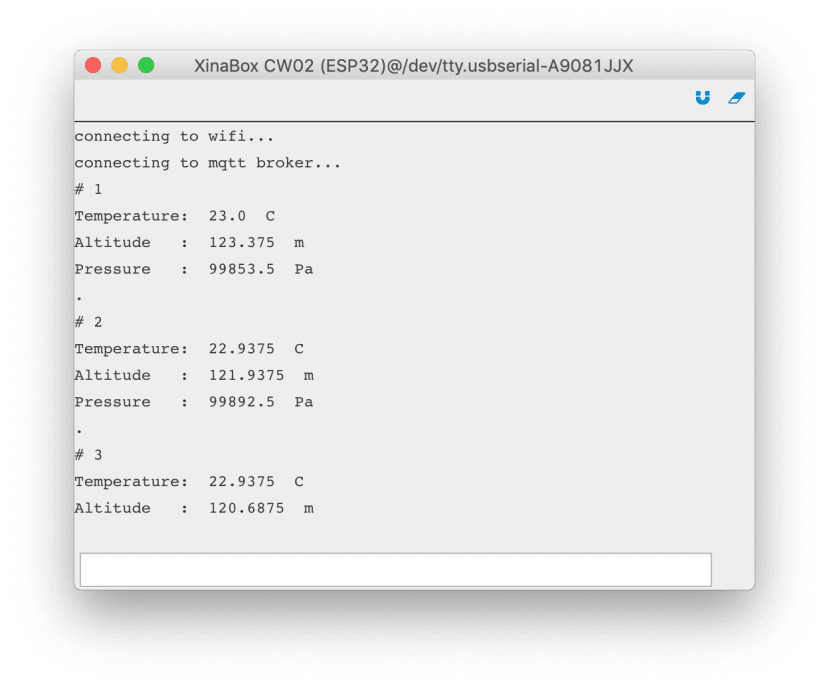
程序代码能在中Zerynth Studio找到,很容易。在Zerynth Studio中,您只需导航到“Examples”并搜索“SW03”,克隆“data environment”项目并将此程序上传到XinaBox即可。程序代码的数据输出可以在console查看。
代码:
##############################################
#   This is an example for SW03 ambient
#   temperature, altitude and pressure
#   sensor.
#
#   Ambient temperature, altitude and pressure
#   is measured and printed out on the console.
##############################################
import streams
from xinabox.sw03 import sw03

streams.serial()

# SW03 instance
SW03 = sw03.SW03(I2C0)

# configure SW03
SW03.init()

while True:
    temp = SW03.getTempC()      # return temp in degree celcius
    alt = SW03.getAltitude()    # return alitude in meters
    pres = SW03.getPressure()   # return pressure in pascals

    print('Temperature: ', temp, ' C')
    print('Altitude   : ', alt, ' m')
    print('Pressure   : ', pres, ' Pa')

    sleep(1000)
Console的显示结果:

第四步:设置ubidots
在ubidots中创建帐户
使用您的电子邮件地址和所选的用户名和密码,在https://app.ubidots.com/accounts/signin/注册。登录后,会看到下面类似的页面。

设置ubidots和连接您的设备
帐户建立后,要先创建新的Device和Variables才能接收设备推送的数据。点击“Devices” → “Add Device”, 键入所需的名称(如XinaBox)。点击剛剛创建的Device,您可以看到以下相似的内容。

接下来,创建新的变以使ubidots能够接收设备发送的内容。点击“Add Variable”→“Default”,输入变量的名称为“temperature”,如下图所示。

在此之后,还有几步即可接收XinaBox的数据。
第五步:编写XinaBox以发送随机数据至ubidots
启动Zerynth Studio并在“Examples”中寻找“Ubidots → IOT → Controlled publish period”的示例项目,或者可以下载这网页最底的附件。
先看一下這项目的资料夹,如下
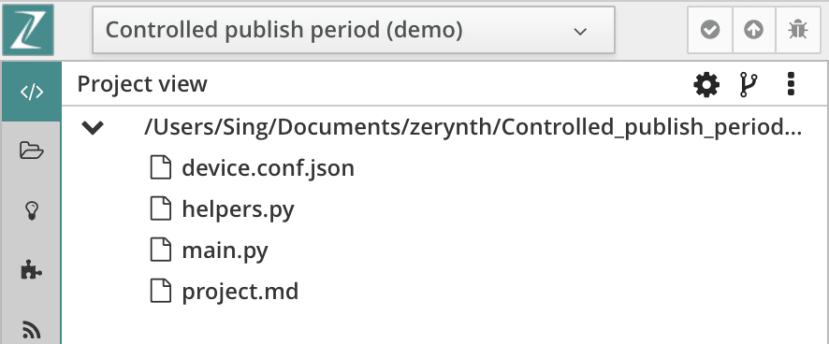
main.py - 这项目的主代码。
main.py的代码:
# Ubidots Controlled publish period
# Created at 2017-10-03 08:49:48.182639

import streams
import json
from wireless import wifi

# choose a wifi chip supporting secure sockets
from espressif.esp32net import esp32wifi as wifi_driver

# import ubidots iot module
from ubidots.iot import iot

# import helpers functions to easily device configuration
import helpers

# SET DEVICE CONFIGURATION INSIDE THE FOLLOWING JSON FILE
new_resource('device.conf.json')

# define a callback for period updates
def period_callback(value):
    global publish_period
    print('requested publish period:', int(value))
    publish_period = int(value)

streams.serial()
wifi_driver.auto_init()

print('connecting to wifi...')
# place here your wifi configuration
#### !!!! Change HERE !!!!
wifi.link("SSID",wifi.WIFI_WPA2,"PSD")

device_conf = helpers.load_device_conf()
publish_period = 1000

# create ubidots iot device instance, connect to mqtt broker, set variable update callback and start mqtt reception loop
device = iot.Device(device_conf['device_label'], device_conf['user_type'], device_conf['api_token'])
print('connecting to mqtt broker...')
device.mqtt.connect()

device.on_variable_update(device_conf['device_label'], 'publish_period', period_callback, json=False)
device.mqtt.loop()

while True:
    print('publish random sample...')
    device.publish({ 'value': random(0,10) }, variable='temperature')
    sleep(publish_period)
看看main.py的代码。此函数
device.publish({ 'value': random(0,10) }, variable='temperature')将包含payload { 'value': random(0,10) }, variable='temperature'的MQTT数据包发送到ubidots。它是向ubidots发送数据的函数。
在main.py中,您需要更改2个变数的值,在第31行的SSID和PSW。
# place here your wifi configuration
wifi.link("SSID",wifi.WIFI_WPA2,"PSW")SSID和PSW(密码)是您的Wi-Fi网络设置。我用我的手机作为Wi-Fi热点,当然,我的手机已连接到互联网(通过4G蜂窝网络)。
device.conf.json - 储存XinaBox这装置的配置,我们要修改"device_label"和"api_token"的值。
{
    "user_type": "educational",
    "device_label": "my-dev",
    "api_token": "api-token"
}
关于"my_dev"和"api-token",它们是用于在云中验证设备的唯一信息。您可以在ubidots中获取唯一的device_label和api_token。
回到您的浏览器。在你创建的Device中,点击箭头所指的按钮能更改显示方式,找到左边的device_label “xinabox” (注意大写小写)。点击右上角自己的名称,点击“API Credentials”,把Default token的内容复制到api_token。

修改后,device.conf.json如下
{
    "user_type": "educational",
    "device_label": "xinabox",
    "api_token": "A1E-7xxxu"
}
在Zerynth Studio把这main.py档案verify后,uplink至XinaBox。結果如下:


第六步:创建在线仪表板
在ubidots中,您可以在Dashboard处决定要显示哪些数据和决定以哪种方法显示数据(设计数据的可视化方式)。
查看视频,了解如何构建简单的仪表板。
第七步:将SW03传感器数据转发给ubidots
我们只需要将上面的代码整合,就能发送SW03数据至ubidots。传感器数据传可以显示在ubidots的仪表板中。
这是合并后main.py的代码,亦可从附件下载此项目:
# test_20190813_ubidots
# Created at 2019-08-13 04:01:02.692687

#################### SETTING 1 <BEGIN> ####################
#################### Uploading data to Ubidots Dashboard
## Example: Ubidots Controlled publish period

import streams
import json
from wireless import wifi

# choose a wifi chip supporting secure sockets
from espressif.esp32net import esp32wifi as wifi_driver

# import ubidots iot module
from ubidots.iot import iot

# import helpers functions to easily device configuration
import helpers

# SET DEVICE CONFIGURATION INSIDE THE FOLLOWING JSON FILE
new_resource('device.conf.json')

# define a callback for period updates
def period_callback(value):
    global publish_period
    print('requested publish period:', int(value))
    publish_period = int(value)

streams.serial()
wifi_driver.auto_init()

print('connecting to wifi...')
# place here your wifi configuration
wifi.link("Rxxxs",wifi.WIFI_WPA2,"axxx4")

device_conf = helpers.load_device_conf()
publish_period = 1000

# create ubidots iot device instance, connect to mqtt broker, set variable update callback and start mqtt reception loop
device = iot.Device(device_conf['device_label'], device_conf['user_type'], device_conf['api_token'])
print('connecting to mqtt broker...')
device.mqtt.connect()

device.on_variable_update(device_conf['device_label'], 'publish_period', period_callback, json=False)
device.mqtt.loop()
#################### SETTING 1 <END> ####################


#################### SETTING 2 <BEGIN> ####################
## Example: environmental_data, for SW03 weather sensor
## This is an example for SW03 ambient temperature, altitude and pressure sensor.

#import streams
from xinabox.sw03 import sw03

#streams.serial()

# SW03 instance
SW03 = sw03.SW03(I2C0)

# configure SW03
SW03.init()
#################### SETTING 2 <END> ####################


a=0

while True:
    ###### SW03 weather sensor <BEGIN> ######
    temp = SW03.getTempC()      # return temp in degree celcius
    alt = SW03.getAltitude()    # return alitude in meters
    pres = SW03.getPressure()   # return pressure in pascals
    ###### SW03 weather sensor <END> ######
    sleep(1)

    ###### Publish data to Ubidots Cloud <BEGIN> ######
    a=a+1
    print('#', a)

    print('Temperature: ', temp, ' C')
    device.publish({ 'value': temp}, variable='temperature')
    sleep(1000)
    print('Altitude   : ', alt, ' m')
    device.publish({ 'value': alt}, variable='altitude')
    sleep(1000)
    print('Pressure   : ', pres, ' Pa')
    device.publish({ 'value': pres}, variable='pressure')

    print(".\n\n\n")
    sleep(publish_period)
###### Publish data to Ubidots Cloud <END> ######注:您必须更改main.py的SSID,PSD;更改device.conf.json的device_label和api_token变量。
结果: