Building a Raspberry Pi Powered LoRaWAN Gateway
Follow article
 Dave from DesignSpark
How do you feel about this article? Help us to provide better content for you.
Dave from DesignSpark
Thank you! Your feedback has been received.
Dave from DesignSpark
There was a problem submitting your feedback, please try again later.
Dave from DesignSpark
What do you think of this article?
Using a Raspberry Pi 2 + iC880A to build the first gateway for Things Network Calderdale
Last month I wrote about The Things Network (TTN) — a free and open LoRaWAN powered data network for IoT applications — and how we've started a community in Calderdale, with our immediate priority being to use this to support a crowdsourced flood sensor network.
This post picks up where the previous left off, taking a look in more detail at the hardware used to construct a DIY gateway (a.k.a. an “access point” or “base station”), together with the software, its configuration and initial testing.
Note that there are numerous off-the-shelf LoRaWAN gateways available, along with simpler/cheaper DIY solutions. However, the approach taken here provides a good balance of cost, flexibility and performance, while enabling us to also learn a bit more about how LoRaWAN works.
Hardware
The front-end is provided by an IMST iC880A LoRaWAN “concentrator” board. This integrates two Semtech SX1257 transceiver ICs plus an SX1301 baseband processor. A combination that is able to emulate 49x LoRa demodulators, with 10 parallel demodulation paths, in order to receive up to 8 LoRa packets simultaneously sent with different spreading factors on different channels.
This may sound complex and it's thanks to LoRa's modulation format that it is able to achieve such incredible ranges with remarkably modest transmit power levels, while also supporting thousands of nodes per gateway. In practice there are details you probably don't need to worry about, although radio and MAC layer configuration is possible and may be required in certain circumstances.
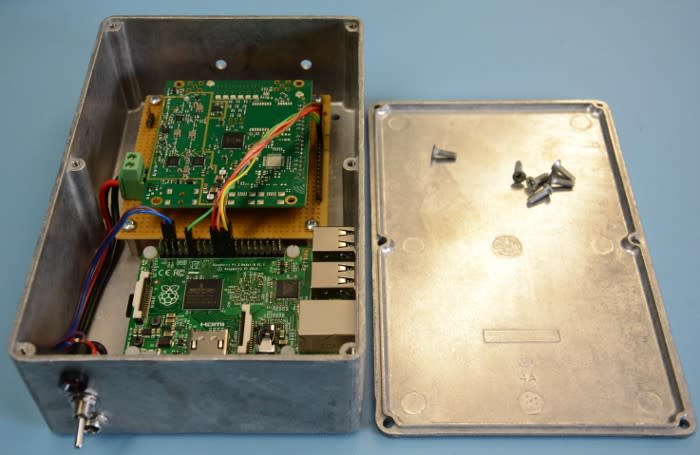
A Raspberry Pi 2 Model B was selected to run the gateway software and this interfaces with the concentrator via SPI and a very simple breakout/baseboard constructed from perfboard. Connection details for the iC880A can be found in the associated documentation and note that in addition to SPI connection, a standard GPIO pin on the Raspberry Pi is also required for resetting the module.
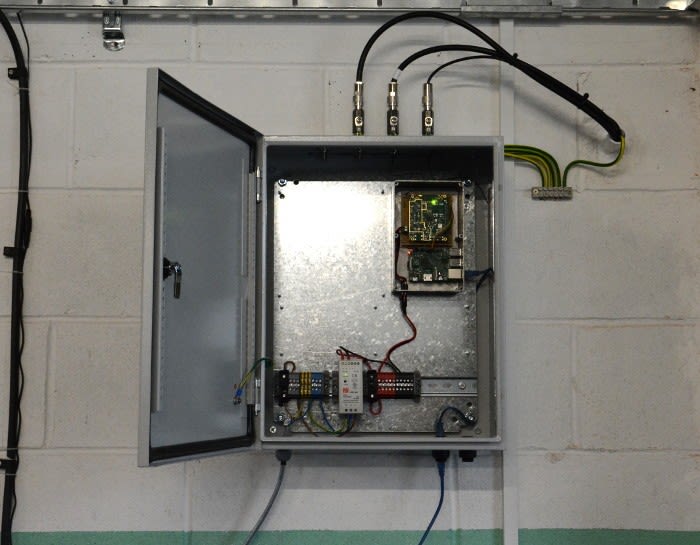
The boards were housed in a diecast aluminium enclosure to provide RF Screening, which was drilled for a power socket, switch and LED, and chain-drilled/filed to provide access to Ethernet.
Software
The latest Raspbian Jessie Lite image was downloaded and written out to a Micro SD card. Upon then booting the Raspberry Pi, this was followed by the usual sequence of:
$ sudo apt-get update
$ sudo apt-get upgrade
And also:
$ sudo apt-get install git wiringpi
Git is required for cloning the software sources and WiringPi to provide a simple mechanism for toggling the GPIO pin which resets the concentrator board.
The hostname was changed by editing /etc/hostname, along with the corresponding entry in /etc/hosts.
The Raspberry Pi configuration tool was run next with:
$ sudo raspi-config
To enable communications via the SPI bus, Advanced Options (9), followed by SPI (A6) was selected, before then selecting to enable SPI and the kernel module to load at boot time.
Since we were using a 16GB Micro SD card, the raspi-config tool was also used to expand the root filesystem to fill this, before then rebooting.
The documentation from IMST suggests building the LoRaWAN software from the reference sources provide by Semtech. However, forks of this with various updates are being maintained by The Things Network under their GitHub organisation.
The Things Network Zurich have gone one step further by providing an automated installer. Although I wasn't happy with a few of the steps that this performs, such as renaming your Raspberry Pi to a generic name (ttn-gateway) and building WiringPi from source, instead of simply using the package available from the Raspbian repositories.
So instead I used the install.sh script as a crib to manually installing, and performed the following:
-
Got the SPI branch of the automated installer (git clone, git checkout...)
-
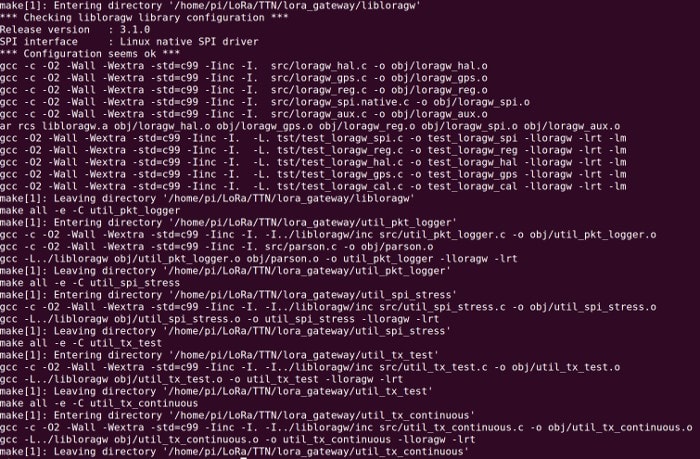
Cloned and built the LoRa gateway application
-
Cloned and built the packet forwarder application
-
Created the bin directory, plus the symbolic link for poly_pkt_fwd and copied across the global_conf.json file
-
Omitted creating local_conf.json or resetting the gateway ID
-
Copied start.sh to the bin directory and set up the packet forwarder as a service
Note that when building the gateway application:
-
The libloragw/library.cfg file must be updated so that PLATFORM is set to imst_rpi (see the corresponding sed line in install.sh)
-
Debugging can be turned on by setting the appropriate variable(s) in libloragw/library.cfg
The ability to turn on debugging for SPI, device registers and the HAL etc. can prove invaluable if the application does not successfully start once configured.
Note also that if you want to use the provided service description file — to enable starting the application at boot time — you need to make sure that software and config has been moved to the expected locations under /opt/ttn-gateway, else modify this as appropriate.
At some point I'll probably clone the installer repository and modify the script slightly to suite my own tastes. Although what would be much better is to have the gateway and packet forwarder applications properly packaged and installable via a Debian repository and apt-get, with config held in a more suitable location, such as /etc/ttn/, instead of alongside executables in the bin directory.
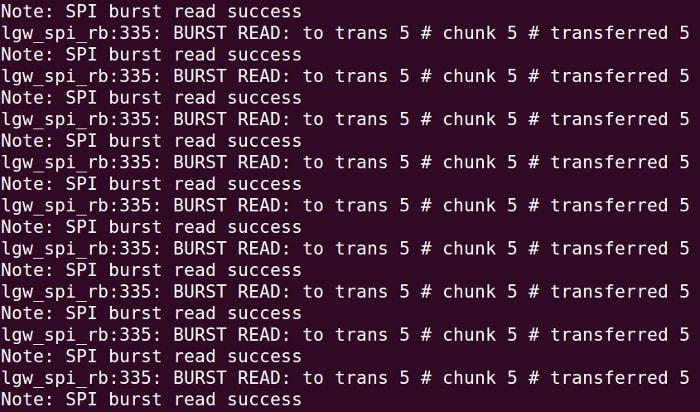
At this point I was able to run up a utility that tests transmit and in doing so confirm operation of SPI and the software.
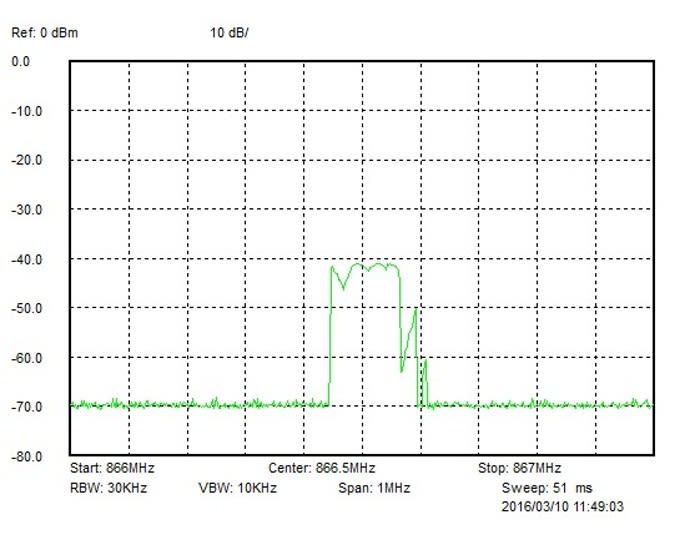
Although I should note that the spectrum analyser had a small antenna connected to its port and was not directly connected, so ignore the level measurement. Also, at this point the gateway was running from a power supply which was not delivering sufficient current, so the transmit burst may look a little different when the concentrator is provided with sufficient power.
Configuration
So now we have two pieces of software built, lora_gateway and packet_forwarder. But what do these provide?
lora_gateway is mainly a library — libloragw.a — that provides the foundations for building a gateway, which is configured via the library.cfg file for the particular hardware platform and interface with the computer running the software, along with optional debugging etc. Helper programs are also provided that enable you to log received packets and test SPI and transmit.
packet_forwarder then builds on top of the library (a.k.a. “driver” or “HAL”) to forward packets that are received over the air interface, via an IP/UDP link to a host. In addition to uplink operation, the gateway also supports sending downlink (to nodes) packets generated by the server, e.g. for time synchronisation. Note that at this point is does not support a general downlink data service.
At the time of writing there are actually four packet forwarder applications:
-
basic. As the name suggests! Simply forwards received packets over UDP to a host.
-
gps. Adds support for a aGPS receiver, for absolute time sync and gateway localisation.
-
beacon. As with gps, but adds support for sending beacon packets for node synchronisation.
-
poly. As with beacon, but adds support for multiple servers and other features.
The poly_pkt_forward application appears to be the preferred one, even if you do not require some of the more advanced features, do to a reported increased stability.
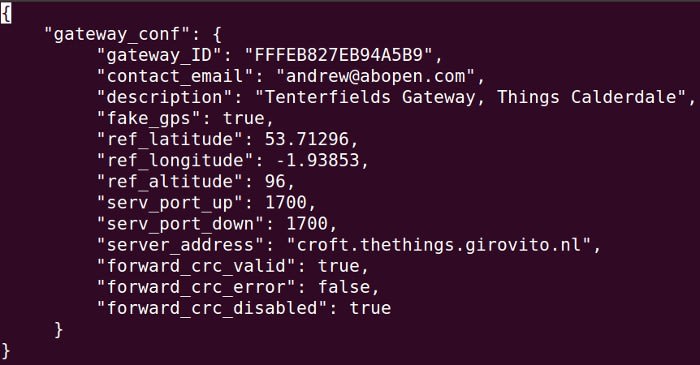
The packet forwarder applications are configured by a generic global_conf.json file, which provides the bulk of the configuration required, including that for the transceivers, radio channels, MAC and network key etc. Site configuration is then provided via local_conf.json (as pictured above), which allows for additional settings and default ones to be overridden. In the main these are:
-
Gateway ID. This is constructed from the prefix FFE plus the Ethernet interface MAC address on the Raspberry Pi.
-
Contact e-mail and description.
-
GPS coordinates and altitude. Enabling fake_gps as a receiver module is not fitted at this point.
-
Server address and ports. Those of the server operated by The Things Network.
On this last configuration point, note that you could equally configure details for your own server.
With configuration completed, the packet forwarder could be started manually with:
$ ./poly_pkt_fwd
Once satisfied that the gateway packet forwarder would successfully start up, the Pi was shut down.
Site installation
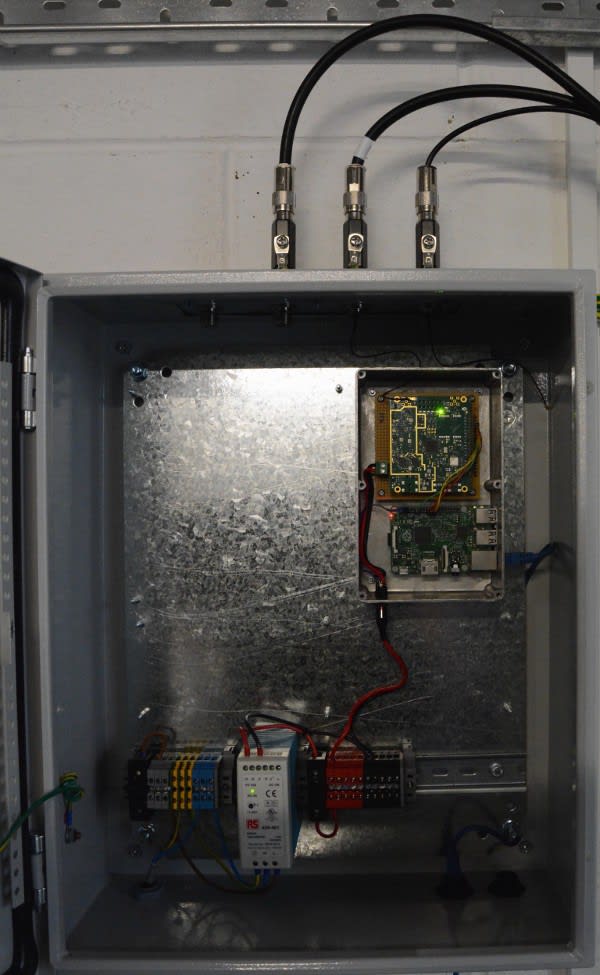
The gateway in its diecast aluminium enclosure was fitted inside a larger, steel, IP rated enclosure that is wall mounted. This includes plenty of space for a future wideband SDR receiver which can be used for spectrum monitoring. Din rail is fitted towards the bottom of the cabinet.
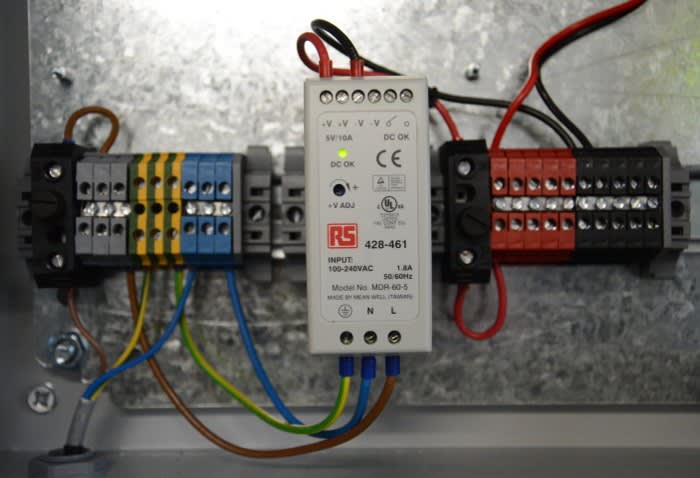
Currently fitted to this we have mains distribution and a 5V PSU with plenty of spare capacity, along with further space for additional PSUs should we later require other voltage rails.
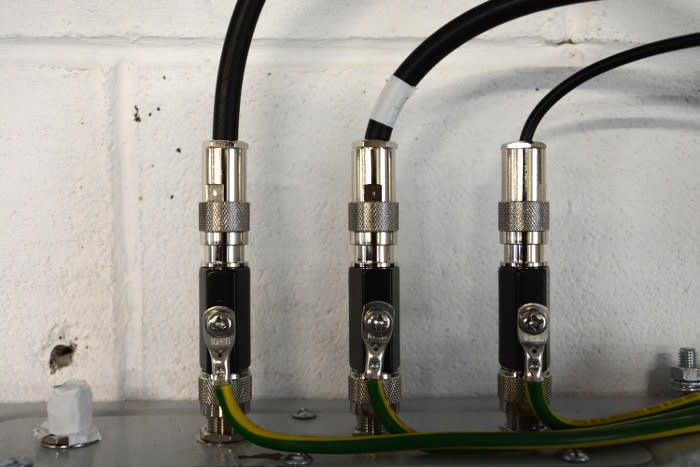
At the top of the cabinet we have surge arresters fitted before the aerials, with heavy 10mm2 cable connecting these to a dedicated earth rod.
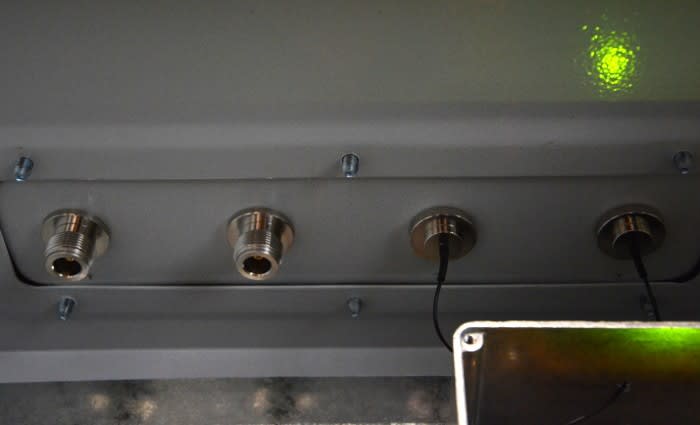
On the interior we can see two tiny coaxial cables feeding through for the 868MHz and GPS aerials. To the left of which is an N type feedthrough for the 25-3,0000MHz antenna. With a spare to the left of that, which could be used in the future to connect that antenna, via a coaxial relay, back out to another feeder which runs into the workshop, enabling use with other equipment.
Testing
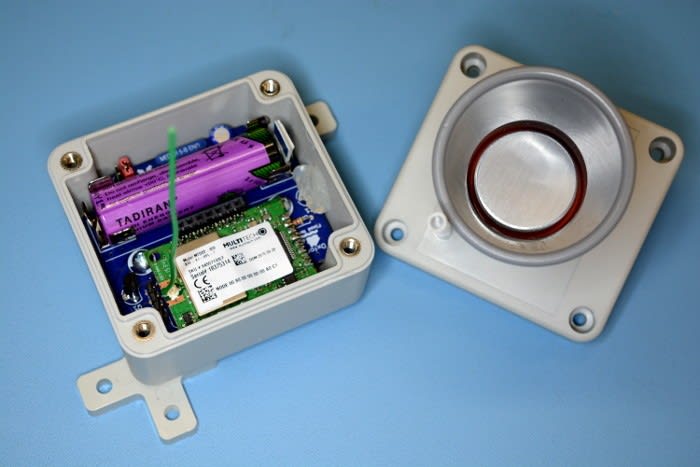
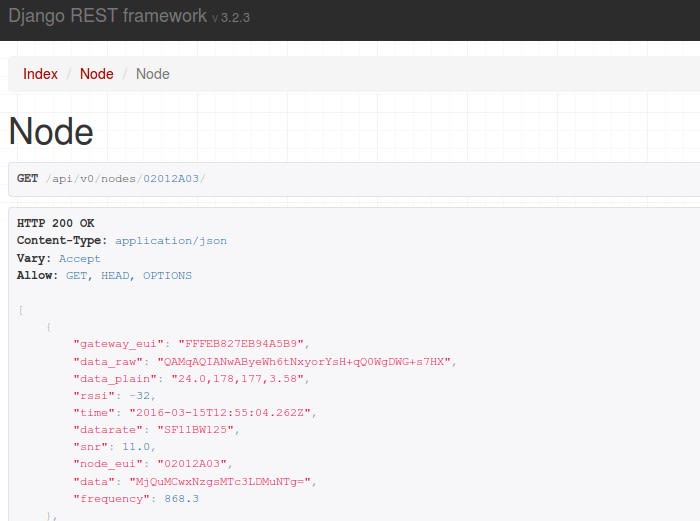
With the gateway installed it was time to put this to the test. At the present time the only complete LoRaWAN node we have a is prototype of the new sensor from Flood Network, so we decided to power this up and see if we could find it via The Things Network API. Happily, we could!
What next? Well, we plan to:
-
Work with Flood Network to get a few more sensors online
-
Map coverage of the first gateway
-
Work with the local hackerspace, Bridge Rectifier, to get a 2nd gateway online