Adventures in RepRap Construction
Follow article
 Dave from DesignSpark
How do you feel about this article? Help us to provide better content for you.
Dave from DesignSpark
Thank you! Your feedback has been received.
Dave from DesignSpark
There was a problem submitting your feedback, please try again later.
Dave from DesignSpark
What do you think of this article?
A report on the first experiences of building a RepRap 3D printer.
Over a weekend back in March my local hackerspace group, Bridge Rectifier, hosted a 3D printing workshop at which we learnt how to construct a RepRap printer and to use a software toolchain for creating, processing and printing 3D models.
For the workshop we were very fortunate to be under the expert tuition of Alan Wood and Mike Beardmore from Thames Valley RepRap User Group (TVRRUG), a 3D printing enthusiast group that has constructed over 100 RepRap printers and designed its own enhancements.
Around 30 people took part in the workshop and following the introductory presentations we split into two groups: one working on printer construction and a second learning the software tools.
The machine we built was a variant of the RepRap Prusa Mendel, provided to us in the kit form as used in TVRRUG's own printer self-build rounds.
Assembling the printer
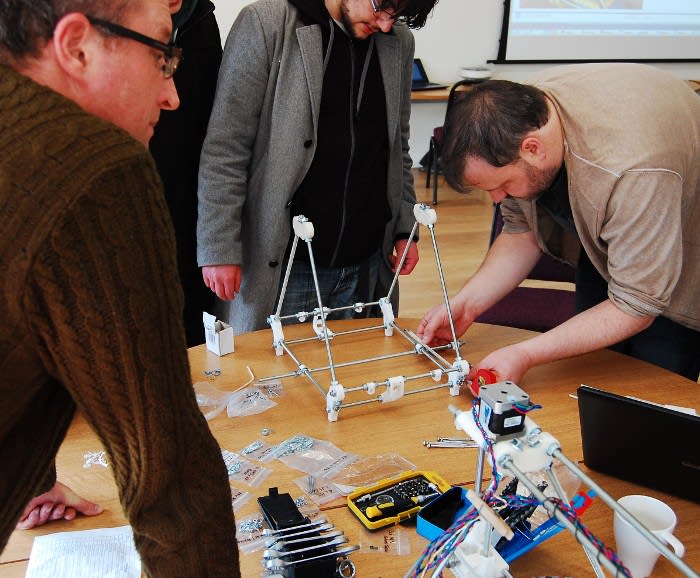
Alan led the printer construction team and it wasn't very long at all before the frame started to take shape. This is essentially little more than steel threaded rod, nuts, washers, and plastic components which have been printed using another 3D printer.
Once the frame had been completed there were smooth rods for the X and Y axis to be added, along with bearings, stepper motors and drive belts, and end-stop microswitches.
The extruder is supported by a carriage which moves along the X axis, with cables coming off this for the extruder stepper motor, “hot end” heater and thermistor, and an end-stop microswitch.
The printer bed moves along the Y-axis and is heated, with cables coming off for the heater power supply and thermistor.
With all 4 stepper motors fitted, along with the end-stop microswitches, heater and thermistor wiring, you end up with quite a rats nest of cables!
The construction team had split into two smaller groups and while one worked on the mechanics another assembled the three circuit boards used to drive the printer. Once the PCBs were completed firmware was loaded onto the controller board.
Post-workshop completion
Thanks to the incredibly enthusiastic construction team by the end of day two we had a mostly complete RepRap. However, a reasonable amount of work still remained to be done in the form of tidying up and terminating the wiring, further aligning the frame and testing.
Due to various reasons the printer sat idle for a number of weeks before myself and another member of Bridge Rectifier, Chris, commenced work on the final touches. As it happened we then ran into a few small snags:
-
Reversing the wiring to the extruder fan caused a MOSFET to blow
-
A poor joint in the cable to the extruder thermistor caused erratic behaviour
-
A badly crimped stepper motor connection meant that it wouldn't step
After 4 evenings spent carefully measuring and adjusting the frame, terminating cables, familiarising ourselves with the software and addressing the aforementioned issues, the RepRap was finally fully functional!
Next steps
There will be a few minor final adjustments to make before the we're ready for printing, such as levelling the printer bed and finding the zero positions for X, Y and Z. However, once this is done we should be ready to go.
As can be seen from the photo at the top of this post, the printer, electronics and power supply have been fastened to a board. This is perhaps not the smartest solution but should hopefully reduce the risk of failure, and we may later look into housing the electronics and PSU in a custom enclosure.
Lessons learned
We should probably have worked at a slightly slower pace at the workshop and afterwards, with each stage of construction being more carefully checked and re-checked, so as to avoid having to later make adjustments and fix the odd fault. That said, I don't think we did bad at all considering that our group had no prior 3D printer experience and only a few of us electronics experience.
Final thoughts
The whole area of 3D printing is fascinating and there is something quite magical about putting together a machine that may not be the most advanced of its kind, but that is nevertheless very much a central part of this paradigm shift, and that is also able to print its own components!
One of the great things about DIY RepRap printers is that there is something so much more organic about them when compared with factory made machines and complete commercial kits. Individuals and groups modifying the design, creating their own custom electronics, deciding where to route cables and how to mount or enclose the PCBs — it all contributes to the character of the printer.
I suspect that in years to come we will look back at our printer with the same fondness as when those old enough to remember now reflect on the DIY home microcomputers of the 1980s.
With thanks to the Electronics, Sensors and Photonics KTN for sposoring the Bridge Rectifier 3D Printing Workshop.