Raspbian Jessie Lite on a New Raspberry Pi Compute Module 3
Follow article
 Dave from DesignSpark
How do you feel about this article? Help us to provide better content for you.
Dave from DesignSpark
Thank you! Your feedback has been received.
Dave from DesignSpark
There was a problem submitting your feedback, please try again later.
Dave from DesignSpark
What do you think of this article?

Those industrious folks at the Raspberry Pi Foundationhave been hard at it, developing the next generation of the Raspberry Pi Compute Module called the Compute Module 3, or CM3 for short. “What can we expect from this next gen Compute Module?” I hear you say. I’m so glad you asked…
There are two variants of the CM3: Standard and Lite. (Support Documentation can be found here)
The Standard module features the same 1.2GHz Broadcom BCM2837 (64-bit quad-core ARM Cortex A53 CPU with VideoCore IV GPU) found in the Raspberry Pi 3 Model B and sports 1GByte LPDDR2 RAM and 4GBytes eMMC flash memory. It is pin compatible with the existing Compute Module.
The Lite module dispenses with the eMMC memory. Instead, the SD/eMMC interface is routed to previously unused edge connector pins, making the interface available for the user to connect their own SD card or eMMC devices.
There is also a new version of the Compute Module I/O board, the CMIO V3. This version of the break-out board has an SD card socket to support the ‘Lite’ module variant but otherwise is the same as the original CMIO board.
In order to use all that lovely Pi processing power on the standard module, we need to flash an OS onto the eMMC memory. While it is perfectly feasible to accomplish this goal with a spare Raspberry Pi, I thought it would interesting to install Linux on a virtual machine running on a standard Windows 10 PC and then use this virtual machine to flash the compute module. However, to keep the Linux familiar to Raspbian users (and because I’ve always liked it), I decided to use (Raspbian’s Grand-Daddy) the Debiandistro in this little project. If you want to go ahead and download the ‘Small Installation Image’ for your machine (the amd64image for most 64-bit PC users) while you continue reading, this is the one we will be using.
Getting Started
Before we do anything else, it is always a good idea to make sure we aren’t wasting time on a module that died in transit. The quickest way to do that is to use the Windows ‘RPi Boot’ tool for proof of life. You can find the installer for ‘RPi Boot’ Raspberry Pi Boot Installer. Once you have downloaded the CM-Boot-Installer.exe file, double-click on it and use the default settings offered by the setup wizard. Once you are done, you will find RPi Boot in your ‘Recently added’ list when you click on the Windows Start Menu button.
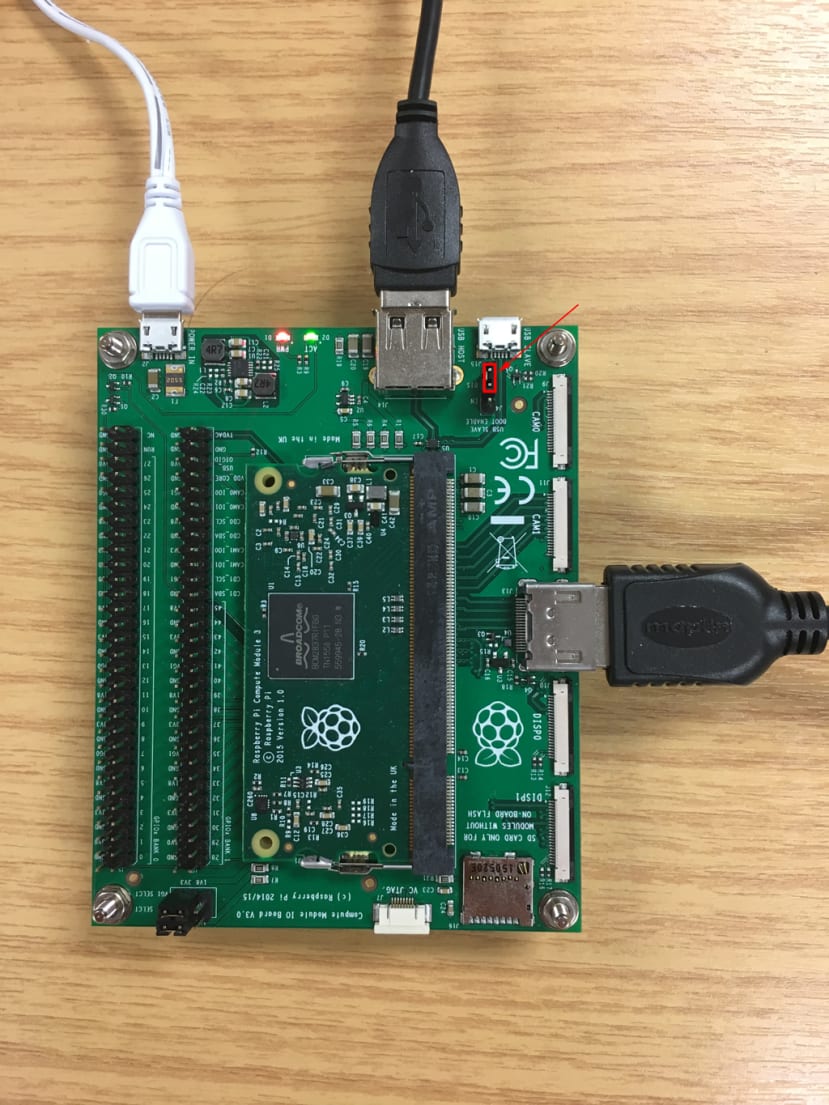
Before you get click-happy on ‘RPi Boot’, make sure you have set the module to boot from slave USB [J4 should be in the EN position, as highlighted in red in Figure 1] and connected the cabling up correctly as shown in Figure 2. Connect a spare USB port on your PC to the USB slave connector with a USB to micro USB cable. Note that, as there is only one USB connector on the CMIO V3 board, you will definitely need a powered USB hub to connect up your USB keyboard, mouse and any other USB peripherals to the Compute Module. You may also need, depending on the age of your monitor, an HDMI to DVI-D adapter.
So, power up the USB hub, power up the CMIO board and run ‘RPi Boot’ on your PC. If everything has gone to plan, the red PWR LED and green ACT LED should both be lit and a command prompt box will open to display information on how the handshaking is progressing. It should look something like Figure 3 before disappearing and then Windows will inform you that it has found a new mass storage device that you will need to format before you can use it. Don’t format it. Just think “Yea! Looks like I have a good module” and turn it off for now.
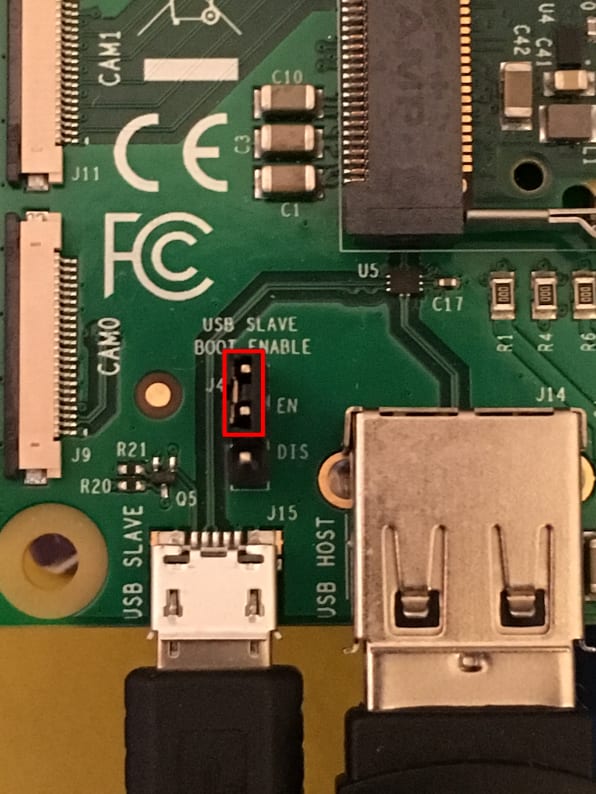
Figure 1
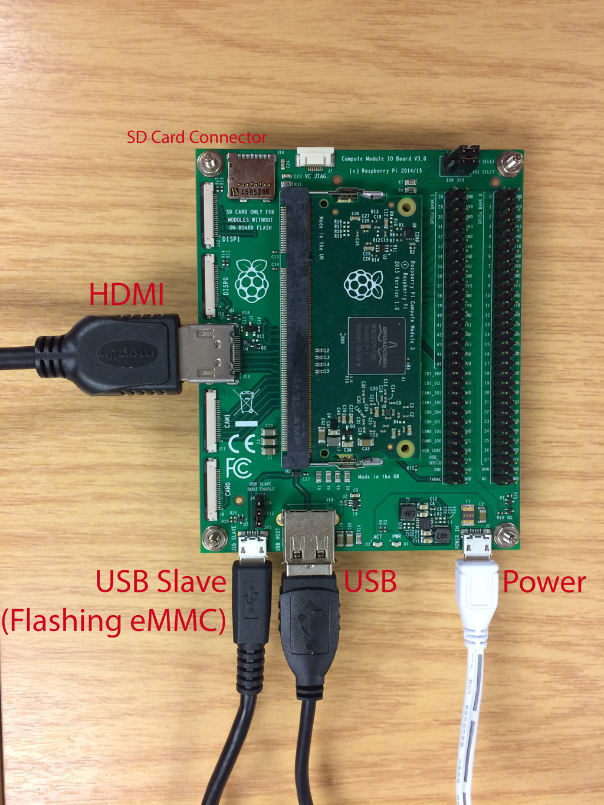
Figure 2
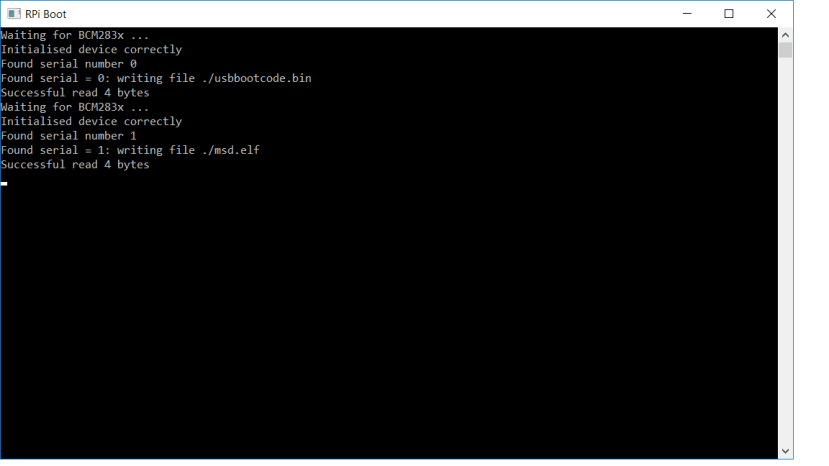
Figure 3
Host UEFI Settings
If we want to run 64-bit virtual machines on our 64-bit PC, we will need to make sure the Virtualisation settings are enabled in our BIOS/UEFI firmware. Pro-tip: if you click on ‘New’ at the top left of the VirtualBox toolbar you will get a new window pop up called ‘Create Virtual Machine’. Click on the pull-down menu labelled ‘Version:’ – if you are offered both 32-bit and 64-bit options, then you don’t need to edit your UEFI and can skip to the next section. If you only have 32-bit options then follow these ensuing instructions. From Windows 10:
Hit [Windows key] + [i]to bring up the settings window.

Click on ‘Update & Security’ which will then show:

Click on ‘Recovery’ and then on the ‘Restart Now’ button under Advanced Start Up. You will then see something like this:
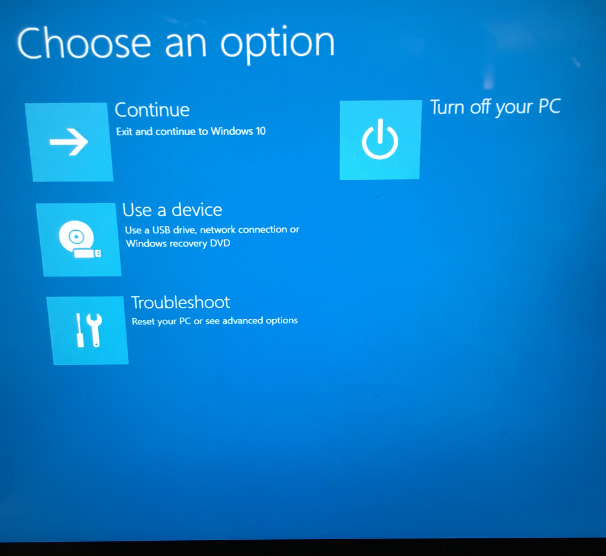
Select ‘Troubleshoot’ and you should see something similar to this:
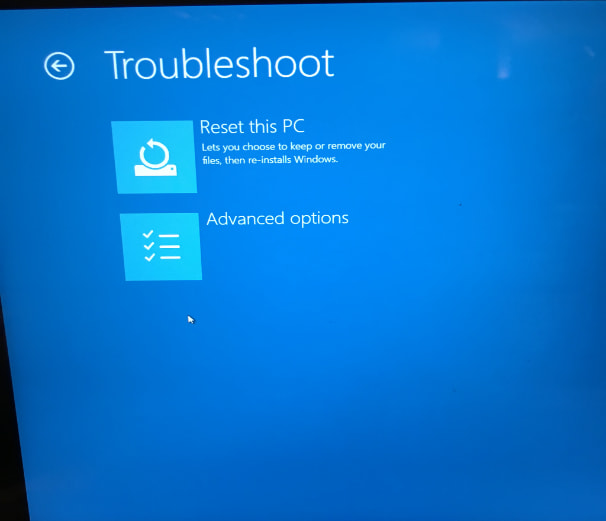
From here, select ‘Advanced options’:

Then select UEFI Firmware Settings:

Hit the restart button and interrupt the start-up sequence with the key that your PC tells you will do just that.

We are now in the UEFI/BIOS settings. Look for ‘Virtualization’ and select it.

Make sure the virtualisation features are set to ‘Enabled’. Hit F10 to save and exit. We are now ready to create 64-bit virtual machines.
Installing a Debian Linux Virtual Machine
What we need at this point is some virtual machine(VM) software. In the spirit of keeping everything Open Source, we will be using Oracle’s VM VirtualBox. Download the installer version for Windows hosts (at the time of writing, this was version 5.1.10) and the user manual. Although it isn’t strictly necessary for what we are doing today, it is probably worth downloading the VirtualBox Extension Pack while we are at it. Make sure the Extension Pack version number is the same as the VirtualBox software.
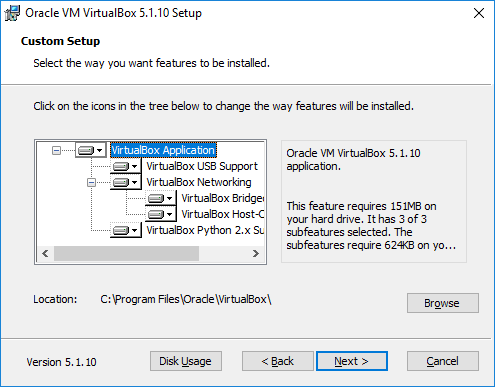
Run the installer (the VirtualBox-5.1.10-112026-Win.exefile you downloaded) and accept the default options presented by the installation wizard, which should include USB and networking support. You can check that these are set correctly at this point in the journey:
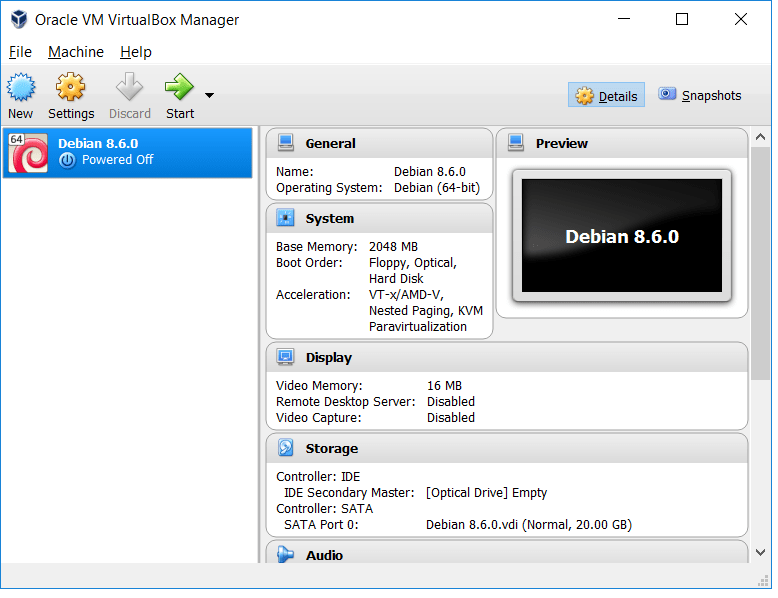
When you get to the end of the installation and start up VirtualBox you should find yourself looking at an interface like this:

We are now ready to set up the virtual environment where we will install our Linux distribution. So click on the ‘New’ button again and let’s go.

The first thing we need to do is name the virtual machine. It’s worth giving it a name that properly reflects what’s installed (rather than ‘MyVirtualMachine’ or similar) so you know what it is six months down the line – especially if you intend to create VMs for other operating systems.

Next, we set how much of your host machine’s RAM the VM will use. This will inevitably be a function of how much memory you have available. More RAM for the VM is better, but make sure you do not starve your host OS of RAM, as this memory will not be available to the host OS when the VM is running.
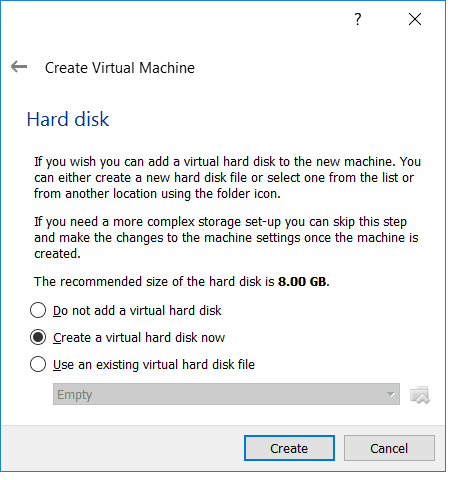
Like your host, the VM will need a hard disk for its filesystem. We create a virtual hard disk for this purpose.

Dynamic allocation is usually the way to go, as this means the file created to hold the hard disk file system starts as small as possible and grows (kind of like a balloon filling with air) as you fill the virtual disk with data.

This window sets the maximum size of the virtual disk. You could easily get away with a mere 8-10Gbytes but I am setting mine larger as I have the space available and I want to use this virtual machine for future projects.
So that is our virtual environment set up. Now we just need to install Debian into it. Double click on our freshly minted virtual machine’s icon.
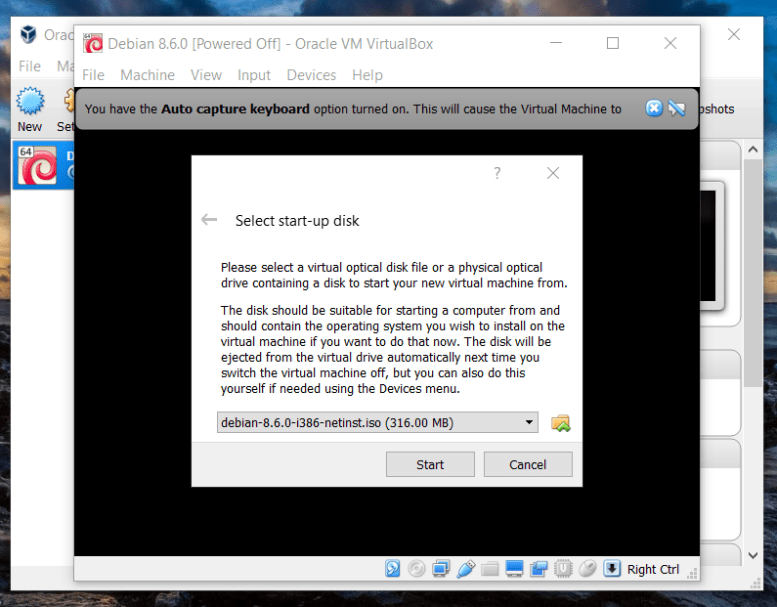
When you start this new virtual environment, a ‘First Start Wizard’ will pop up so you can select what you want to install. In this case, you can select the Debian ISO file you downloaded earlier; you did download it earlier, didn’t you?
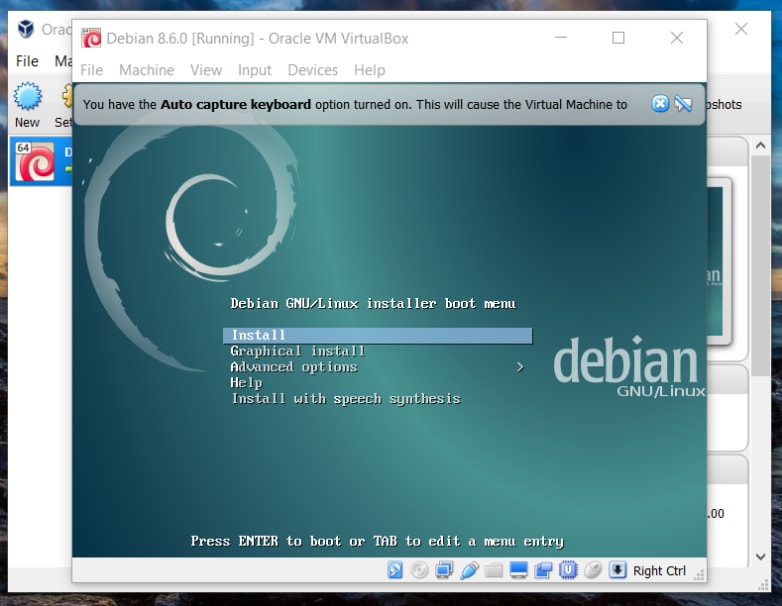
Go ahead and hit enter to install Debian. For the most part, the installation instructions are pretty straight forward and the default settings will suffice. A couple of things that might be less obvious, I have highlighted below:
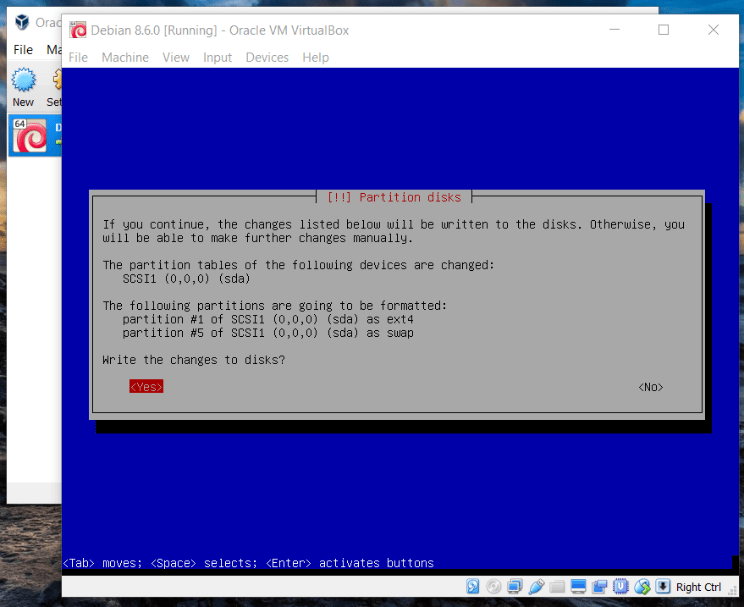
Disk Partitioning sequence:


Bootloader Sequence:


Tweaking Our Debian Installation
When we are all done with the installation and reboot the VM, we should find ourselves looking at a window that looks like this:
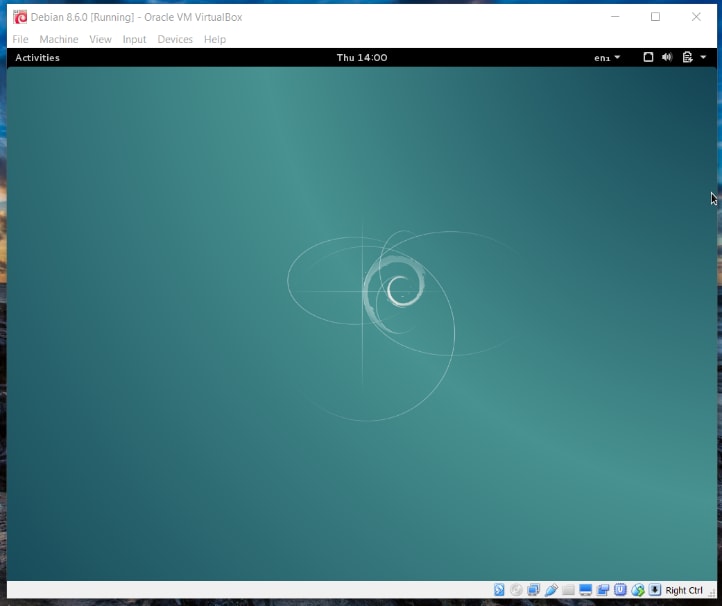
Congratulations! You are now the proud owner of a Debian Linux virtual machine. You can change the wallpaper and personalise the look as you please. However, there are a few little tweaks we really do need to perform in order to get our installation ship-shape and Bristol-fashion.
Guest Additions
The first thing we want to install after we are done is the VirtualBox Guest Additions. These provide for much smoother inter-operation between the host computer and the guest operating system (including such goodies as Automatic VM resizing to current window size; shared clipboard and shared folders between host and guest; seamless mouse operation including drag and drop between host and guest and more). Chapter 4 of the user manual details all the benefits of installing the Guest Additions, but for now just accept that they will make your experience much nicer and more useful.
To get started, we click on ‘Activities’ at the top left which is analogous to the Windows Start Icon. This will bring up a side menu of icons. We want the 3 x 3 set of dots that brings up ‘Show Applications:

From there, we want to get to the last page of applications by selecting the lowest dot on the right:

From here, open a Terminal window (again, you can customise the look of this):

At this point we will need administrator rights to do what we need to do, so at the prompt (which will reflect the username and hostname you set up at install time) type:
treadstone@blackbriar:$ su
Password:
The ‘su’ command gives you root privileges, so you will need to provide the root password you created at installation. If you are new to Linux, be careful after this point. ‘Root’ has unlimited power in a Linux environment and Linux treats ‘root’ like an adult. It will not ask you “are you sure?” even if you aredoing something really dumb like recursively deleting the entire filesystem. Linux will just follow your commands… You have been warned.
Your prompt will then change to the root prompt, which should look a little like this:
root@blackbriar:/home/treadstone#
At this prompt type the following:
apt-get install dkms build-essential
This will install some essential compiler and kernel packages so that we can build kernel modules to support the Guest Additions.
Now that we have the groundwork done, we can mount the Guest additions (virtual) CD. We do that by clicking on ‘Insert Guest Additions CD Image…’ using the ‘Devices’ pull-down menu from along the top of VirtualBox.

If things are going your way, you will get a window pop up saying that “VBOXADDITIONS_yourversion contains software intended to be automatically started. Would you like to run it?” At this point, you can hit the Run button to install Guest Additions.
If, however, today happens to be a day that ends in the letter ‘y’, you may find that this doesn’t work for you. So we must fall back to plan ‘B’.
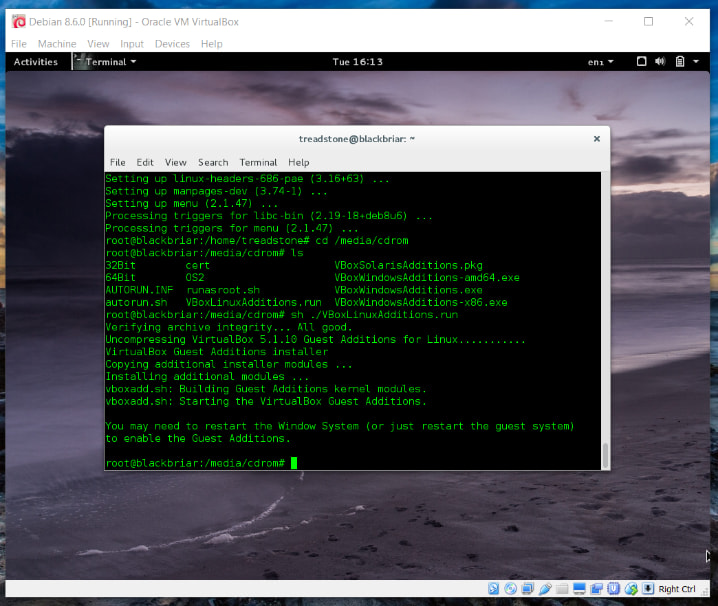
Back in your terminal (logged in as root) change directory:
root@blackbriar:/home/treadstone# cd /media/cdrom
Followed by:
root@blackbriar:/home/treadstone# ls
You should get a listing of your directory that looks like this:

We can now run the installation script with:
root@blackbriar:/home/treadstone# sh ./VBoxLinuxAdditions.run
You should then end up with a printout similar to this:
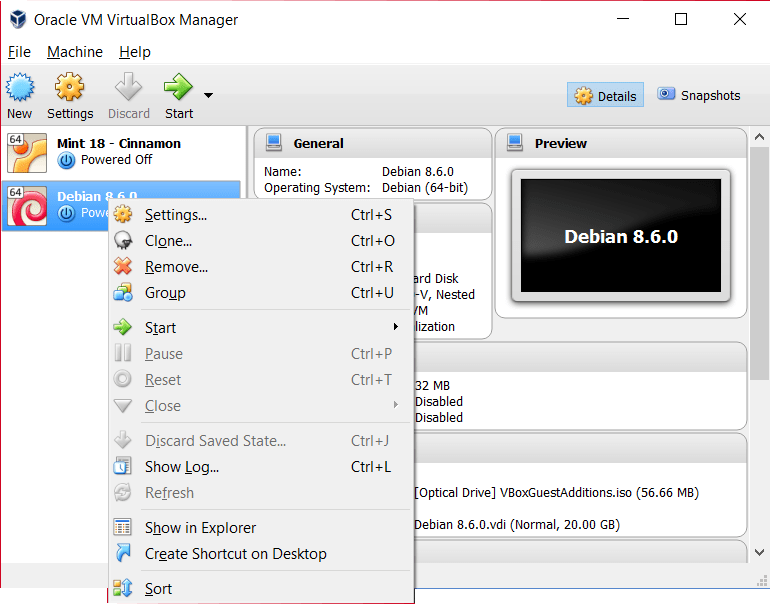
To get the benefit of these Guest Additions we will need to power down our VM. Click on the little down arrow in the top right-hand corner and hit the power button:

Before you power up your VM again, there are a couple of adjustments we can make that will enhance our enjoyment of our new virtual Linux machine. In VirtualBox, right-click on your virtual machine:
Select ‘Settings…’ and under General -> Advanced we can set things up to allow us to easily share data between host and guest. Set the “Shared Clipboard” and “Drag‘n’Drop” to ‘Bidirectional’.
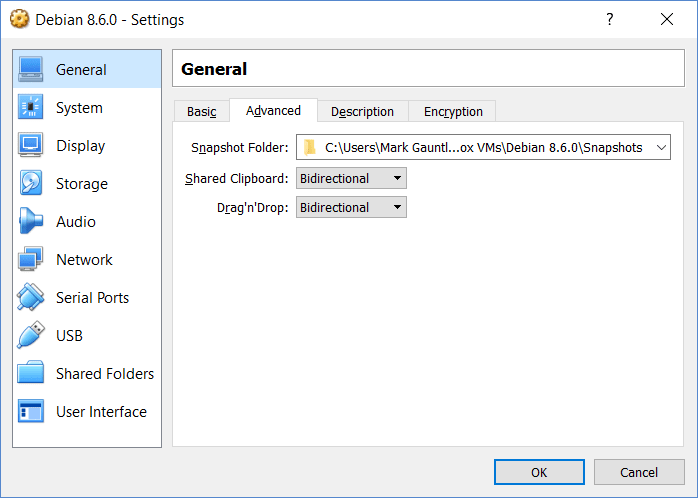
We can also adjust the system and display settings:


When you’re done with your adjustments, power your VM back up. Hurrah! You have a working Linux Virtual Machine.
Get your terminal up again, as there are another couple of packages that we will want to install before we tackle our Raspberry Pi.
The first package is sudo which allows us to run individual commands as root. So, switch user to root with the ‘su’ command then type:
root@blackbriar:/home/treadstone# apt-get install sudo
This will produce a result similar to this:

We now need to add ourselves to the group of users who can use the ‘sudo’ command:
root@blackbriar:/home/treadstone# adduser treadstone sudo
Replace ‘treadstone’ with your own username. We also need to add ourselves to the ‘sudoers’ file:
root@blackbriar:/home/treadstone# nano /etc/sudoers
Scroll down the file in the nano editor until you find a line which says: “%sudo ALL=(ALL:ALL) ALL” below that line, insert the following
treadstone ALL=(ALL:ALL)ALL
Again, substitute your username for ‘treadstone’. Now hit the [Ctrl] + [x] keys, then press [y] followed by [Enter] to exit and save the file.
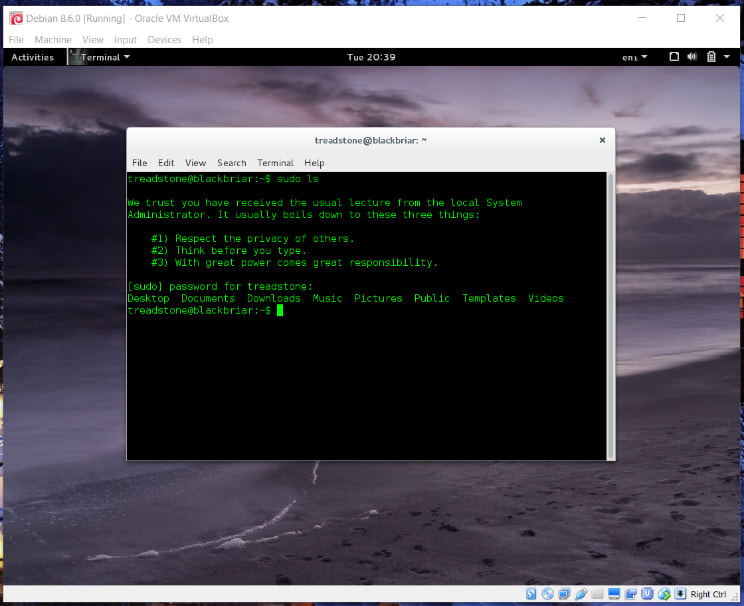
Close the terminal window and open a fresh one. We are going to test our new powers out. At your regular command prompt type:
treadstone@blackbriar:$ sudo ls
Enter your password et voila:
All that remains now is to install Git so we can get our Raspberry Pi support from Github:
treadstone@blackbriar:$ sudo apt-get install git-core

Git implements version control using two primary settings:
- A username
- A user's email
So we will configure those now by typing:
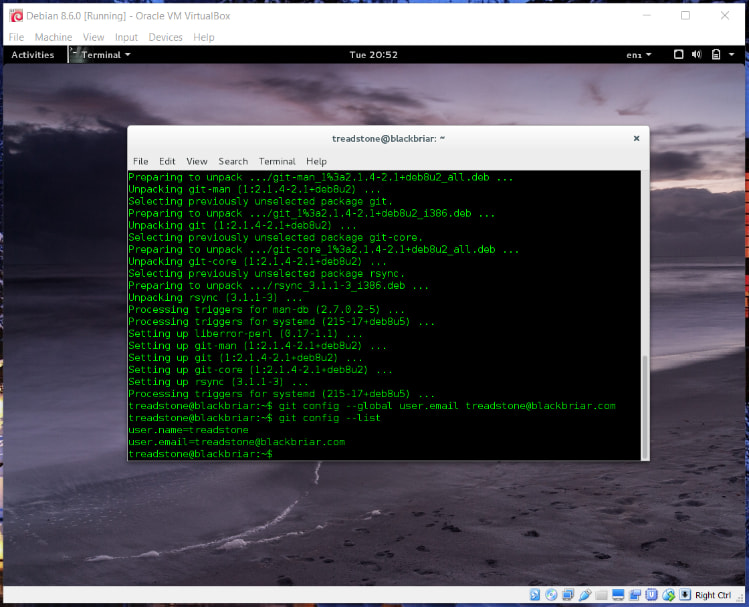
$ git config --global user.name "treadstone"
Then:
$ git config --global user.email treadstone@blackbriar.com
Of course, you are again replacing ‘treadstone’ and ‘treadstone@blackbriar.com’ with your own username and email address. We can check that this has been entered correctly with:
$ git config --list
Which should produce an output like this:
Now we are ready for the main event.
Flashing the Raspberry Pi Compute Module 3
The first thing we need is to do is get our USB boot tools for the Raspberry Pi. We get them by cloning the tools from GitHub:
$ sudo git clone --depth=1 https://github.com/raspberrypi/usbboot
When the clone is ready, change directory into usbboot directory and install the USB library:
$ cd usbboot
$ sudo apt-get install libusb-1.0-0-dev
With everything in place, we can use the helpful makefile to build the USB tool we need:
$ sudo make
Now, if you haven’t downloaded your Raspbian OS image into your virtual machine already, do so now from https://www.raspberrypi.org/downloads/raspbian/using the Firefox browser that came with your Debian distro. As we only have a total of 4GBytes, we will need to download the ‘lite’ version.
In the terminal we can copy the download to our current directory:
$ sudo cp ../Downloads/2016-11-25-raspbian-jessie-lite.zip .
Obviously, you will need to adjust this for the filename of the version of Raspbian you downloaded. Note the dot at the end of the command – it represents your current directory in the command so don’t miss it out!
Then we unzip the image:
$ sudo unzip 2016-11-25-raspbian-jessie-lite.zip
You should now have an image file (with the ending .img) to load onto your CM3. There is one final bit of preparation that will make your life much easier. Go to the ‘Activities’ menu and open the ‘Files’ tool (6thitem down) and navigate to the /dev directory [on the left side, click on computer then click on the ‘dev’ folder]. List the files by when they were modified, and move the window next to your terminal window. We are now ready to load our image. Fire up the QuattroCompute Module I/O board!
When you turn on the power to the board, your PC will probably acknowledge that there is something new on USB. In order for your virtual machine to see it too you will need to find it on the ‘Devices’ menu:
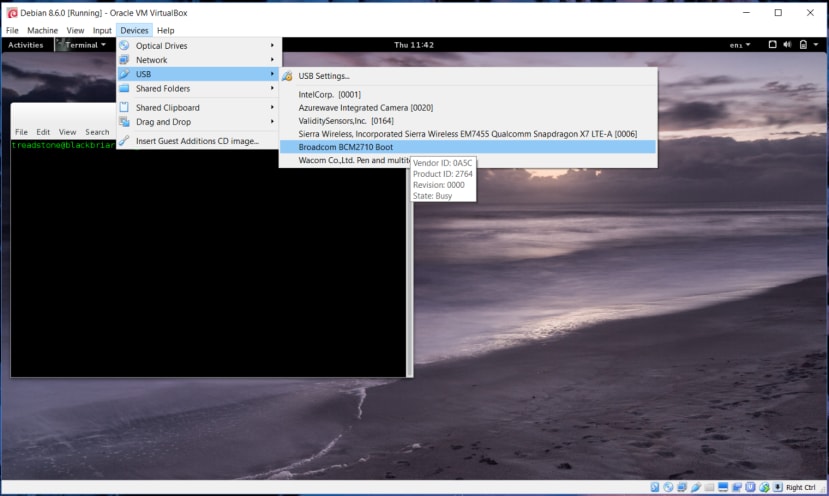
You will find yourself doing this a couple more times during the process. Now that the USB chip is visible, we can run rpiboot:
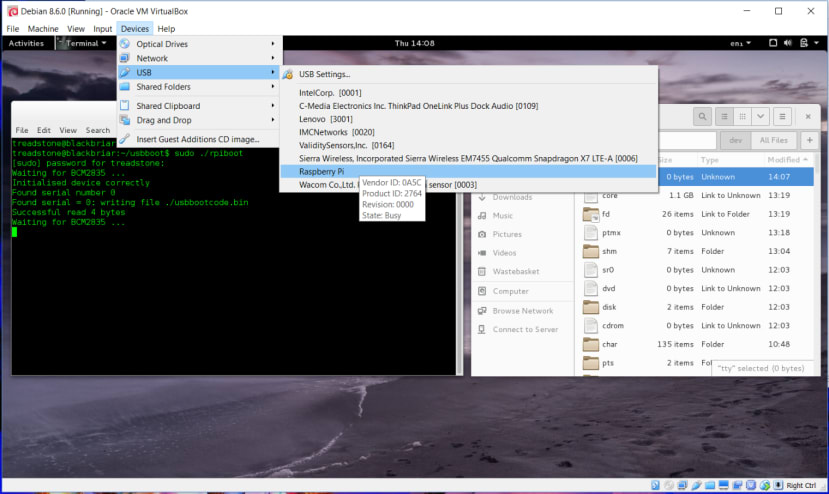
$ sudo ./rpiboot
This will inject our boot code (usbbootcode.bin), after which we will need to find the next enumeration of the USB connection in the ‘Devices’ menu:
The program then sends a .elf file which will again require us to find the new USB enumeration on the ‘Devices’ Menu:
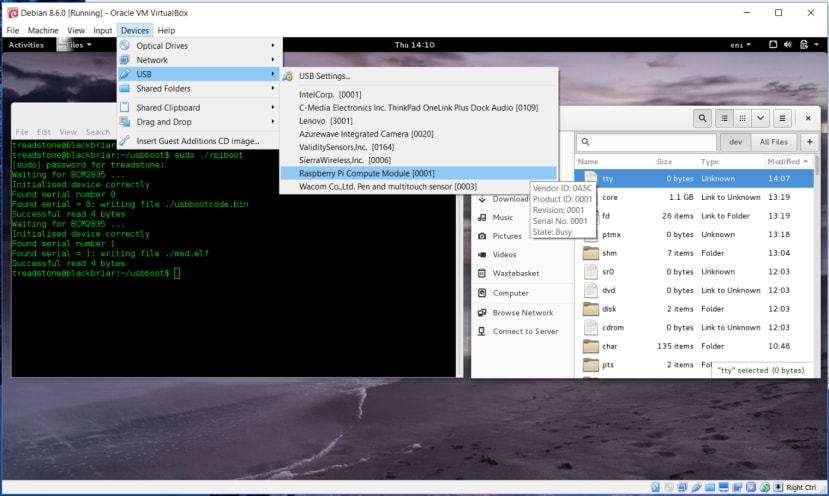
This is where the file browser comes into its own, as we need to see what name the USB disk has been mounted under. We do this by simply looking for the brand new devices that have just been listed. You may need to manually scroll up to see what has just arrived:
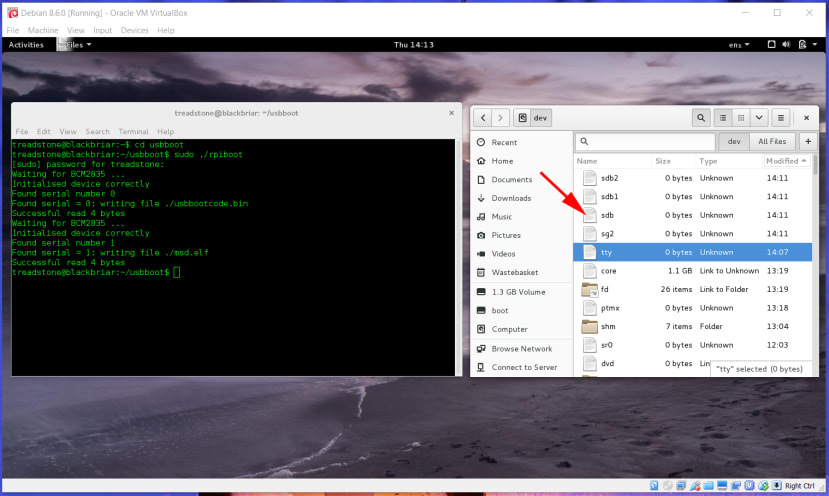
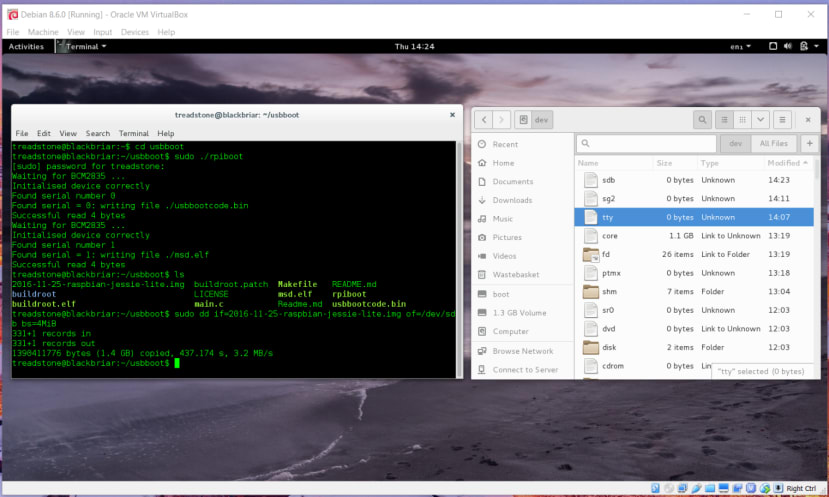
It will usually be sd(something). In our case it is sdb – we only want the first enumeration. We then load our image to this disk with:
$ sudo dd if=2016-11-25-raspbian-jessie-lite.img of=/dev/sdb bs=4MiB
Now we wait… for about 5 to 10 minutes for the filesystem image to load. When it is all done it will report back to us with something like this:
So now we come to the moment of truth.
Power down your Raspberry Pi. Disable the slave USB on header J4 (swap the jumper position as highlighted below) and remove the slave micro-USB connector:
Power up.
When presented with the start-up output leading to the login prompt you are there!
The default user login is: pi with the default password: raspberry
Add Wi-Fi
The last thing we will do today is give our Pi CM3 the chance to communicate with the world by adding a USB Wi-Fi adapter to our USB hub . I am using the Raspberry Pi adapter (892-0012) but there are others (760-3621) for example, that will work just as well.
Luckily, this is quite a simple procedure as the software we need is already on the filesystem. All we need to do is modify a couple of configuration files.
First, let’s find the network we want to attach to. At your command line type:
$ sudo iwlist wlan0 scan
You will be presented with a scrolling list of all the Wi-Fi networks in your locale. If there are a lot of them, you may need to use the paging tool ‘more’:
$ sudo iwlist wlan0 scan ¦ more
Use the spacebar to scroll down one page at a time. You are looking for the ESSID of your network. I am using my iPhone personal hotspot for this example, so my ESSID will show up as “iPhone”.
We now need to add this information and the Wi-Fi password to the wpa-supplicant file using the nano editor:
$ sudo nano /etc/wpa_supplicant/wpa_supplicant.conf
Go to the bottom of the file and add the following:
network={
ssid="Your_ESSID_from_earlier"
psk="Your_wifi_password"
}
So my file ends up looking like this:
ctrl_interface=DIR=/var/run/wpa_supplicant GROUP=netdev update_config=1
network={ ssid="iPhone” psk="password" }
Now we can save this with [Ctrl]-X followed by ‘Y’ and then [Enter].
The other thing we want to do is get the Raspberry Pi to join the network using DHCP so that its IP address is assigned automatically. We do that in the interfaces file:
$ sudo nano /etc/network/interfaces
Your file should look like this:
# Please note that this file is written to be used with dhcpcd # For static IP, consult /etc/dhcpcd.conf and 'man dhcpcd.conf' # Include files from /etc/network/interfaces.d:
source-directory /etc/network/interfaces.d
auto lo iface lo inet loopback
iface eth0 inet manual
allow-hotplug wlan0 iface wlan0 inet manual wpa-conf /etc/wpa_supplicant/wpa_supplicant.conf
allow-hotplug wlan1 iface wlan1 inet manual wpa-conf /etc/wpa_supplicant/wpa_supplicant.conf
We want to change the line:
iface wlan0 inet manual
to
iface wlan0 inet dhcp
Then it’s [Ctrl]-X followed by ‘Y’ and then [Enter] again to save.
Now we are configured, all we have to do is reload the network interfaces:
$ sudo service networking reload
We can check that the network interface is up with:
$ ifconfig
Which should show something like this for wlan0:
wlan0 Link encap:Ethernet HWaddr 80:1f:02:aa:12:58
inet addr:172.20.10.3 Bcast:172.20.10.15 Mask:255.255.255.240
inet6 addr: fe80: :416b:a810:b9b2:be34/64 Scope:link
UP BROADCAST RUNNING MULTICAST MTU:1500 Metric:1
RX packets:154 errors:0 dropped:173 overruns:0 frame:0
TX packets:65 errors:0 dropped:0 overruns:0 carrier:0
collisions:0 txqueuelen:1000
RX bytes:32399 (31.6 KiB) TX bytes:13036 (12.7 KiB)
If we have an inet addr that looks good, we are on our way. We can test this further by pinging the Google servers:
$ ping –c10 8.8.8.8
This will transmit and receive 10 packets, which should give us an idea of how good our networking is looking.
Remote Login
One last thing we can do to make our Compute module easier to work with is set it up so that we can remotely log in to it. This means the only things we need to connect to the CMIO board will be the power and the Wi-Fi adapter, allowing us to reclaim our keyboard and monitor for other projects!
At the command line type:
$ sudo raspi-config
This will bring up the configuration utility. Use the arrow keys to navigate to ‘Advanced Options’ and hit [Enter]. Then navigate down to ‘A4 SSH’ and hit [Enter]. To the question “Would you like the SSH server to be enabled?” Select .
You are now enabled. You can connect to your CM3 from other computers on your network. An easy way to test this is to use Puttyon your Windows PC. It is as easy as putting your Pi’s IP address in the ‘Host Name (or IP address) box’ when you start Putty. This will allow you to log into your Pi from a window on your PC.
When you want to connect from your Linux virtual machine, you can use the nmap tool to find your Raspberry Pi and then connect to it.
First, install nmap on your virtual machine in an open terminal:
$ sudo apt install nmap
We want to make sure of the subnet we are operating on so use:
$ hostname –I
This will give us our address which in my case came out as 172.20.10.15
Armed with this information we can check all the other devices connected to this subnet:
$ nmap -sn 172.20.10.0/24
This will run a ping scan that pings all the IP addresses to see if they respond. For every device that responds to the ping, the output shows the hostname and IP address.
Somewhere in the list, we should see:
Nmap scan report for raspberrypi (172.20.10.3)
Host is up (0.0020s latency).
We use that address to login:
$ ssh pi@172.20.10.3
If you get a timeout, recheck your IP address, otherwise, you can log into your Pi remotely any time you like. You are now a Raspberry Pi CM3 Jedi and a galaxy of adventures awaits. May the Force be with you…
Appendix A – Virtual Machines
Modern PCs, even the lower-end offerings, provide more than enough computing power to run multiple operating systems simultaneously. Virtual machine software takes advantage of this power by creating an environment inside which an operating system can be installed. As far as this installed operating system is concerned, it is running on PC hardware. In reality, this ‘guest’ operating system is interacting with software that mimics the responses of hardware, so it is interacting with virtual hardware; i.e. a virtual machine.
By using virtual machine software, a PC that boots up running Windows 10 can also go on to be running Linux, Solaris or Mac OSX. You could even be running venerable operating systems like DOS or OS/2 that would no longer be able to run on modern hardware. This is because you can present the operating system with any virtual hardware you like; even long-retired hardware like floppy disk drives.
As well as allowing you to play the first DOS version of Populous, virtual machines have many other useful raisons d'être, particularly because they are sandboxed ‘container’ environments. This means you can test software (for example, something you think may be a Trojan) in an environment that is separate from your host computer and which can be frozen and restarted at will, rolled back to save points, then copied and shared or backed-up and restarted from scratch. All pretty useful if that suspect file does turn out to be a ransomware downloader that encrypts your filesystem: just bin that virtual machine and use another one that you saved earlier.